a-simple-triangle / Part 4 - Setup iOS app
Marcel Braghetto 9 March 2019
In this article we are going to add in the iOS platform target to our existing workspace. To recap where we got to in our previous article we:
- Setup the MacOS platform target using
XcodeGen to automatically create the project.
The setup for an iOS application will have a few similarities to the MacOS setup. Specifically, we will be using XcodeGen again to automatically generate the iOS Xcode project - giving us the same advantages that were discussed in the MacOS setup article.
There are a couple of differences between an iOS and MacOS application that we will need to navigate:
- iOS won’t use frameworks for SDL2 integration. There are a couple of ways to include SDL in iOS but we will be compiling a static library from the SDL2 source code and linking to it.
- iOS has different header file requirements to include OpenGL support.
- We won’t want to have a fixed size window for iOS, instead it should fill the entire screen in ‘full screen’ mode.
As we explored the structure of a MacOS desktop application in the last article, let’s do the same thing for a typical iOS application.
An iOS application is just a folder containing files. If you have an .ipa file it is simply a zipped up version of your iOS .app folder. You can right click on an .app folder and choose Show Package Contents to view its contents. Here is an example of our A Simple Triangle application structure:
A Simple Triangle.app
  + _CodeSignature
    CodeResources
  A Simple Triangle
  Info.plist
  LaunchScreen.storyboardc
  PkgInfo
In the example above there are no graphic assets but that’s the general shape of an application.
We will follow the same approach as we did for the MacOS platform target, by creating an XcodeGen definition file and letting it generate our iOS Xcode project for us. The reasons for doing this were well explained in the MacOS setup article and still hold true for iOS - probably more so because there are far more iOS developers than MacOS developers.
Create a new folder named ios as a sibling to our other target folders. We also need to include an iOS launch storyboard that serves two purposes:
- It is the splash screen shown when the iOS application is starting.
- Most importantly, if there are no launch images or storyboards, the iOS application will report itself as only having a screen size of 480x320 to our code which would prevent us from creating the correctly sized window. I didn’t realise this the first time I worked on this article and was baffled why the screen size was only being reported as 480x320. I have no idea why the presence of a launch storyboard determines the capabilities of the iOS device - but it seemed to be consistently true …
You can create a basic empty iOS application somewhere and copy the LaunchScreen.storyboard from it, or you can download this empty one I made and save it into the ios folder - you might need to right click the link and Save link as.
root
  + project
    + ios
      LaunchScreen.storyboard
Note: the LaunchScreen.storyboard can be checked into version control as we can’t dynamically generate it - and nor would we want to.
Next create a new text file named setup.sh in the ios folder:
root
  + project
    + ios
      LaunchScreen.storyboard
      setup.sh
Mark the new setup.sh as executable via Terminal as we’ve done before for other scripts (chmod +x setup.sh) then edit it, entering the following script:
#!/bin/bash

# Include the shared scripts and utility methods that are common to all platforms.
. ../shared-scripts.sh

fetch_brew_dependency "wget"
fetch_brew_dependency "xcodegen"

fetch_third_party_lib_sdl
Note that we are not fetching the SDL frameworks this time.
Compiling SDL2 into a static library
For iOS, we only need the source code version of SDL2, and not the prebuilt frameworks like the MacOS and console targets did. In addition, we will be consuming SDL2 via a static library .a file, however we will need to create this static library ourselves because SDL2 doesn’t ship with it.
This process might look a little scary but basically what we need to do is this:
- Check to see if we already have the
libSDL2.a library in our root/project/ios/Libs folder.
- If we don’t, we will create the
Libs folder if needed, then build the Xcode iOS project that ships with the SDL2 source code library. The SDL Xcode project is found in our third-party folder at SDL/Xcode-iOS/SDL/SDL.xcodeproj. We will need to build it twice: once for the iOS phone target, and once for the iOS simulator target.
- After both phone and simulator targets have been built, we need to join them together into one single
fat static library so it can be used for both simulator and phone compilation.
- Finally, we will copy the
fat static library into our root/project/ios/Libs folder, so it can be linked into our iOS application.
We will add a new method into our setup.sh named create_static_library which will build a static library if needed and copy it into the Libs folder. We are writing this as a method because we will have other use cases in the future when we want to add other SDL extension libraries into the iOS project, however our first use case is just to build the main SDL2 static library. Edit setup.sh and enter the following:
#!/bin/bash

# Include the shared scripts and utility methods that are common to all platforms.
. ../shared-scripts.sh

fetch_brew_dependency "wget"
fetch_brew_dependency "xcodegen"

fetch_third_party_lib_sdl

# This method will compile a static library from an Xcode project if it doesn't already exist in the Libs folder.
create_static_library() {
    # The following arguments need to be passed into this method:
    STATIC_LIBRARY=$1
    PROJECT_PATH=$2
    XCODE_PROJECT=$3
    XCODE_TARGET=$4
    BUILD_FOLDER=$5

    # If there is no 'Libs' folder yet, create it.
    if [ ! -d "Libs" ]; then
        mkdir Libs
    fi

    # Navigate into the 'Libs' folder.
    pushd Libs
        # If the static library file doesn't exist, we'll make it.
        if [ ! -e $STATIC_LIBRARY ]; then

          # Navigate to the path containing the Xcode project.
          pushd $PROJECT_PATH
              # Build the iPhone library.
              echo "Building the iOS iPhone static library ..."

              xcrun xcodebuild -configuration "Release" \
                  -project $XCODE_PROJECT \
                  -target $XCODE_TARGET \
                  -sdk "iphoneos" \
                  build \
                  ONLY_ACTIVE_ARCH=NO \
                  RUN_CLANG_STATIC_ANALYZER=NO \
                  BUILD_DIR="build/$BUILD_FOLDER" \
                  SYMROOT="build/$BUILD_FOLDER" \
                  OBJROOT="build/$BUILD_FOLDER/obj" \
                  BUILD_ROOT="build/$BUILD_FOLDER" \
                  TARGET_BUILD_DIR="build/$BUILD_FOLDER/iphoneos"

              # Build the simulator library.
              echo "Building the iOS Simulator static library ..."

              xcrun xcodebuild -configuration "Release" \
                  -project $XCODE_PROJECT \
                  -target $XCODE_TARGET \
                  -sdk "iphonesimulator" \
                  -arch i386 -arch x86_64 \
                  build \
                  ONLY_ACTIVE_ARCH=NO \
                  RUN_CLANG_STATIC_ANALYZER=NO \
                  BUILD_DIR="build/$BUILD_FOLDER" \
                  SYMROOT="build/$BUILD_FOLDER" \
                  OBJROOT="build/$BUILD_FOLDER/obj" \
                  BUILD_ROOT="build/$BUILD_FOLDER" \
                  TARGET_BUILD_DIR="build/$BUILD_FOLDER/iphonesimulator"

              # Join both libraries into one 'fat' library.
              echo "Creating fat library ..."

              xcrun -sdk iphoneos lipo -create \
                  -output "build/$BUILD_FOLDER/$STATIC_LIBRARY" \
                  "build/$BUILD_FOLDER/iphoneos/$STATIC_LIBRARY" \
                  "build/$BUILD_FOLDER/iphonesimulator/$STATIC_LIBRARY"

              echo "The fat static library '$STATIC_LIBRARY' is ready."
            popd

            # Copy the result into the Libs folder.
            echo "Copying '$STATIC_LIBRARY' into Libs."
            cp "$PROJECT_PATH/build/$BUILD_FOLDER/$STATIC_LIBRARY" .
        fi
    popd
}

# Create our main SDL2 static library if necessary and put it into the Libs folder.
create_static_library \
    libSDL2.a \
    ../../../third-party/SDL/Xcode-iOS/SDL \
    SDL.xcodeproj \
    libSDL-iOS \
    SDL
Although it seems that there is a lot going on in that script, we are just using the standard Xcode command line tools to build Xcode projects.
Creating the iOS project definition
We will be writing another YAML definition that will be used by XcodeGen to generate our iOS project, in a very similar way to the MacOS project before. As a refresher, be sure to get familiar with the documentation for the XcodeGen tool itself: https://github.com/yonaskolb/XcodeGen/blob/master/Docs/ProjectSpec.md.
First up, we need to create our project.yml file in the root/project/ios folder:
root
  + project
    + ios
      LaunchScreen.storyboard
      project.yml
      setup.sh
Edit the project.yml file with the following content:
name: A Simple Triangle

options:
  bundleIdPrefix: io.github.marcelbraghetto
  createIntermediateGroups: true
  usesTabs: false
  indentWidth: 4
  tabWidth: 4
  deploymentTarget:
    iOS: "9.0"

settings:
  CLANG_CXX_LANGUAGE_STANDARD: c++17
  CLANG_CXX_LIBRARY: libc++
  GCC_C_LANGUAGE_STANDARD: c11
  CLANG_WARN_DOCUMENTATION_COMMENTS: false

targets:
  A Simple Triangle:
    type: application
    platform: iOS
    info:
      path: Generated/Info.plist
      properties:
        LSRequiresIPhoneOS: true
        UIRequiredDeviceCapabilities: [armv7]
        UIRequiresFullScreen: true
        UIStatusBarHidden: true
        UISupportedInterfaceOrientations: [UIInterfaceOrientationLandscapeLeft, UIInterfaceOrientationLandscapeRight]
        UILaunchStoryboardName: LaunchScreen
    entitlements:
      path: Generated/app.entitlements
    sources:
      - Source
      - LaunchScreen.storyboard
    settings:
      HEADER_SEARCH_PATHS: $(PROJECT_DIR)/../../third-party/SDL/include
      LIBRARY_SEARCH_PATHS:
        - $(inherited)
        - $(PROJECT_DIR)
        - $(PROJECT_DIR)/Libs
    dependencies:
      - sdk: Metal.framework
      - framework: Libs/libSDL2.a
        embed: false
      - sdk: MobileCoreServices.framework
      - sdk: CoreMotion.framework
      - sdk: CoreGraphics.framework
      - sdk: AudioToolbox.framework
      - sdk: CoreAudio.framework
      - sdk: QuartzCore.framework
      - sdk: GameController.framework
      - sdk: Foundation.framework
      - sdk: OpenGLES.framework
      - sdk: UIKit.framework
      - sdk: AVFoundation.framework
      - sdk: ImageIO.framework
The definition is quite similar to the one we wrote for the MacOS target, with a few subtle differences:
- The
targets/info now has a properties section which is where we can add settings into the generated Info.plist file. For iOS we want to tell the application that it should hide its status bar, be in full screen mode and only support landscape orientations. There are a couple of others too that we have added. This is also where we set the LaunchScreen.storyboard to be what is displayed when the iOS app is booting.
- The
Libs/libSDL2.a has been added in the dependencies section (along with the other frameworks that the iOS app needs), however we also need to add information about where Xcode should look when it needs to find the libSDL2.a file itself. This is done by adding an entry into the targets/*/settings/LIBRARY_SEARCH_PATHS with a value of $(PROJECT_DIR)/Libs. This will let Xcode look into our Libs folder when trying to find our static library file.
Note that we still add the sources and HEADER_SEARCH_PATHS the same as for the MacOS target, with the addition of the LaunchScreen.storyboard file so it is bundled up with the iOS application.
Save and close the project.yml file, then edit your setup.sh again, adding the following script to the bottom of the file:
# Check to see if we have an existing symlink to our shared main C++ source folder.
if [ ! -d "Source" ]; then
    echo "Linking 'Source' path to '../main/src'"
    ln -s ../main/src Source
fi

# Invoke the xcodegen tool to create our project file.
echo "Generating Xcode project"
xcodegen generate
This new script will create the symlink to the shared C++ source code, and ask XcodeGen to generate our project.
If you save and run ./setup.sh now, you should see it start to build the static libraries if it needs to, followed by the creation of our Xcode project. The output would look something similar to this:
$ ./setup.sh
Fetching Brew dependency: 'wget'.
Dependency 'wget' is already installed, continuing ...
SDL library already exists in third party folder.
Building the iOS iPhone static library ...
Build settings from command line:
    BUILD_DIR = build/SDL
    BUILD_ROOT = build/SDL
    OBJROOT = build/SDL/obj
    ONLY_ACTIVE_ARCH = NO
    RUN_CLANG_STATIC_ANALYZER = NO
    SDKROOT = iphoneos12.1
    SYMROOT = build/SDL
    TARGET_BUILD_DIR = build/SDL/iphoneos

** BUILD SUCCEEDED **

Building the iOS Simulator static library ...
Build settings from command line:
    ARCHS = i386 x86_64
    BUILD_DIR = build/SDL
    BUILD_ROOT = build/SDL
    OBJROOT = build/SDL/obj
    ONLY_ACTIVE_ARCH = NO
    RUN_CLANG_STATIC_ANALYZER = NO
    SDKROOT = iphonesimulator12.1
    SYMROOT = build/SDL
    TARGET_BUILD_DIR = build/SDL/iphonesimulator

** BUILD SUCCEEDED **

Creating fat library ...
The fat static library 'libSDL2.a' is ready.
Copying 'libSDL2.a' into Libs.
Linking 'Source' path to '../main/src'
Generating Xcode project
Loaded project:
  Name: A Simple Triangle
  Targets:
    A Simple Triangle: iOS application
⚙️  Generating project...
⚙️  Writing project...
Created project at <snip>/ios/A Simple Triangle.xcodeproj
Prior to running the setup.sh, our ios folder looked like this:
LaunchScreen.storyboard
project.yml
setup.sh
And after running setup.sh it will look like this:
A Simple Triangle.xcodeproj
+ Generated
LaunchScreen.storyboard
+ Libs
  libSDL2.a
project.yml
setup.sh
+ Source
Our first conditional code problem
With the Xcode project generated we should be able to open the iOS A Simple Triangle.xcodeproj in Xcode.
Note: The LaunchScreen.storyboard will also be shown in the Xcode project - I had captured these screenshots before I had added the storyboard to the project.yml file and I felt too lazy to recapture these screens again.
Open the Xcode project now and try to build the project - you will observe that we have a problem including the OpenGL headers:
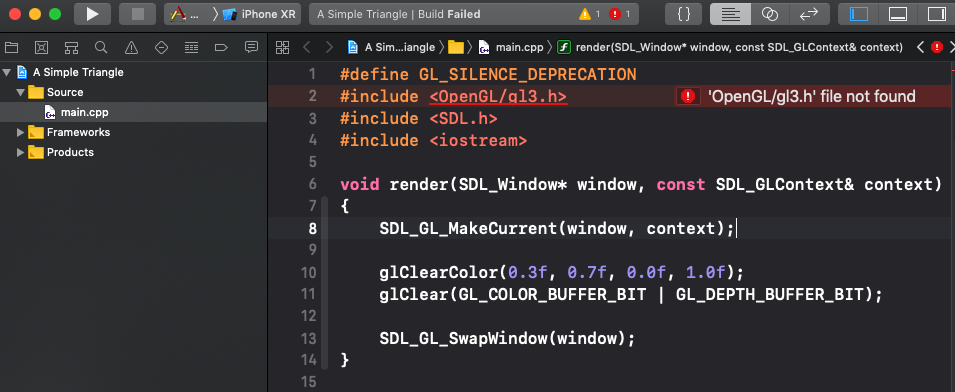
The reason for this is that on mobile platforms such as iOS and Android, the full ‘desktop’ version of OpenGL is not available. We need to instead use the OpenGL ES (Embedded Systems) version of OpenGL. This means we’ll need to write some conditional C++ code that will include the correct headers based on which platform is being compiled.
Quit out of Xcode now and open our a-simple-triangle.workspace in Visual Studio Code. We will come back later after changing the C++ code to regenerate the Xcode project.
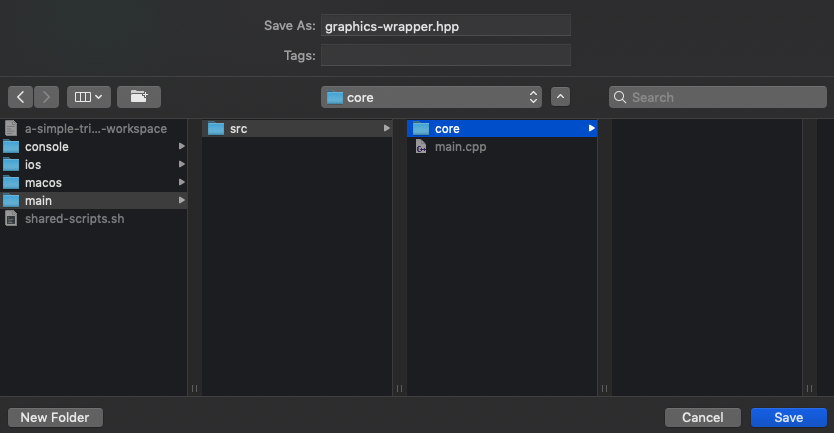
- Select
File -> New File in Visual Studio Code, then select File -> Save to be prompted to save it.
- In the dialog window, navigate to our
root/project/main/src folder then press the Create Folder button.
- Create a new folder named
core under root/project/main/src - we will start collating some core C++ code here.
- With the
core folder selected, set the file name to be graphics-wrapper.hpp.
- Press
Save to commit the new file to disk.
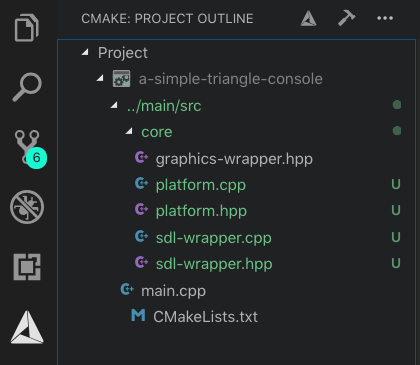
After saving the new file, navigate to the CMake panel in Visual Studio Code and press the small CMake icon next to the hammer to tell CMake to refresh its configuration and therefore pick up the new source file we added. You should then see something like this:

Within the graphics-wrapper.hpp file, enter the following code:
#pragma once

#if defined(__APPLE__)
#define GL_SILENCE_DEPRECATION
#include "TargetConditionals.h"
#if TARGET_OS_IPHONE
#include <OpenGLES/ES2/gl.h>
#else
#include <OpenGL/gl3.h>
#endif
#endif
The logic behind this code is:
Am I building for an Apple platform?
  - Yes:
    - Ignore the OpenGL deprecation warnings.
    - Include Apple TargetConditionals properties.
    - Am I building for iOS?
      - Yes: include the OpenGL ES headers.
      - No: include the OpenGL headers.
  - No: we will add other platforms later.
We will add more definitions when the Android and Emscripten platform targets are introduced. If you were going to add Windows or Linux platform targets you would do the same thing.
Save graphics-wrapper.hpp and edit the main.cpp file, changing this code:
#define GL_SILENCE_DEPRECATION
#include <OpenGL/gl3.h>
#include <SDL.h>
#include <iostream>
to this:
#include "core/graphics-wrapper.hpp"
#include <SDL.h>
#include <iostream>
While we are still in Visual Studio Code, run our console application with the debugger to make sure it still works.
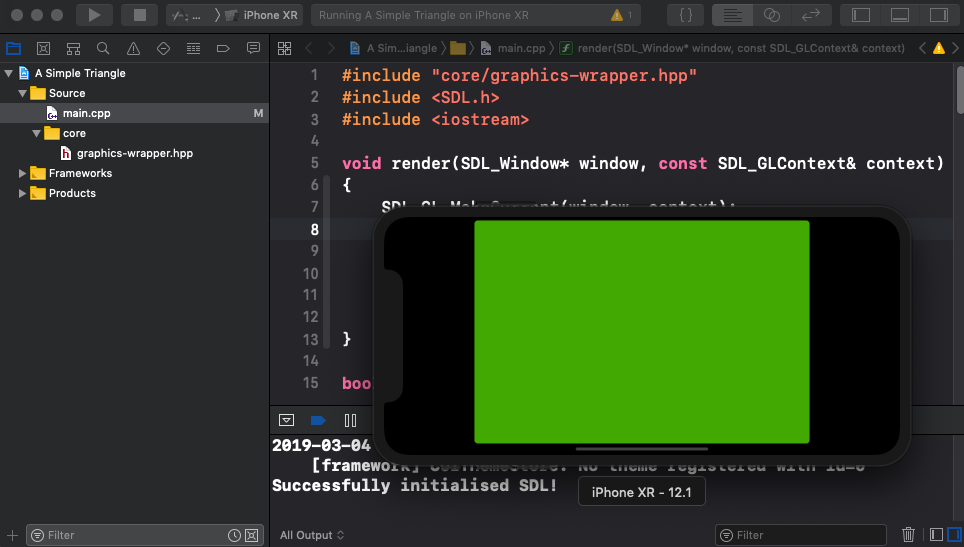
Return back to our root/project/ios folder in Terminal and run ./setup.sh again so XcodeGen regenerates our project, therefore automatically adding the new core/graphics-wrapper.hpp source file.
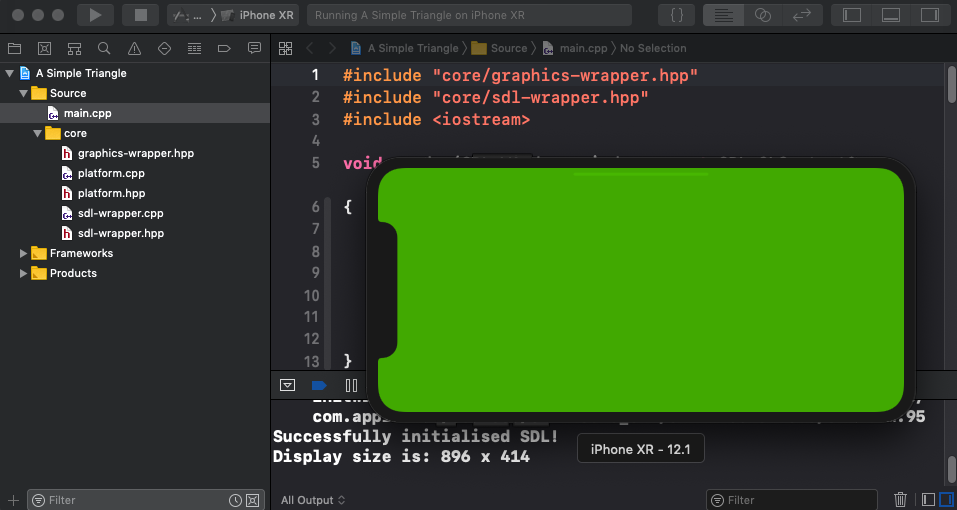
Open the iOS project in Xcode again and observe that our new C++ header is included in the project now. Run the application on the iOS simulator and if everything goes according to plan it should work!.
Sweet!
Window size problem
An astute observer will notice that although we can now run our iOS application, the green box which is our SDL window doesn’t appear to be filling the screen of the phone. This is because at the moment we have hard coded the window size when we create it with these dimensions:
uint32_t width{640};
uint32_t height{640};
What we really need to do is this:
Am I running on MacOS or console?
  - Yes: use a fixed window size.

Am I running on iOS?
  - Yes: make the window fill my screen.
We’ll solve this problem in a new C++ class that will start providing us with some core SDL functionality.
Quit Xcode and go back into Visual Studio Code then create the following new files in the main/src/core folder:
platform.hppplatform.cppsdl-wrapper.hppsdl-wrapper.cpp
Sync CMake as we did before so the new files appear in Visual Studio Code.
Note: As we author more C++ code, we will start to adopt some C++ programming techniques such as:
- Using C++ namespaces, the main namespace for our code base will be
ast (A Simple Triangle).
- Preferring to write C++ free functions instead of member functions when possible.
- I will prefer to not use the
auto keyword because some C++ IDEs on the Mac have very poor intellisense capabilities (looking directly at you Xcode), and if I’m trying to read C++ code in a browser or text file I find that using explicit types can be easier to contextually understand. This is a trade off between writing more compact code versus clearer type inference when reading code. There will be times where I will use auto, typically with iterators and that kind of thing where the explicitly typed code can get ugly otherwise.
I’ll introduce a few other techniques as we need them.
There will be various points in our application where we will need to know what kind of platform we are running on at runtime. We could use preprocessor macros to #define properties to mark what platform we are running on, but I’m going to try to limit the use of macros to when I have no other choice. Instead, we will write a new enum that represents the platforms we will support, and hide the ugly #ifdef code in its implementation.
Edit the platform.hpp file and enter:
#pragma once

namespace ast
{
    enum class Platform
    {
        mac,
        ios
    };

    Platform getCurrentPlatform();
} // namespace ast
To start, we only need to represent mac (includes MacOS and Console) or ios. In future articles we’ll be adding entries for Android and Emscripten too. Notice also that we are placing this code inside the ast namespace.
Now edit the platform.cpp file and enter:
#include "platform.hpp"

ast::Platform ast::getCurrentPlatform()
{
#if defined(__APPLE__)
#include "TargetConditionals.h"
#if TARGET_OS_IPHONE
    return ast::Platform::ios;
#else
    return ast::Platform::mac;
#endif
#endif
}
We can’t really avoid the ugly #if statements but at least by putting it in the implementation we can avoid seeing it in our consuming code.
Note: This method might benefit from being declared inline but I’ll keep the code simple for now.
Code: sdl-wrapper.hpp / cpp
As we grow our code base, we will need to ask the SDL library to do many tasks for us. Our first task that we can model is the creation of a window, which will automatically detect what platform we are running on to decide what size to make the window.
Edit the sdl-wrapper.hpp file:
#pragma once

#include <SDL.h>
#include <utility>

namespace ast::sdl
{
    std::pair<uint32_t, uint32_t> getDisplaySize();

    SDL_Window* createWindow(const uint32_t& windowFlags);
} // namespace ast::sdl
Note: The SDL libraries are written in C, so we will usually need to work with raw pointers when using it, hence the SDL_Window* type.
We are declaring a couple of SDL utility functions here:
getDisplaySize: calculates the dimensions of the current display.createWindow: creates an SDL window that will automatically size itself correctly.
Notice also that we are using the ast::sdl namespace for this class.
Now edit the sdl-wrapper.cpp file:
#include "sdl-wrapper.hpp"
#include "platform.hpp"

namespace
{
    bool shouldDisplayFullScreen()
    {
        switch (ast::getCurrentPlatform())
        {
            case ast::Platform::ios:
                return true;

            default:
                return false;
        }
    }
} // namespace

std::pair<uint32_t, uint32_t> ast::sdl::getDisplaySize()
{
    uint32_t displayWidth{0};
    uint32_t displayHeight{0};

    switch (ast::getCurrentPlatform())
    {
        case ast::Platform::ios:
        {
            // For mobile platforms we will fetch the full screen size.
            SDL_DisplayMode displayMode;
            SDL_GetDesktopDisplayMode(0, &displayMode);
            displayWidth = static_cast<uint32_t>(displayMode.w);
            displayHeight = static_cast<uint32_t>(displayMode.h);
            break;
        }

        default:
        {
            // For other platforms we'll just show a fixed size window.
            displayWidth = 640;
            displayHeight = 480;
            break;
        }
    }

    return std::make_pair(displayWidth, displayHeight);
}

SDL_Window* ast::sdl::createWindow(const uint32_t& windowFlags)
{
    std::pair<uint32_t, uint32_t> displaySize{ast::sdl::getDisplaySize()};

    SDL_Window* window{SDL_CreateWindow(
        "A Simple Triangle",
        SDL_WINDOWPOS_CENTERED, SDL_WINDOWPOS_CENTERED,
        displaySize.first, displaySize.second,
        windowFlags)};

    if (::shouldDisplayFullScreen())
    {
        SDL_SetWindowFullscreen(window, SDL_TRUE);
    }

    return window;
}
The implementation of the createWindow method will:
- Query the current display size to determine how big the window should be - the display size is determined by checking what platform we are on and either fetching the size from the operating system, or hard coding a default size.
- After the window is created, the platform is evaluated again to determine if we should display in full screen mode, and if so apply it to our window.
- The window is then returned to the caller.
Using our new code
Now that we have a shiny new wrapper for SDL, we can update our main.cpp to take advantage of it.
Change main.cpp from this:
#include "core/graphics-wrapper.hpp"
#include <SDL.h>
#include <iostream>
to this:
#include "core/graphics-wrapper.hpp"
#include "core/sdl-wrapper.hpp"
#include <iostream>
and this:
void runApplication()
{
    uint32_t width{640};
    uint32_t height{640};

    // Create a new SDL window based on OpenGL.
    SDL_Window* window{SDL_CreateWindow(
        "A Simple Triangle",
        SDL_WINDOWPOS_CENTERED, SDL_WINDOWPOS_CENTERED,
        width, height,
        SDL_WINDOW_RESIZABLE | SDL_WINDOW_OPENGL | SDL_WINDOW_ALLOW_HIGHDPI)};

    // Obtain an OpenGL context based on our window.
    SDL_GLContext context{SDL_GL_CreateContext(window)};

    // Setup some basic global OpenGL state.
    glClearDepthf(1.0f);
    glEnable(GL_DEPTH_TEST);
    glDepthFunc(GL_LEQUAL);
    glEnable(GL_CULL_FACE);
    glViewport(0, 0, width, height);
to this:
void runApplication()
{
    std::pair<uint32_t, uint32_t> displaySize{ast::sdl::getDisplaySize()};

    std::cout << "Display size is: " << displaySize.first << " x " << displaySize.second << std::endl;

    // Create a new SDL window based on OpenGL.
    SDL_Window* window{ast::sdl::createWindow(SDL_WINDOW_RESIZABLE | SDL_WINDOW_OPENGL | SDL_WINDOW_ALLOW_HIGHDPI)};

    // Obtain an OpenGL context based on our window.
    SDL_GLContext context{SDL_GL_CreateContext(window)};

    // Setup some basic global OpenGL state.
    glClearDepthf(1.0f);
    glEnable(GL_DEPTH_TEST);
    glDepthFunc(GL_LEQUAL);
    glEnable(GL_CULL_FACE);
    glViewport(0, 0, displaySize.first, displaySize.second);
Run the application again via Visual Studio Code and apart from a slight adjustment to the fixed window size, it should work the same as it did before.
Check what our iOS app does now
The reason we wrote the new core code was to allow the iOS platform to create its window at the correct full screen size. To test our new code, run the ./setup.sh script in root/project/ios again to pick up the new source files, then open up the iOS Xcode project and run it.
Sweet! We now have the iOS platform target running successfully and have added the ability to know at runtime which platform we are on.
Git ignore
If you were to commit A Simple Triangle into version control, you would want to create a new .gitignore file for the root/platform/ios folder, so it won’t include all the files that get auto generated by running XcodeGen. Here is a sample .gitignore that would achieve this for our project:
A Simple Triangle.xcodeproj
DerivedData
Source
Generated
Libs
The code for this article can be found here.
In the next article we will add the Android platform target, extending some of the C++ code further to accommodate it.
Continue to Part 5: Setup Android app.
End of part 4
