crust / Part 2 - Foundation setup
Marcel Braghetto 23 January 2022

In this article we are going to lay out the foundation structure for our Rust project and get to a stage where we can launch a basic version of our main application via Visual Studio Code on both MacOS and Windows.
Our goal is to wire up two brand new Rust applications - the crust-main application which will have all our 3D engine code and the crust-build application whose job it is to actually build our main application into a usable program. We will end up with a directory structure like so:
: root
    + crust-build: Rust command line application to build the main app
    + crust-main:  Main Rust source code and assets
We will add the implementation for building the MacOS console and Windows targets in the next couple of articles, but by the end of this article we should have the skeleton in place to orchestrate our builds through our crust-build project.
Cargo
First off we should talk a bit about how to build Rust code. The Rust toolchain includes a system named Cargo which provides dependency management and build commands used for building or running Rust code. Technically you don’t have to use Cargo - you could manually build everything using rustc (the Rust compiler) by hand, but why make life harder than it needs to be - plus Cargo is kinda the defacto standard way of doing it.
We will be using Cargo for our project both to setup its foundational structure and to perform the actual building and running of our Rust code. We will use Cargo manifest files (typically but not necessarily named Cargo.toml) to declare the various properties of our Rust projects and to define which third party dependencies (if any) our projects need. Public Rust dependencies via Cargo are known as crates and are typically published to https://crates.io/.
Note: I have never quite figured out how Rust is related to the theme of cargo and crates … for some reason it conjures images of pirates on rusty ships bootlegging crates of rum, but surely that isn’t the actual reason … anyway whatever!
Let’s get the basics up and running, with the help of Cargo. Create a directory for our new Rust adventure - we will refer to it as the root directory.
To start, we will ask Cargo to create our crust-main project. Enter the following in your project root directory:
cargo new crust-main --vcs none
You should see output like:
Created binary (application) `crust-main` package
Now the same thing again to create our crust-build project:
cargo new crust-build --vcs none
And you should see:
Created binary (application) `crust-build` package
Important: If we don’t specify the --vcs none then Cargo will ‘helpfully’ initialise a brand new Git project inside each new Rust project directory. This seems like a pretty opinionated thing to do and I don’t agree with it - in our use case we would make the root directory our Git repository, rather than the individual Rust projects within the root directory. I’ll leave it to you to setup Git for your root project directory.
Afterward you’ll end up with a structure like:
: root

    + crust-build
        - Cargo.toml
        + src
            - main.rs

    + crust-main
        - Cargo.toml
        + src
            - main.rs
Check that everything is working by changing into the crust-main directory and issuing the cargo run command:
$ cd crust-main
$ cargo run
   Compiling crust-main v0.1.0
    Finished dev [unoptimized + debuginfo] target(s) in 1.65s
     Running `target/debug/crust-main`
Hello, world!
We see Hello, world because main/src/main.rs contains:
fn main() {
    println!("Hello, world!");
}
The same thing would happen in the crust-build directory. Congrats - you just made your first Rust application!
Rust code styles
Before getting into the thick of our Rust programming we are going to tweak a few of the default Rust code formatting rules - this is kinda optional but I like having longer source code line lengths (130 characters seems reasonable) than the default settings. If you prefer shorter line lengths feel free to skip this part.
Create a new file named rustfmt.toml in your project root directory. This file will be picked up when applying code formatting in Visual Studio Code and will override any of the default rules:
max_width = 130
fn_call_width = 130
chain_width = 130
The set of available formatting options can be found https://rust-lang.github.io/rustfmt.
Visual studio code
Ok, now is a good time to create a Visual Studio Code workspace with our new Rust projects so it’s easy to work with. Create a new file named crust.code-workspace in your project root with the following:
{
    "folders": [
        {
            "path": "crust-build"
        },
        {
            "path": "crust-main"
        }
    ],
    "settings": {}
}
It simply declares that the workspace should open the crust-build and crust-main folders when opened. Additionally because we have the Rust Visual Studio Code extension installed, our Rust projects will actually start integrating with the IDE automatically. Save the file then open it in Visual Studio Code via File -> Open Workspace from File and choose crust.code-workspace.
Note: If Visual Studio Code opens the workspace in ‘restricted’ mode you may need to ‘trust’ the workspace.
You should see something similiar to:

Main application
Ok, let’s tweak our Cargo manifest for the crust-main project to gear things up for some 3D development. Edit crust-main/Cargo.toml like so:
[package]
name = "crust"
version = "1.0.0"
authors = ["Marcel Braghetto"]
edition = "2021"
rust-version = "1.59.0"

[lib]
name = "crustlib"
path = "src/lib.rs"
crate-type = ["lib"]

[[bin]]
name = "crust"
path = "src/bin.rs"

[dependencies]
libc = "0.2.88" # Note iOS targets won't compile without this.
gl = "0.14.0"
tobj = "2.0.3"
glm = "0.2.3"
sdl2-sys = "0.34.4"

[dependencies.sdl2]
version = "0.34.4"
default-features = false
features = ["use_mac_framework", "image"]
Section: package
[package]
name = "crust"
version = "1.0.0"
authors = ["Marcel Braghetto"]
edition = "2021"
rust-version = "1.59.0"
name: this influences the name of the produced binary when the project is compiledversion: the semantic version to associate with your projectauthors: some pleasantries about who is involved - feel free to change this :)edition: this declares the Rust Edition which may represent major changes in the Rust toolchain. For example when I started this project I was using Rust Edition 2018, but along the way a new version came out with breaking changes in the form of Rust Edition 2021rust-version: the release of Rust Edition 2021 included this directive which will refuse to build your project unless the declared minimum version of the Rust toolchain is available on the build machine
Section: lib
[lib]
name = "crustlib"
path = "src/lib.rs"
crate-type = ["lib"]
Ok so this might seem a bit odd - why do we need a lib (Rust library) in our project? Well the reason is that some of our target platforms such as Android and iOS cannot ‘run’ a binary executable from our Rust code directly - instead they need to consume our Rust code as a library and invoke methods upon it.
name: the binary name of the library output - additionally this declares the name of the package in our Rust code that this library can be called from.path: the root Rust source code file to associate with the librarycrate-type: Cargo has a notion of crate types which specify what kind of library to produce - by default the lib option is used which produces Rust compatible libraries intended to be consumed by Rust code, but later on for Android and iOS we are going to need to change this to other options such as cdylib (for Android) and staticlib (for iOS).
Note that we have declared the path to point at src/lib.rs but at the moment there is no such source file. Create a new file named lib.rs in the crust-main/src directory with:
pub fn main() {
    println!("Hello, world!");
}
Section: bin
[[bin]]
name = "crust"
path = "src/bin.rs"
This section looks a bit odd with the double square bracket notation, but it’s basically a collection of binary target definitions that our project should be able to produce - we could have more than one if we liked but there isn’t any need for our use case. Think of the bin section as representing the configuration of the main standalone executable that would be produced from a build - as opposed to a library that doesn’t actually run by itself. Note that on target platforms such as Android and iOS, we won’t actually build or use the output of the bin section - instead we would build and consume the output of the lib section.
name: this determines the compiled binary file name, in our case crustpath: the location of the main Rust source code to bootstrap when the exectuable starts
Note that the path is currently set to src/bin.rs but that file doesn’t exist yet. Rename the existing main.rs to bin.rs and replace its content with:
pub fn main() {
    crustlib::main();
}
All this is doing is wiring in the main method which is automatically invoked when we execute the binary, and deferring its actual implementation to the main method in our library source code. So ultimately the bin target only exists to bootstrap the library. The crustlib::main(); code invokes the main method in the Rust library module name crustlib - which we declared in the [lib] section.
Note: you can see here how the name field declared in the [lib] section of our manifest acts as the package identifier in Rust code into the library - because we named the library crustlib we can use it as a prefix to invoke code in the library: crustlib::main();.
Section: dependencies
The set of dependencies sections declare all the third party libraries from crates.io that we need. Of note:
libc: this is required to have a stable implementation of some C functionality we need across our target platformsgl: a Rust wrapper over OpenGL so we can run OpenGL commands in our Rust codetobj: this is a library that will help us to parse .obj 3D model filesglm: a Rust port of the GLM library that provides a suite of mathematical utilitiessdl2-sys: some additional SDL2 Rust mappings into the SDL2 library
The separate [dependencies.sdl2] is because for the sdl2 dependency we want to configure more than just the version:
version: I think you can figure that out …default-features: we want to control what parts of the Rust SDL2 library are automatically included ourselvesfeatures: which features to explicitly include, for us just the use of the Mac framework and image support
Test drive
Now, to see if we have been successful, open the crust-main directory in terminal (you can use the integrated terminal window inside Visual Studio Code if you like) and do a cargo run:
$ cargo run
   Compiling libc v0.2.113
   ...
   Compiling crust v1.0.0
    Finished dev [unoptimized + debuginfo] target(s) in 55.31s
     Running `target/debug/crust`
Hello, world!
The first time you run this it may take a few minutes as Cargo will go and fetch all the dependencies specified in the manifest, then compile each one into our application before running it.
Note the line Running 'target/debug/crust' - the crust file is the actual compiled binary that was produced. You can very easily produce native binary applications in this way, in fact if we used cargo build instead of cargo run it would have done everything except launch the application. In our project we effectively are running a natively compiled binary that in reality doesn’t need to have any Rust toolchains installed or available to work.
Note: On Windows the compiled binary will have a .exe suffix, for example target/debug/crust.exe.
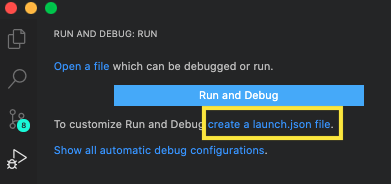
Before we dig into the crust-build project let’s wire up some launch buttons in Visual Studio Code to allow us to run (and debug) our code directly in the IDE instead of in a terminal session.
Tap the debug icon on the left, then select create a launch.json file.
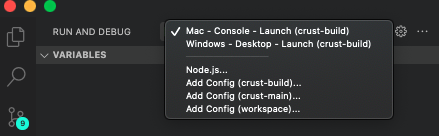
Choose the crust-build option so the launch profile is created in the crust-build/.vscode directory, then pick anything from the next option (it doesn’t matter too much because we will replace the launch script anyway). Replace the content of the resulting crust-build/.vscode/launch.json with the following:
{
    "version": "0.2.0",
    "configurations": [
        {
            "name": "Mac - Console - Launch",
            "type": "lldb",
            "request": "launch",
            "cwd": "${workspaceRoot}/../macos-console/out/debug",
            "program": "${workspaceRoot}/../macos-console/out/debug/crust",
            "args": [],
            "sourceLanguages": [
                "rust"
            ],
            "preLaunchTask": "build-dev-application"
        },
        {
            "name": "Windows - Desktop - Launch",
            "type": "cppvsdbg",
            "request": "launch",
            "cwd": "${workspaceRoot}/../windows/out/debug",
            "program": "crust.exe",
            "args": [],
            "stopAtEntry": false,
            "environment": [],
            "console": "newExternalWindow",
            "preLaunchTask": "build-dev-application"
        }
    ]
}
There is one configuration for Windows and one for MacOS. Of interest are the following:
type: for MacOS this should be lldb and aligns with the VS Code LLDB extension, on Windows this is cppvsdbg which aligns with the VS Code C/C++ extension - these extensions allow us to attach a debugger to our Rust application and debug our code while it is runningcwd: the working directory to launch the binary from - this will be the debug directory where our compiled crust binary will end upprogram: the location of the actual binary to launch then attach the debugger tosourceLanguages (MacOS only): this is needed by the LLDB extension to understand what language we are debugging for the binarypreLaunchTask: before launching the binary for debugging, we want to actually invoke our crust-build program to build it - though we haven’t implemented this just yet!
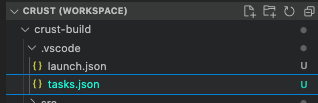
If you save launch.json you will now see a drop down field when in the debug view:
Choose the appropriate drop down based on your computer and click the run button - it won’t work due to this kind of error:
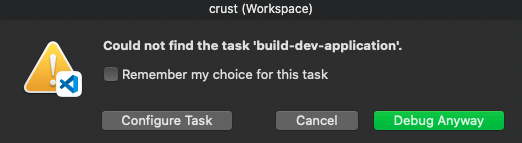
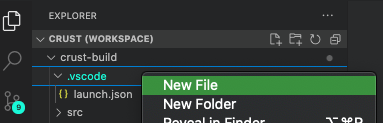
The build-dev-application task we specified doesn’t exist yet in our project configuration. Cancel the error dialog and create a new file named tasks.json in the crust-build/.vscode directory with the following content:
{
    "version": "2.0.0",
    "tasks": [
        {
            "label": "build-dev-application",
            "group": {
                "kind": "build",
                "isDefault": true
            },
            "type": "shell",
            "windows": {
                "command": "cargo",
                "options": {
                    "cwd": "${workspaceRoot}"
                },
                "args": [
                    "run",
                    "--",
                    "--target",
                    "windows",
                    "--variant",
                    "debug"
                ]
            },
            "osx": {
                "command": "cargo",
                "options": {
                    "cwd": "${workspaceRoot}"
                },
                "args": [
                    "run",
                    "--",
                    "--target",
                    "macos-console",
                    "--variant",
                    "debug"
                ]
            }
        }
    ]
}
This creates a Visual Studio Code task, which we’ve decided to name build-dev-application (but could be named anything), which registers itself as the default build task. For both Windows and MacOS (osx) the task will invoke the cargo run command within the working directory of the crust-build project and with a trailing set of command line arguments indicating which target and variant to build.
If you were to see the commands as one liners they would look like this:
- MacOS:
cargo run -- --target macos-console --variant debug
- Windows:
cargo run -- --target windows --variant debug
Note: the use of the -- argument after cargo run specifies that any subsequent arguments should be passed into the actual binary that is launched (our command line application) rather than the Cargo command itself. You could actually run these commands manually in a terminal window in the crust-build directory to get the same outcome. In fact if you were to automate the build pipeline in CI or something that’s what you’d do.
The --target and --variant arguments will be part of our command line crust-build application which we’ll start authoring shortly.
With this task defined, the result is that when we run our debugger from Visual Studio Code, this build task will run first, executing our crust-build application for Windows or MacOS - the output being the binary that the launch task will subsequently run and attach the debugger to.
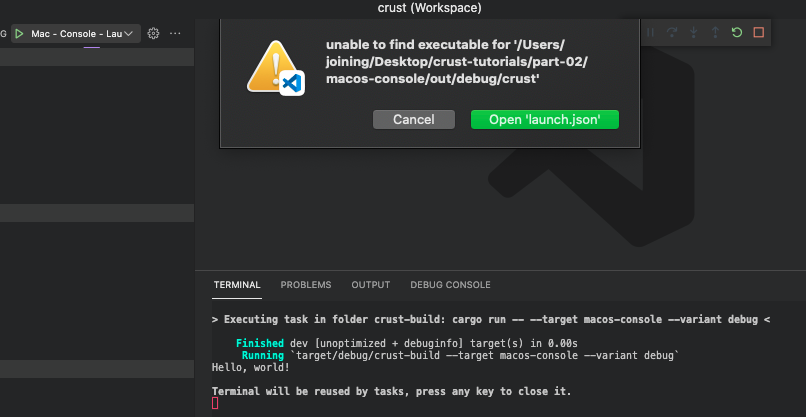
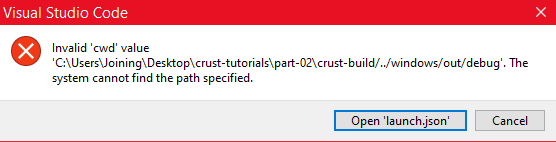
Save the tasks.json file and try to launch again, this time you will see that the crust-build project ran successfully via cargo run (you can see the Hello world! output in the IDE), but the binary and/or working directory for the binary we are trying to debug couldn’t be found:
MacOS
Windows
This is expected because nothing has actually produced the debuggable binary or directory structure where we have told our launch.json to launch. That’s what our crust-build application will need orchestrate!
Git ignore
Now is a good time to add some Git ignore rules so we don’t commit generated files into our repository. Add a new .gitignore file to your root directory:
.DS_Store
Frameworks
build
out
target
DerivedData
xcuserdata
.rust-build
Most of these are fairly common things to ignore, the .rust-build is a bit special but we’ll discuss that in the next article.
Note: Astute iOS / MacOS developers might wonder why we are ignoring the Frameworks folder pattern. This is because we’ll be dynamically constructing the Frameworks folder via our build code each time a build runs making it more of a dynamic folder - we don’t want to check it into version control because of this.
Summary
Next up, we will start writing the Rust code in our crust-build project, setting up some of the core utilities and tools needed to start onboarding each of our target platforms.
The code for this article can be found here.
Continue to Part 3: Build core.
End of part 2
