iac-env / Part 4 - Setup Jenkins
Marcel Braghetto 6 May 2020
In this part we will setup a Jenkins instance using Docker to run it, and connect it to Bitbucket so it can automatically start build pipelines.
Installing Jenkins
Jenkins has a Docker image available from Docker Hub but we are going to actually make our own Docker image from it as we need to customise it a tiny bit.
The customisation is needed to allow Jenkins to actually start and stop Docker images itself during build pipelines - out of the box the default Jenkins Docker image doesn’t seem to be able to do this. Thankfully it is quite trivial to apply this customisation.
Jenkins Dockerfile
Create a new folder named iac-jenkins as a sibling to the setup/iac-env folder with a Dockerfile and create-docker-image.sh script in it, along with a start-jenkins.sh script we will use to start Jenkins:
.
├─+ example-project
├─+ setup
│   ├─+ iac-env
│   └─+ iac-jenkins
│       ├── Dockerfile
│       └── create-docker-image.sh
├── start-bitbucket.sh
└── start-jenkins.sh
Enter the following into setup/iac-jenkins/Dockerfile:
FROM jenkins/jenkins:2.2.35-alpine
LABEL description 'Infrastructure as Code - Jenkins (iac-env-jenkins).'
USER root
RUN apk add --no-cache docker=18.09.8-r0
As you can see the Dockerfile is quite simple, all it does is use jenkins/jenkins:2.2.35-alpine as a base, then install docker into it. Installing Docker inside a Docker image might seem strange but later we will be running our build pipeline that needs to start and stop Docker containers from within the running Jenkins container. Adding docker into the Jenkins image allows it to do this.
Enter the following into setup/iac-jenkins/create-docker-image.sh, and apply executable permissions to it:
#!/usr/bin/env bash

pushd $(cd $(dirname $0) && pwd)
    docker build -t iac-jenkins .
popd
This looks very similar to the script we wrote for the iac-env image - it will invoke Docker to build the image based on the Dockerfile and tag the result as iac-jenkins.
Run the script to build the image, then check to see what Docker images we now have:
$ setup/iac-jenkins/create-docker-image.sh

$ docker images
REPOSITORY                   TAG                 IMAGE ID            SIZE
iac-jenkins                  latest              fe6d0797ca13        495MB
iac-env                      latest              1541cb836ece        714MB
atlassian/bitbucket-server   6.10                09c4f264b197        945MB
jenkins/jenkins              2.2.35-alpine       58047ae198b8        228MB
ubuntu                       bionic              c3c304cb4f22        64.2MB
Notice we have both jenkins/jenkins:2.2.35-alpine and iac-jenkins:latest images now which is cool!
Now enter the following into start-jenkins.sh and mark it as executable:
#!/usr/bin/env bash

# After Jenkins has started it can be browsed at http://localhost:8080
# To access the Jenkins home folder you can mount the Docker volume
# assigned to Jenkins with the volume name: 'jenkins-data', typically
# found at: /var/lib/docker/volumes/jenkins-data on Linux. If you are
# running Docker on MacOS, the volumes are hidden inside a Docker VM.
#
# Jenkins will auto restart itself after a system shutdown/reboot unless
# it was manually stopped, so theoretically you should only need to ever
# start it once. If for some reason you do want to manually stop Jenkins,
# use the following command:
#
# docker stop jenkins
#
echo 'Starting Jenkins ...'
docker run \
    -d \
    --name jenkins \
    --network iac-env \
    --publish 8080:8080 \
    --publish 50000:50000 \
    --restart unless-stopped \
    --volume jenkins-data:/var/jenkins_home \
    --volume /var/run/docker.sock:/var/run/docker.sock \
    iac-jenkins:latest
We are publishing ports 8080 and 50000 which are what Jenkins runs on and mapping its data volume to a Docker persistent volume named jenkins-data. We are also specifying the --network iac-env parameter like we did for our other Docker images. The following line might seem a bit mysterious:
--volume /var/run/docker.sock:/var/run/docker.sock \
This line maps the Docker application inside the Jenkins image to actually execute its Docker commands on through the Docker application on the host machine. We do this to avoid running Docker containers inside Docker containers.
Start Jenkins
Run the start-jenkins.sh script to boot up Jenkins. You can reach it via http://localhost:8080 - give it a minute to boot up though. Eventually you will be greeted by this screen:
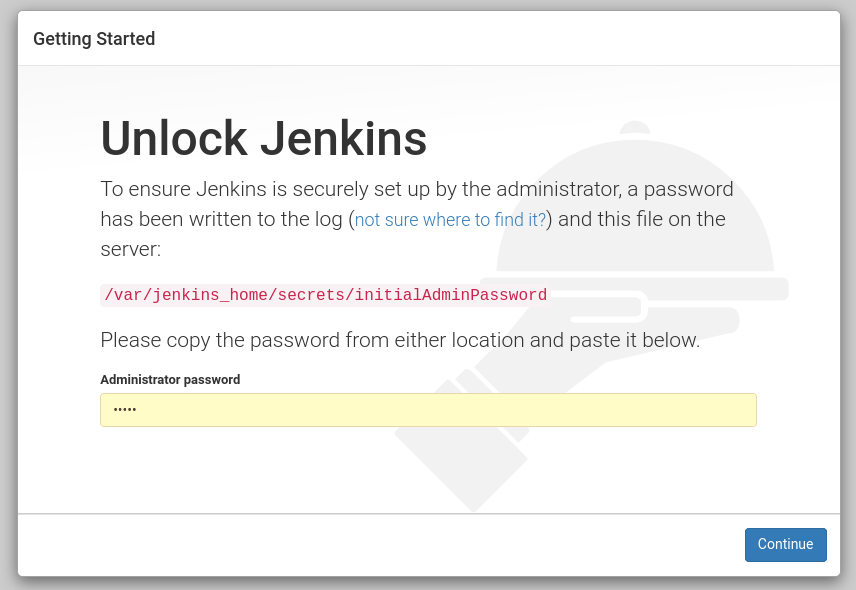
Now, I bet if you go and try to find /var/jenkins_home you’ll discover it doesn’t exist! The reason is that we are running Jenkins inside a Docker container, and we associated a Docker volume for Jenkins to use, which in fact is located at /var/lib/docker/volumes/jenkins-data on Linux, and is buried inside a Docker VM if you are running on MacOS.
To get the initial admin password you can run this:
docker exec jenkins cat /var/jenkins_home/secrets/initialAdminPassword
Basically we are just invoking a command on the running container that looks inside its own file system and prints the result.
Copy the output and paste it into the Administrator password field - also remember it for when Jenkins restarts when you will need to login again.
Select Install suggested plugins from the next screen as there are a few standard Jenkins plugins we will be using.
On the Create first admin user screen just select Continue as admin, then Save and Finish, Start using Jenkins. You are welcome to do more user configuration if you like but for the purpose of this experiment we’ll keep things as simple as possible.
Install multi branch plugin
Once Jenkins starts, we will install the Bitbucket Branch Source plugin - https://github.com/jenkinsci/bitbucket-branch-source-plugin/blob/master/docs/USER_GUIDE.adoc - which will let us integrate with our Git repositories and detect Git branches for our build pipelines.
Go to Manage Jenkins -> Manage Plugins -> Available tab -> Search for and select Bitbucket Branch Source then selected Download now and install after restart.
Once Jenkins has restarted, we will configure the plugin to be able to communicate with our Bitbucket server.
Note: Sometimes you have to refresh your browser manually if Jenkins doesn’t appear to have restarted itself.
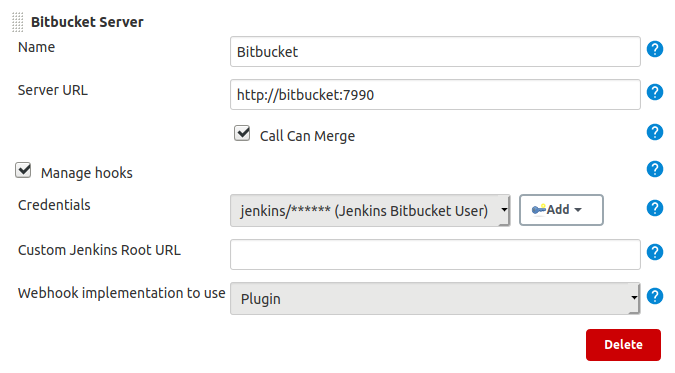
Go to Manage Jenkins -> Configure System then scroll down to the Bitbucket Endpoints section. It should look like this:
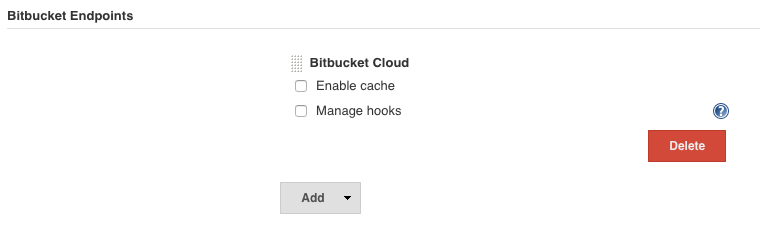
- Delete the default
Bitbucket Cloud configuration and add a Bitbucket Server configuration instead.
- Enter
Bitbucket in the Name field.
- Enter
http://bitbucket:7990 in the Server URL field, which is where Jenkins can find Bitbucket - remember, Bitbucket is hosted on the host machine within the iac-env Docker network, so we need to use http://bitbucket to reach it.
- Enable the
Manage hooks checkbox - for some reason the page scrolls when you select this, so scroll back to the Bitbucket Server section again.
- Set the
Webhook implementation to use to Plugin.
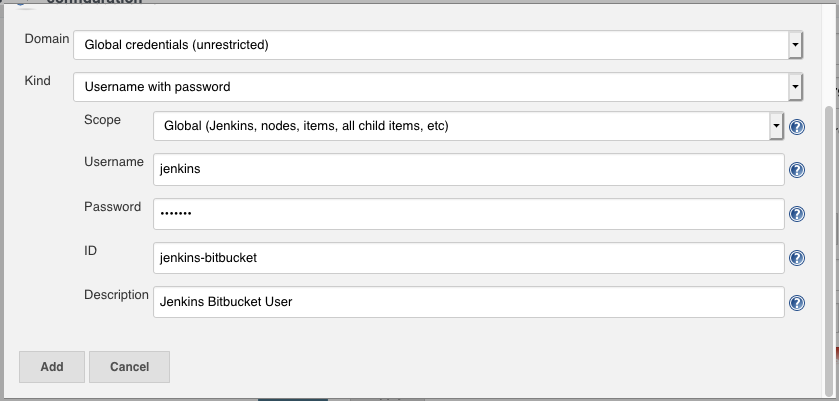
- Select
Add -> Jenkins next to the Credentials field - this is where we will add the details of the jenkins user we created in Bitbucket, allowing Jenkins to authenticate with Bitbucket.
- Fill in the details using the credentials of the
jenkins user you created in Bitbucket, like the following:
Save the credential, then your Bitbucket Endpoints section should look like the following:
Select the Save button at the lower left to save your changes.
Create the build pipeline job
We can now create a new Jenkins build pipeline job, associating it with our Git repository in Bitbucket. Once the job has been created it will scan Bitbucket for any Git branches in our repository and detect new branches and Git changes.
To create the Jenkins job, select the New Item menu option. Enter iac-example-project in the Item Name field and select Multibranch Pipeline as the type.
Enter the following details in the configuration form:
- Display Name: Infrastructure as Code - Example Project
- Description: Example project
- Branch Sources: Bitbucket
- Credentials: Jenkins Bitbucket User
- Owner: IC
- Repository name: example-project
This job will inherit the Jenkins Bitbucket configuration we setup earlier. We are setting the Owner to be IC which is the project key in Bitbucket that we created. If the connectivity is working correctly, the Repository name field will actually provide you with a drop down box of all the repositories available under the IC project ID, from which we select example-project. This means that the job will be associated to any changes coming from the IC/example-project configuration.
Leave everything else as default for now and select Save.
Immediately after saving the job, Jenkins will kick of a scan to find out what branches it should be aware of. The output will likely look similar to this:
Started
Starting branch indexing...
Connecting to http://bitbucket:7990 using jenkins/****** (Jenkins Bitbucket User)
Repository type: Git
Looking up IC/example-project for branches

Checking branch master from IC/example-project
      ‘Jenkinsfile’ not found
    Skipped

  1 branches were processed
Looking up IC/example-project for pull requests

  0 pull requests were processed
Finished branch indexing. Indexing took 0.98 sec
Finished: SUCCESS
Jenkins was able to scan our Bitbucket repository, finding a master branch. By default Jenkins will attempt to locate a special file named Jenkinsfile in the root of the repository which contains the instructions for what to do run in its build pipeline. Our repository doesn’t yet have a Jenkinsfile so we get the 'Jenkinsfile' not found output in the build console. We’ll create a Jenkinsfile in the next article.
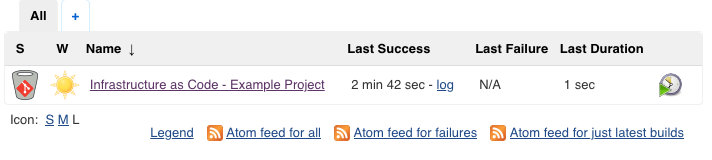
If you navigate back to the Jenkins home screen you will see a new build pipeline project like this:
Onward!
Next up we will create our Jenkinsfile which will define how and what to build in our pipeline.
Source code can be found at: https://github.com/MarcelBraghetto/iac-env
Continue to Part 5: Create build pipeline.
End of part 4
