algorithms / Dijkstra's Algorithm - Part 2
Marcel Braghetto 12 September 2015

Get the example project here
If you’d like to try it out on your device:
Download and install Treasure-Crab.apk
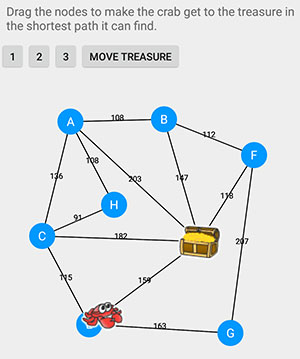
This post continues on from my Dijkstra’s Algorithm - Part 1 post. In this part we will put together a basic Android app to visualize the pathfinding. Let’s call the app Treasure Crab. The goals for the app are to:
- Display a graph along with an agent who needs to travel the shortest distance to reach the goal. The agent for this demo will be a crab and the goal will be a treasure chest.
- Allow the user to choose from some preset graphs.
- Create an render loop to show the agent moving to the goal in real time.
- Implement the ability to interact with the graph using touch to move the nodes around.
- Implement the ability to serialize and deserialize the graph so it can remember how we left it.
Note: for this post I’ll be changing the graph to an undirected graph to keep the visualization simple - however the sample should work for directed graphs as well.
1. Setup
Most of the code from part 1 can be used as the base for this. I won’t list all the code again, but will point out the main differences for the new app.
There will also be a number of code classes that I won’t display in the post, but you can of course download all the source code to see it yourself.
2. Overall differences
The overall differences from our original Dijkstra’s algorithm example are:
- A node now holds a world position coordinate for rendering and an update feature to allow its position to be changed at runtime.
- An edge is no longer given its weight in the constructor - instead it will calculate its weight as being the distance between the position of its origin and target, and include a feature to invalidate itself when asked to.
- Actors (crab/treasure chest) who know their world position and how to update themselves.
- Custom Android View to:
- Render the graph to screen.
- Capture and handle touch events.
- A graph now contains a number of methods to:
- Invalidate - causing all edges to recalulate their weights.
- Set node position - given a node, update its world position.
- Find node near point - given a world position, find the closest node within an epsilon threshold.
- Configure the agent (crab) and goal (treasure chest) by choosing where to place them in the graph.
- Render the nodes, edges and the actors abstractly.
- Deserialize a string representation of the graph data.
- Serialize the graph to a string representation.
2. Node model changes
The node will now need to track its position in the world and provide a method for updating it.
public class Node {

    ...

    // Position of this node in the world
    private PointF mPosition;

    public Node(@NonNull String key, @NonNull PointF position) {
        mKey = key;
        mEdges = new HashMap<>();
        mPosition = position;
    }

    /**
     * Retrieve the position of this node in the world.
     *
     * @return position coordinate.
     */
    @NonNull
    public PointF getPosition() {
        return mPosition;
    }

    /**
     * Update the node's position in the world.
     *
     * @param x new X position.
     * @param y new Y position.
     */
    public void updatePosition(float x, float y) {
        mPosition.set(x, y);
    }

    /**
     * Adding an edge will connect this node with the target
     * node.
     *
     * @param target node to connect to.
     */
    public void addEdge(@NonNull Node target) {
        if(mEdges.containsKey(target)) {
            return;
        }

        mEdges.put(target, new Edge(this, target));
    }

    ...
}
3. Edge model changes
The edge will now be responsible for calculating its own weight and will take a reference to its origin as well as its target.
It will also calculate its own mid point along its length so we can draw a text label halfway between its origin and target nodes on the screen.
public class Edge {
    private Node mOrigin;
    private Node mTarget;
    private double mWeight;
    private PointF mMidPoint;

    public Edge(@NonNull Node origin, @NonNull Node target) {
        mMidPoint = new PointF();
        mOrigin = origin;
        mTarget = target;
        invalidate();
    }

    /**
     * The weight of this edge from its origin
     * to its target node.
     *
     * @return edge weight.
     */
    public double getWeight() {
        return mWeight;
    }

    /**
     * The mid point position between the origin
     * and target node.
     *
     * @return mid point position of the edge.
     */
    @NonNull
    public PointF getMidPoint() {
        return mMidPoint;
    }

    @NonNull
    public Node getTarget() {
        return mTarget;
    }

    @NonNull
    public Node getOrigin() {
        return mOrigin;
    }

    @NonNull
    public String getLabel() {
        return String.valueOf(Math.round(mWeight));
    }

    /**
     * Invalidating the edge will cause it
     * to re compute its data based on its
     * origin and target nodes.
     */
    public void invalidate() {
        mWeight = MathUtils.distanceBetween(mOrigin.getPosition(), mTarget.getPosition());
        MathUtils.midPoint(mOrigin.getPosition(), mTarget.getPosition(), mMidPoint);
    }
}
The methods to calculate the distance / weight and the mid point are pretty basic and look like this:
public class MathUtils {
    private MathUtils() { }

    /**
     * Given two points, determine the distance
     * between them.
     *
     * @param p1 origin point.
     * @param p2 target point.
     *
     * @return distance between the two given points.
     */
    public static double distanceBetween(@NonNull PointF p1, @NonNull PointF p2) {
        return Math.sqrt((p1.x - p2.x) * (p1.x - p2.x) + (p1.y - p2.y) * (p1.y - p2.y));
    }

    /**
     * Given two points and an output point, determine the
     * mid point between the two points and put the resulting
     * X/Y coordinate into the output point.
     *
     * @param p1 origin point.
     * @param p2 target point.
     * @param output to populate with the mid point result.
     */
    public static void midPoint(@NonNull PointF p1, @NonNull PointF p2, @NonNull PointF output) {
        float x = (p1.x + p2.x) / 2f;
        float y = (p1.y + p2.y) / 2f;

        output.set(x, y);
    }
}
4. Actors - Crab and Treasure Chest
Both the Crab and the Treasure Chest are actors in our world, and have some common characteristics. An actor will know its position in the world and how to update itself.
In this demo the actors will also know what their graphical representation is (a bitmap).
Here is the basic actor super class.
public abstract class Actor {
    protected final PointF mPosition;

    private final Bitmap mBitmap;
    private final int mOffsetX;
    private final int mOffsetY;

    public Actor(@NonNull Bitmap bitmap) {
        mPosition = new PointF();
        mBitmap = bitmap;
        mOffsetX = -1 * bitmap.getWidth() / 2;
        mOffsetY = -1 * bitmap.getHeight() / 2;;
    }

    @NonNull
    public Bitmap getBitmap() {
        return mBitmap;
    }

    public int getOffsetX() {
        return mOffsetX;
    }

    public int getOffsetY() {
        return mOffsetY;
    }

    public void setPosition(float x, float y) {
        mPosition.set(x, y);
    }

    @NonNull
    public PointF getPosition() {
        return mPosition;
    }

    protected abstract void update();
}
The Treasure Chest actor is fairly simple - it just needs to know what node it should position itself on. Nothing too amazing here, it just sets its position during an update to the position of its target node (if it has one).
Note: The ScreenUtils class is just a helper class for doing miscellaneous things like getting bitmaps or converting pixel units. Check out the Git repo to find the related code.
public class TreasureChest extends Actor {
    private Node mTargetNode;

    public TreasureChest() {
        super(ScreenUtils.getBitmap(R.drawable.treasure));
    }

    public void setTargetNode(@Nullable Node targetNode) {
        mTargetNode = targetNode;
    }

    @Override
    public void update() {
        if(mTargetNode != null) {
            setPosition(mTargetNode.getPosition().x, mTargetNode.getPosition().y);
        }
    }
}
The Crab actor is a little more complex because it is the agent and needs to know how to follow a path to reach its goal.
Points of interest about this class:
- The crab will move with a set speed toward the next node in its path.
- In order for the crab to know when it has reached the next node in its path, a calculation is performed in the update method to find out how far away it is from the next node it is travelling to. If the distance is smaller than an allowed epsilon, it will retrieve another node from the path stack and start moving toward it (if there is one).
- The crab can be marked as inactive so it doesn’t update itself - for example while the user is dragging nodes around we stop the crab from moving.
- The path is a stack of node keys which will be given to the crab as a result of Dijkstra’s algorithm.
Note: The MutableVector is just a vector class used for calculating directions based on input deltas. Check out the Git repo to find the related code.
public class Crab extends Actor {
    private static final float EPSILON = ScreenUtils.dpToPx(1f);
    private static final float SPEED = 2f;

    private final Graph mParentGraph;
    private Stack<String> mPath;

    private Node mLastVisitedNode;
    private Node mTargetNode;
    private MutableVector mDirection;
    private boolean mActive;

    public Crab(@NonNull Graph parentGraph, @NonNull Node initialNode) {
        super(ScreenUtils.getBitmap(R.drawable.crab));
        mParentGraph = parentGraph;
        mDirection = new MutableVector(0.0, 0.0);
        mLastVisitedNode = initialNode;
        setPosition(mLastVisitedNode.getPosition().x, mLastVisitedNode.getPosition().y);
    }

    public void setActive(boolean active) {
        mActive = active;
    }

    public void setPath(@NonNull Stack<String> path) {
        mPath = path;
        if(mPath.size() > 0) {
            mTargetNode = mParentGraph.getNode(mPath.pop());
        } else {
            mTargetNode = null;
        }
    }

    @NonNull
    public Node getLastVisitedNode() {
        return mLastVisitedNode;
    }

    @Override
    public void update() {
        if(mTargetNode == null || !mActive) {
            return;
        }

        // If we arrived at the target node, choose the next node in
        // the path or if there are no more, then we've arrived at
        // the target node.
        if(MathUtils.distanceBetween(mPosition, mTargetNode.getPosition()) < EPSILON) {
            if(mPath.size() > 0) {
                mTargetNode = mParentGraph.getNode(mPath.pop());
                mLastVisitedNode = mTargetNode;
            }
            return;
        }

        // At this stage, we need to move Mr. Crab toward the target node...
        mDirection.setDirection(mTargetNode.getPosition().x - mPosition.x, mTargetNode.getPosition().y - mPosition.y);
        mDirection.normalize();

        mPosition.set(
                mPosition.x += mDirection.getDeltaX() * SPEED,
                mPosition.y += mDirection.getDeltaY() * SPEED);
    }
}
5. Custom Android View
A custom Android view is necessary to draw our graph and actors onto the screen. It will hold a canvas and issue drawing commands to it. In order for the rendering view to be called from the graph structure, a glue interface provides the contract such that the graph can abstractly render itself, without knowing the details of how to draw to the screen.
The rendering contract looks like this:
public interface DemoRenderer {
    /**
     * Set the canvas to draw onto.
     *
     * @param canvas to draw onto.
     */
    void setCanvas(@Nullable Canvas canvas);

    /**
     * Render a node with the given information.
     *
     * @param node to render.
     */
    void renderNode(@NonNull Node node);

    /**
     * Render an edge with the given information.
     *
     * @param edge to render.
     */
    void renderEdge(@NonNull Edge edge);

    /**
     * Render the given actor.
     *
     * @param actor to render.
     */
    void renderActor(@NonNull Actor actor);
}
You will see in the graph section of this post how rendering commands are sent through this contract.
The key parts of the custom view are:
- It needs a reference to its source graph so it can communicate to it (eg notify when the user interacts with the screen).
- It implements the rendering contract and knows how to draw bitmaps, lines and text to the screen with the data it is provided.
- It runs a looping handler every ~16MS to simulate a 60 fps display (though this implementation doesn’t account for time deltas - its pretty basic)
- The onDraw method is where the heart of the rendering is done - it will assign the current canvas instance to the custom renderer, then ask the graph to render itself against the instance of the custom renderer.
- The onTouchEvent method is where the user interaction and drag detection is determined to know if the user is dragging nodes.
The following code is the implementation of a custom view which knows how to render to the screen and how to react to touch events.
public class DemoCanvasView extends View {
    private DemoRenderer mDemoRenderer;
    private Graph mGraph;
    private Bitmap mNodeDot;

    private Paint mLinePaint;
    private Paint mNodeLabelPaint;
    private Paint mEdgeLabelPaint;

    private int mNodeDotOffset;
    private float mTextOffset;

    private String mDragNodeKey;

    private boolean mIsAnimating;
    private Handler mHandler;
    private Runnable mRunnable;

    public DemoCanvasView(Context context) {
        super(context);
    }

    public DemoCanvasView(Context context, AttributeSet attrs) {
        super(context, attrs);
    }

    public DemoCanvasView(Context context, AttributeSet attrs, int defStyleAttr) {
        super(context, attrs, defStyleAttr);
    }

    public void setGraph(@NonNull Graph graph) {
        mGraph = graph;

        mIsAnimating = true;
        startAnimating();
    }

    public void stop() {
        mIsAnimating = false;
        mHandler.removeCallbacks(mRunnable);
    }

    public void init() {
        mDemoRenderer = new DefaultDemoRenderer();

        mNodeDot = ScreenUtils.getBitmap(R.drawable.node);
        mNodeDotOffset = -1 * mNodeDot.getWidth() / 2;

        mLinePaint = new Paint();
        mLinePaint.setAntiAlias(true);
        mLinePaint.setStrokeWidth(3f);
        mLinePaint.setStyle(Paint.Style.STROKE);
        mLinePaint.setStrokeJoin(Paint.Join.ROUND);
        mLinePaint.setColor(Color.LTGRAY);

        mTextOffset = ScreenUtils.dpToPx(5);
        mNodeLabelPaint = new Paint();
        mNodeLabelPaint.setColor(Color.WHITE);
        mNodeLabelPaint.setTextAlign(Paint.Align.CENTER);
        mNodeLabelPaint.setAntiAlias(true);
        mNodeLabelPaint.setTextSize(ScreenUtils.dpToPx(14));

        mEdgeLabelPaint = new Paint();
        mEdgeLabelPaint.setColor(Color.BLACK);
        mEdgeLabelPaint.setTextAlign(Paint.Align.CENTER);
        mEdgeLabelPaint.setAntiAlias(true);
        mEdgeLabelPaint.setTextSize(ScreenUtils.dpToPx(9));

        mRunnable = new Runnable() {
            @Override
            public void run() {
                if(mIsAnimating) {
                    invalidate();
                    startAnimating();
                }
            }
        };

        mHandler = new Handler();
    }

    private void startAnimating() {
        mHandler.removeCallbacks(mRunnable);
        mHandler.postDelayed(mRunnable, 16);
    }

    @Override
    protected void onDraw(final Canvas canvas) {
        super.onDraw(canvas);

        if(mGraph == null) {
            return;
        }

        mDemoRenderer.setCanvas(canvas);
        mGraph.render(mDemoRenderer);
        mDemoRenderer.setCanvas(null);
    }

    @Override
    public boolean onTouchEvent(@NonNull MotionEvent event) {
        float x = event.getX();
        float y = event.getY();

        switch(event.getActionMasked()) {
            case MotionEvent.ACTION_DOWN:
                if(mDragNodeKey == null) {
                    mDragNodeKey = mGraph.getNodeNearPosition(new PointF(ScreenUtils.pxToDp(x), ScreenUtils.pxToDp(y)));
                }
                break;
            case MotionEvent.ACTION_MOVE:
                if(mDragNodeKey != null) {
                    mGraph.dragInteractionStarted();
                    mGraph.setNodePosition(mDragNodeKey, new PointF(ScreenUtils.pxToDp(x), ScreenUtils.pxToDp(y)));
                    invalidate();
                }
                break;
            default:
                mGraph.dragInteractionEnded();
                mDragNodeKey = null;
                invalidate();
                break;
        }

        return true;
    }

    /**
     * Renderer to visualise the data.
     */
    private class DefaultDemoRenderer implements DemoRenderer {
        private Canvas mCanvas;

        public void setCanvas(@Nullable Canvas canvas) {
            mCanvas = canvas;
        }

        @Override
        public void renderNode(@NonNull Node node) {
            float renderX = ScreenUtils.dpToPx(node.getPosition().x);
            float renderY = ScreenUtils.dpToPx(node.getPosition().y);

            mCanvas.drawBitmap(
                    mNodeDot,
                    renderX + mNodeDotOffset,
                    renderY + mNodeDotOffset,
                    null);

            mCanvas.drawText(
                    node.getKey(),
                    renderX,
                    renderY + mTextOffset,
                    mNodeLabelPaint);
        }

        @Override
        public void renderEdge(@NonNull Edge edge) {
            mCanvas.drawLine(
                    ScreenUtils.dpToPx(edge.getOrigin().getPosition().x),
                    ScreenUtils.dpToPx(edge.getOrigin().getPosition().y),
                    ScreenUtils.dpToPx(edge.getTarget().getPosition().x),
                    ScreenUtils.dpToPx(edge.getTarget().getPosition().y),
                    mLinePaint);

            mCanvas.drawText(
                    edge.getLabel(),
                    ScreenUtils.dpToPx(edge.getMidPoint().x),
                    ScreenUtils.dpToPx(edge.getMidPoint().y),
                    mEdgeLabelPaint);
        }

        @Override
        public void renderActor(@NonNull Actor actor) {
            mCanvas.drawBitmap(
                    actor.getBitmap(),
                    ScreenUtils.dpToPx(actor.getPosition().x) + actor.getOffsetX(),
                    ScreenUtils.dpToPx(actor.getPosition().y) + actor.getOffsetY(),
                    null);
        }
    }
}
6. Graph changes
The graph class itself probably has the most changes in this example compared to my earlier post.
In particular, the graph now needs to be able to:
- Invalidate all the edges in the graph to cause them to recalculate their weights and data.
- Update the world position of a given node in the graph.
- Find the closes node to a given world coordinate within a permitted threshold.
- Configure the agent (crab) and goal (treasure chest) and utilise our Dijkstra’s algorithm implementation to find a path for the agent to follow.
- Render itself abstractly - through the rendering contract shown above.
- Deserialize a string representation and construct itself.
- Serialize itself to a string that can be saved to disk for next time.
The listing for this class is fairly long, but again it isn’t really that complicated:
public class Graph {
    private static final float TOUCH_EPSILON = ScreenUtils.dpToPx(10f);

    private final Map<String, Node> mNodes;
    private TreasureChest mTreasureChest;
    private Crab mCrab;
    private Random mRandom;

    public Graph() {
        mNodes = new HashMap<>();
        mRandom = new Random();
    }

    /**
     * In this example we will just create a new node
     * if we ask for one that doesn't exist.
     *
     * @param key to find.
     *
     * @return the node with the given key or a new one.
     */
    @NonNull
    public Node getNode(@NonNull String key) {
        Node result = mNodes.get(key);

        if(result == null) {
            addNode(key, new PointF());
            return mNodes.get(key);
        }

        return result;
    }

    /**
     * Add a new node with the given unique node key into
     * the graph. Passing a node key that already exists
     * will replace it.
     *
     * @param key of the node to add.
     * @return the new node.
     */
    @NonNull
    public Node addNode(@NonNull String key, @NonNull PointF position) {
        Node node = new Node(key, position);
        mNodes.put(key, node);
        return node;
    }

    /**
     * Connecting nodes will create a new edge between the origin node
     * and the target node, and assign the edge with the given weight.
     *
     * For this demo we will also connect the target back to the origin
     * to simplify the visual rendering.
     *
     * @param originKey to connect from.
     * @param targetKey to connect to.
     */
    public void connectNodes(@NonNull String originKey, @NonNull String targetKey) {
        Node origin = mNodes.get(originKey);
        Node target = mNodes.get(targetKey);

        if(origin == null || target == null) {
            return;
        }

        origin.addEdge(target);
        target.addEdge(origin);
    }

    /**
     * Before running a path finding algorithm over the nodes
     * in the graph, this method should be called to reset all
     * the nodes back into their default state for path finding.
     */
    public void resetPathFindingData() {
        for(Node node : mNodes.values()) {
            node.resetPathFindingData();
        }
    }

    /**
     * Invalidate the graph, causing all distances to be re calculated
     * for edges between nodes.
     */
    public void invalidate() {
        // Loop over all our nodes.
        for(Node node : mNodes.values()) {
            // And for each edge for the given node refresh it.
            for(Edge edge : node.getEdges().values()) {
                edge.invalidate();
            }
        }
    }

    public void dragInteractionStarted() {
        pauseAnimation();
    }

    public void dragInteractionEnded() {
        resumeAnimation();
    }

    public void pauseAnimation() {
        mCrab.setActive(false);
    }

    public void resumeAnimation() {
        mCrab.setActive(true);
    }

    /**
     * Set the node with the given key to the given X/Y position
     * measured in DPs.
     *
     * @param nodeKey for the node to set the position.
     * @param position to assign to the node.
     */
    public void setNodePosition(@NonNull String nodeKey, @NonNull PointF position) {
        Node node = mNodes.get(nodeKey);

        // Trying to set a position on a non existing node?
        if(node == null) {
            return;
        }

        // Set the node to the new position.
        node.updatePosition(position.x, position.y);

        // Invalidate the graph to update edges etc.
        invalidate();
    }

    /**
     * Given an X/Y coordinate (in DPs), find a node that is
     * close enough to that point and return its key if found.
     *
     * An 'epsilon' value is used to provide a radius for an
     * acceptable match to a node. The first node found that
     * is within this epsilon value is chosen and no further
     * evaluation occurs.
     *
     * @param position of the touch point in density independent pixels.
     *
     * @return the key for the node within the acceptable radius
     * of the X/Y position, or null if no nodes are near the position.
     */
    @Nullable
    public String getNodeNearPosition(@NonNull PointF position) {
        for(Node node : mNodes.values()) {
            if(MathUtils.distanceBetween(position, node.getPosition()) < TOUCH_EPSILON) {
                return node.getKey();
            }
        }

        return null;
    }

    /**
     * Make the 'treasure chest' actor jump to a random node, then
     * configure the 'crab' actor to find the shortest path
     * to the treasure and begin to travel to it.
     */
    public void moveTreasureChestToRandomNode() {
        pauseAnimation();

        // We don't want to select the same node that the crab is on.
        Node lastVisitedNode = mCrab.getLastVisitedNode();

        int numNodes = mNodes.size();
        Node treasureChestTargetNode = null;

        // We should expect to find a new target node, for this demo
        // we won't bother checking for graphs that have only 1 node
        // where you might potentially exclude the only valid choice
        // and be stuck in an infinite loop.
        while(treasureChestTargetNode == null) {
            // Pick a node at random from our set of nodes
            int randomIndex = mRandom.nextInt(numNodes);
            int count = 0;

            for(Node node : mNodes.values()) {
                // If the current count matches our random index AND
                // the node at that position is not our excluded node
                // then select it and assign it to the treasure.
                if(count == randomIndex && node != lastVisitedNode) {
                    treasureChestTargetNode = node;
                    break;
                }

                count++;
            }
        }

        mTreasureChest.setTargetNode(treasureChestTargetNode);

        // This is where we call on our implementation of Dijkstra's algorithm
        // to formulate a path from the crab to the treasure chest.
        resetPathFindingData();
        GraphPath path = new DijkstrasAlgorithm().findPath(lastVisitedNode, treasureChestTargetNode);

        // If we successfully found a path, assign it
        // to our crab actor.
        if(path != null) {
            mCrab.setPath(path.getPath());
        } else {
            mCrab.setPath(new Stack<String>());
        }

        resumeAnimation();
    }

    /**
     * Render the elements of the graph into the given
     * renderer instance.
     *
     * @param renderer to send render commands to.
     */
    public void render(@NonNull DemoRenderer renderer) {
        // Loop through all the nodes in our collection.
        for(Node node : mNodes.values()) {
            // Loop through all the edges for the given node.
            for(Edge edge : node.getEdges().values()) {
                renderer.renderEdge(edge);
            }
        }

        // Draw each of the nodes after the edges (so they are on top).
        for(Node node : mNodes.values()) {
            renderer.renderNode(node);
        }

        // Update and render the treasure chest actor.
        mTreasureChest.update();
        renderer.renderActor(mTreasureChest);

        // Update and render the crab actor.
        mCrab.update();
        renderer.renderActor(mCrab);
    }

    /**
     * Given a string in the correct format, clear the current
     * graph instance and deserialize the graph stored in the string.
     *
     * The string format is as follows:
     *
     * Line 1: Number of nodes (n) in the graph - integer
     * Line 2: The key for the first node - string
     * Line 3: The X coordinate for the first node - float
     * Line 4: The Y coordinate for the first node - float
     * Line 5: Repeating sequence (lines 2 - 4) for each remaining node
     * Line n + 1: Number of edges for the first node - integer
     * Line n + 2: The key for the target node for the first edge of the first node - string
     * Line n + 3: Repeated line n + 2 for how many edges are in the first node - string
     * Line n + 4: Repeated edge for the nth node followed by the lines for each target node keys - string
     *
     * Example data structure:
     *
     * 8                            <-- 8 nodes in the data
     * D 70.666664 62.666668        <-- First node has key 'D' and is at X/Y ~(70.7, 62.7)
     * C -149.66667 -31.0           <-- Second node properties ...
     * E -122.666664 156.0
     * A -98.666664 -189.66667
     * H -58.666668 -62.333332
     * G 120.0 90.0
     * F 138.33333 -137.33333
     * B 57.333332 -174.0
     * 5 A B C E F                  <-- First node has 5 edges, which target node keys A, B, C, E, F
     * 4 A E H D                    <-- Second node edges ...
     * 3 G C D
     * 4 B H C D
     * 2 A C
     * 2 F E
     * 3 B G D
     * 3 A F D
     *
     * @param graphText correctly formatted graph data text.
     */
    public void deserializeGraph(@NonNull String graphText) {
        mNodes.clear();

        Scanner scanner = new Scanner(graphText);

        int numNodes = scanner.nextInt();

        // In order to post process the node edges in the correct order,
        // we create a temporary array to hold the nodes while they are
        // being parsed so they can be found by the same position index
        // later.
        Node[] orderedNodes = new Node[numNodes];

        for(int i = 0; i < numNodes;i++) {
            // Create and add a new node into the graph with the given data values.
            orderedNodes[i] = addNode(scanner.next(), new PointF(scanner.nextFloat(), scanner.nextFloat()));
        }

        int numEdges;
        String originNodeKey;
        String targetNodeKey;

        // Loop through each of the nodes to parse and process their edges.
        for(int i = 0; i < numNodes;i++) {
            // Grab the correct node key from the previously cached
            // array of parsed nodes.
            originNodeKey = orderedNodes[i].getKey();

            // Find out how many edges this particular node has.
            numEdges = scanner.nextInt();

            // Read each of the edge data records and 'connect' the
            // current node and the target node inside the graph.
            for(int j = 0; j < numEdges;j++) {
                targetNodeKey = scanner.next();
                connectNodes(originNodeKey, targetNodeKey);
            }
        }

        // The graph should now be populated so create
        // our actors and set them up.
        mTreasureChest = new TreasureChest();
        mCrab = new Crab(this, orderedNodes[0]);

        // Invalidate the graph to cause all the distances
        // to be calculated.
        invalidate();

        // Begin the simulation!
        moveTreasureChestToRandomNode();
    }

    /**
     * Take the data in the graph and serialize it into
     * a string formatted data structure that can be
     * stored or transmitted and be deserialized later.
     *
     * @return string containing the text content that can
     * be stored for future use.
     */
    @NonNull
    public String serializeGraph() {
        // Track the node data and edge data in separate
        // string builders to avoid passing across the
        // data twice - we need to record all the nodes
        // first so when they are deserialized, they all
        // exist by the time the edges are deserialized.
        StringBuilder nodeData = new StringBuilder();
        StringBuilder edgeData = new StringBuilder();

        // How many nodes in the graph.
        nodeData.append(mNodes.size());
        nodeData.append("\n");

        for(Node node : mNodes.values()) {
            // Save the key, x, y data fields on a line.
            nodeData.append(node.getKey());
            nodeData.append(" ");
            nodeData.append(node.getPosition().x);
            nodeData.append(" ");
            nodeData.append(node.getPosition().y);
            nodeData.append("\n");

            // Add the number of edges for this node.
            edgeData.append(node.getEdges().size());
            edgeData.append(" ");

            // Loop through all the edges for the current node
            // and emit them to the data record.
            for(Edge edge : node.getEdges().values()) {
                edgeData.append(edge.getTarget().getKey());
                edgeData.append(" ");
            }

            // Prepare the edge data for the next line.
            edgeData.append("\n");
        }

        // Combine the edge data and the node data to
        // form a full data set.
        nodeData.append(edgeData);

        return nodeData.toString();
    }
}
7. Wiring it all up
Whoa that was a massive wall of text… hopefully you are still hanging in there! The last part is to wire all this together.
The host Android activity for this example will take the following actions:
- Initialise the custom view.
- Initialise the graph instance.
- Load one of the predefined graph data files or if the user had interacted with a graph previously, load the last saved state of the graph.
- When being closed, serialize and save the current state of the graph for next time.
I won’t list the code for the activity here, but check the MainActivity class in the Github repo.
8. Further improvements
This has just been a simple example of seeing the pathfinding algorithm in action, there are probably a number of optimizations and refinements that could be included to make it better.
Here are a few ideas:
- Once set of paths has been found for a given origin to other nodes, the path could be stored in an LRU cache to provide a fast lookup.
- The paths from each node as the origin to every other node could be pre computed and stored in data files, and perhaps on bootup could be loaded into a cache.
- Serialization could be done with something more performant or robust than a text file. Data formats such as flat buffers or binary files might be a good idea.
- At the moment our algorithm implementation will potentially enqueue the same edge target nodes more than once. Although it doesn’t affect the quality of the result, it is a bit wasteful because the oldest instance will be discarded when it is encountered but adds no value to the overall algorithm. Another data structure could be used instead of the default priority queue that is able to perform an update if a node was already placed into the priority queue at an earlier time.
Anyway, I enjoyed writing this demo so hopefully there is something here that might be of interest to someone else!!
