android / Configuration Launching
Marcel Braghetto 13 September 2015

Get the source for this example here
Often when building Android apps we need to find a way to apply different configuration settings depending on the type of build. For example, a development build might need to point to a development server, or a production build might need to prevent any configuration at all.
There are myriad of ways to achieve this, but I thought I’d build on an earlier post regarding deep linking to demonstrate how to have a companion configuration app or web page which is capable of launching the main application with a given state.
Our companion launcher app will be known as Configula because it will have the ability to infect our debug application behaviour - you know - just like vampires can, however we’ll also walk through how to put a silver cross on our release builds to repel Configula…
Key goals for this demo:
- Build an application which can be launched via deep linking techniques.
- Only allow the application to be launched via deep linking in debug builds.
- For release builds this should be impossible.
- Build a companion launcher app Configula - which will be able to launch the main app via an intent containing configuration properties.
The overall concept is quite similar to what I covered in my Launching apps from HTML links post.
1. Building the main application
There is some good information about having different build types in android here.
We are going to create a main application that has different behaviour in debug versus release builds.
Debug
- Custom overridden manifest that includes a ConfigulaActivity which will receive deep linking intents from outside the app.
- Implementation of a debug variant of the AppConfig class that knows how to save the properties passed in through the deep link and is queried in the MainActivity.
Release
- Default manifest for the main app - the ConfigulaActivity is not included.
- Implementation of a release variant of the AppConfig class that always returns hard coded values when used in the MainActivity.
- Zero debug code / configuration compiled into the release build.
2. Basics
The basics for this app is to have a simple activity that is launched and displays:
- The current server url being pointed to.
- Whether or not analytics is enabled.
Notice in the source code snippets that I am showing what source set each source file is located. This is very important because debug and release specific source sets are not created in the main source set folders.
MainApp
Source folder: /src/main/java/...
public class MainApp extends Application {
    private static Context sContext;

    @Override
    public void onCreate() {
        super.onCreate();
        sContext = getApplicationContext();
    }

    @NonNull
    public static Context getContext() {
        return sContext;
    }
}
MainActivity
Source folder: /src/main/java/...
public class MainActivity extends AppCompatActivity {
    @Override
    protected void onCreate(Bundle savedInstanceState) {
        super.onCreate(savedInstanceState);
        setContentView(R.layout.activity_main);

        TextView textView = (TextView) findViewById(R.id.main_text);

        // TODO: Ask something what our server url is
        String serverUrl = "";

        // TODO: Ask something whether analytics is enabled
        boolean isAnalyticsEnabled = false;

        StringBuilder sb = new StringBuilder("Server Url: ")
                .append(serverUrl)
                .append("\n")
                .append("Analytics enabled: ")
                .append(isAnalyticsEnabled);

        textView.setText(sb.toString());
    }
}
And the accompanying Android manifest would look like this:
AndroidManifest
<?xml version="1.0" encoding="utf-8"?>
<manifest
    xmlns:android="http://schemas.android.com/apk/res/android"
    package="io.github.marcelbraghetto.configula.mainapp">

    <application
        android:name=".MainApp"
        android:icon="@mipmap/ic_launcher"
        android:label="@string/app_name"
        android:theme="@style/AppTheme">

        <activity android:name=".MainActivity">
            <intent-filter>
                <action android:name="android.intent.action.MAIN" />
                <category android:name="android.intent.category.LAUNCHER" />
            </intent-filter>
        </activity>
    </application>
</manifest>
If you run the app now, it doesn’t really do anything useful. You would likely see something like this:
Server Url:
Analytics enabled: false
You may have noticed that we put some TODO comments into the MainActivity class - instead of hard coding the values for the server url and analytics enabled variables, we can create a special class that is implemented differently in debug builds versus release builds.
We’ll call this class AppConfig and its job is to answer questions about how the app is currently configured.
3. Release build implementation
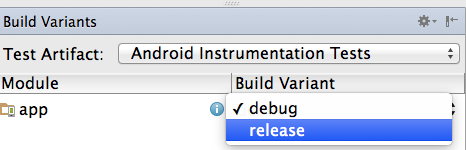
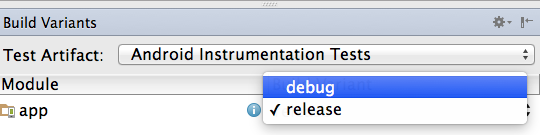
The release build type is easy to complete - as it will not need much else. First off, jump to the release build variant using the Build Variants dialog.
If you attempt to compile the app you will get an error message like this:
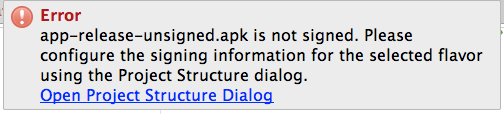
This is Android Studio’s way of telling us to setup a signing key for our release build. I’m not going to walk through the process of doing this - there is plenty of information on the web about it.
There is however a nifty shortcut we can use for demo projects which we’ll use here - just tell our release build to use the default debug signing configuration.
Edit your app Gradle file like so to do this (other default properties omitted for brevity):
...
android {
    ...
    buildTypes {
        debug { }

        // For this demo example, we will just let the release
        // build be signed with the default debug config.
        release {
            signingConfig signingConfigs.debug
        }
    }
}
...
You should now be able to successfully run the release build, which will simply be signed with the default debug configuration.
Now, we are going to implement the AppConfig class specifically for the release build.
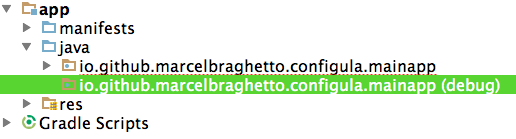
To write release specific Java, we need to create a new Java source folder that only gets compiled into release builds. There is a way to do this in the Android Studio IDE, but I find it is easy enough to do it by hand.
Open the src folder for your Android app in Terminal and enter the following command (you can also manually create the folders yourself if you like):
mkdir -p release/java/io/github/marcelbraghetto/configula/mainapp
This should create a new Java source folder that will be compiled into release builds.
In Android Studio, perform a Gradle Sync, then you should now see something similar to this:
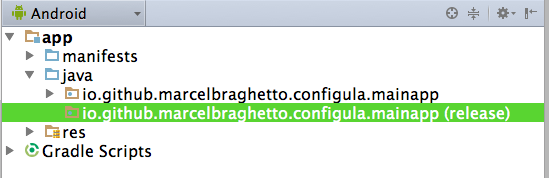
Fantastic, we now have a source set that will only be compiled in release builds. Note that you can do the same thing for Android resource folders, assets etc.
Now let’s create a new class in the release source sets named AppConfig. Make sure you add the new class to the release source set:
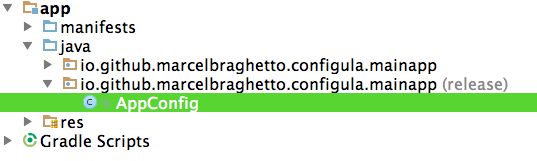
AppConfig (release)
Source folder: /src/release/java/...
public final class AppConfig {
    private AppConfig() { }

    /**
     * Always enable analytics for release builds.
     *
     * @return true always.
     */
    public static boolean isAnalyticsEnabled() {
        return true;
    }

    /**
     * Hard code the server url so it's
     * constant for release builds.
     *
     * @return server url.
     */
    @NonNull
    public static String getServerUrl() {
        return "https://www.google.com";
    }
}
With the AppConfig class now created, the MainActivity can be updated to call its methods to find out what the server url and analytics enabled configurations are:
MainActivity
...

String serverUrl = AppConfig.getServerUrl();
boolean isAnalyticsEnabled = AppConfig.isAnalyticsEnabled();

...
Now if you run your app in the release build variant, you will see something like this:
Server Url: https://www.google.com
Analytics enabled: true
That’s it for the release build.
4. Debug build implementation
Switch back to the debug build variant.
Oh dear, it looks like our debug build now has errors in it:
And in particular the MainActivity now can’t find the AppConfig class:

This is because once you create a class in a specific build variant that is used from classes in the main source set, the same class must exist in every other build variant.
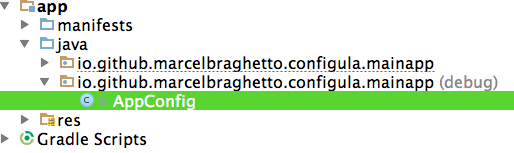
So the fix is that we need a new debug source set folder, and a debug implementation of the AppConfig class.
First off, create a new debug source folder - very similar to how we made the release source folder.
Open the src folder for your Android app in Terminal and enter the following command (you can also manually create the folders yourself if you like):
mkdir -p debug/java/io/github/marcelbraghetto/configula/mainapp
Back to Android Studio, you should now have a debug source set:
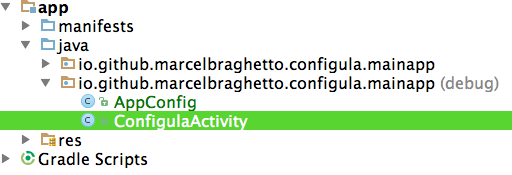
Create a new class named AppConfig in the debug source set:
Cool, now the debug implementation of the AppConfig is going to be quite different to the release implementation.
The debug implementation will:
- Allow the server url and analytics enabled properties to be set (unlike the release implementation).
- The properties that are set will be persisted into SharedPreferences so that they will be remembered between application bootups.
- When a property can’t be found in the persisted SharedPreferences, a default value is returned instead.
Here we go:
AppConfig (debug)
public class AppConfig {
    private static final String KEY_SERVER_URL = "server_url";
    private static final String KEY_ANALYTICS_ENABLED = "analytics_enabled";

    private static final String SERVER_URL_DEFAULT = "http://localhost";
    private static boolean ANALYTICS_ENABLED_DEFAULT = false;

    private AppConfig() { }

    private static SharedPreferences getSharedPreferences() {
        return MainApp.getContext().getSharedPreferences("configula", Context.MODE_PRIVATE);
    }

    /**
     * Accept and store the server url.
     *
     * @param serverUrl value to save.
     */
    public static void setServerUrl(@NonNull String serverUrl) {
        SharedPreferences.Editor editor = getSharedPreferences().edit();
        editor.putString(KEY_SERVER_URL, serverUrl);
        editor.commit();
    }

    /**
     * Accept and store the analytics enabled flag.
     *
     * @param analyticsEnabled value to save.
     */
    public static void setAnalyticsEnabled(boolean analyticsEnabled) {
        SharedPreferences.Editor editor = getSharedPreferences().edit();
        editor.putBoolean(KEY_ANALYTICS_ENABLED, analyticsEnabled);
        editor.commit();
    }

    /**
     * Retrieve the analytics enabled setting as it was saved
     * by Configula, or a default if not set.
     *
     * @return analytics enabled flag that was configured or default.
     */
    public static boolean isAnalyticsEnabled() {
        return getSharedPreferences().getBoolean(KEY_ANALYTICS_ENABLED, ANALYTICS_ENABLED_DEFAULT);
    }

    /**
     * Retrieve the server url as it was saved
     * by Configula, or a default if not set.
     *
     * @return server url that was configured or default.
     */
    @NonNull
    public static String getServerUrl() {
        return getSharedPreferences().getString(KEY_SERVER_URL, SERVER_URL_DEFAULT);
    }
}
With this implementation in place, you should be able to run the debug build again and see something like this:
Server Url: http://localhost
Analytics enabled: false
5. Configula activity to enable deep link launching
So, the final piece of the main application is to listen for external intents that are filtered to our app so we can receive configuration requests.
The implementation is almost the same as the blog post I wrote about using intent deep links.
What we need:
- An activity (let’s call it ConfigulaActivity) which is listed in the Android manifest with an appropriate intent filter to expose it to outside intents.
- The activity and it’s manifest declaraction must only exist in debug builds.
So, create a new class named ConfigulaActivity (you aren’t sick of the Dracula thing yet are you?):
Note: This class is never directly used by any Java code in the main source set, so we do not need to implement a release implementation of this class.
ConfigulaActivity (debug variant only)
public class ConfigulaActivity extends Activity {
    @Override
    protected void onCreate(Bundle savedInstanceState) {
        super.onCreate(savedInstanceState);

        // Grab the data from the intent used to launch this activity.
        Uri uri = Uri.parse(getIntent().getDataString());

        // Attempt to set app config server url to the 'serverUrl' data parameter.
        String serverUrl = uri.getQueryParameter("serverUrl");
        if(!TextUtils.isEmpty(serverUrl)) {
            AppConfig.setServerUrl(serverUrl);
        }

        // Attempt to set app config analytics enabled to the 'analyticsEnabled' data parameter.
        String analyticsEnabled = uri.getQueryParameter("analyticsEnabled");
        if (!TextUtils.isEmpty(analyticsEnabled)) {
            AppConfig.setAnalyticsEnabled(Boolean.valueOf(analyticsEnabled));
        }

        // Generate a new intent to relaunch our main activity fresh.
        Intent intent = new Intent(this, MainActivity.class);
        intent.addFlags(Intent.FLAG_ACTIVITY_NEW_TASK | Intent.FLAG_ACTIVITY_CLEAR_TASK);
        startActivity(intent);

        // Finish this activity as well.
        finish();
    }
}
Finally, we need to register the ConfigulaActivity in the manifest with the appropriate intent filters.
We’ll take advantage of the Android build system and the way it allows for overriding resources in build variants to add a debug manifest that only contains the declaration for the ConfigulaActivity and inherits all other properties from the main manifest.
Right click on the manifests folder in Android Studio and select the option shown below:
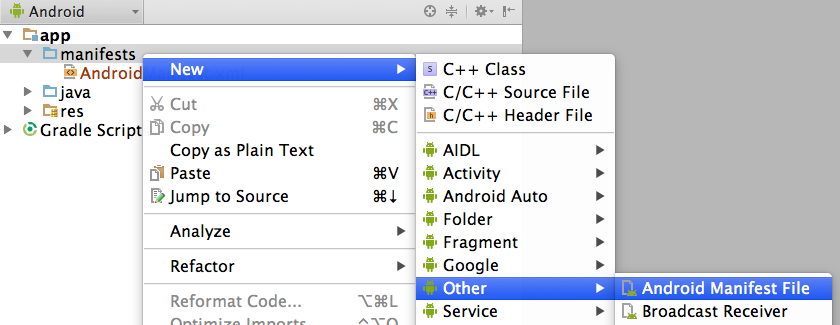
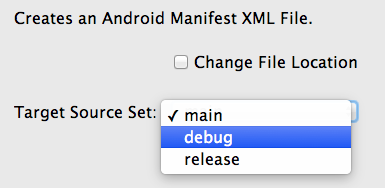
When asked what source set to create the manifest for, select debug:
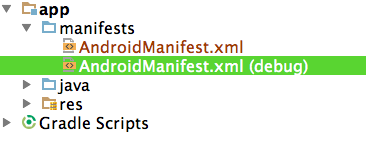
Perform a Gradle Sync and you should see a debug variant manifest:
Enter the following content into the new debug manifest:
<?xml version="1.0" encoding="utf-8"?>
<manifest
    xmlns:android="http://schemas.android.com/apk/res/android"
    package="io.github.marcelbraghetto.configula.mainapp">

    <!--
    Note that this manifest is only for the debug build
    variant and will not be compiled into a release build.
    -->
    <application>
        <!--
        This is our custom 'deep link' handling activity which will be
        able to receive the links and action them.
        -->
        <activity
            android:name=".ConfigulaActivity"
            android:exported="true">

            <intent-filter>
                <data
                    android:scheme="configula"
                    android:host="io.github.marcelbraghetto.configula.mainapp"
                    />

                <action android:name="android.intent.action.VIEW" />
                <category android:name="android.intent.category.DEFAULT" />
                <category android:name="android.intent.category.BROWSABLE" />
            </intent-filter>
        </activity>
    </application>
</manifest>
This will allow the ConfigulaActivity to respond to external intents that match it.
That’s it for the main application!
Technically you could deep link to it without doing anything else except putting a web link on a page that is formatted like this:
<a href="intent://io.github.marcelbraghetto.configula.mainapp?serverUrl=http:%3A%2F%2Flocalhost/configula&analyticsEnabled=true#Intent;scheme=configula;package=io.github.marcelbraghetto.configula.mainapp;S.browser_fallback_url=https%3A%2F%2Fio.github.marcelbraghetto;end">Tap me to launch directly into the Android app</a>
When launched from the example link above, the app would display:
Server Url: http://localhost/configula
Analytics enabled: true
But we were going to make an actual companion launcher app so let’s do it!
6. Configula launcher app
The Configula launcher app is surprisingly easy to create.
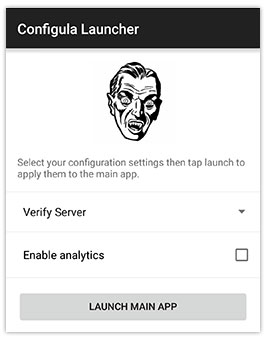
First, create a new Android application project and in the layout for the main activity place the following:
- A spinner which will display a list of servers.
- A collection of strings that represents the names of the servers.
- A collection of strings that represents the urls of the servers.
- A checkbox which can be toggled to turn analytics on or off.
- A launch button which will trigger the intent to launch the main application.
I’ll leave it up to you to come up with a stunning screen design - or you can just grab my sample code from Github.
For this example, we can define the collections of server names and urls in the strings resource:
<resources>
    <string name="app_name">Configula Launcher</string>

    <string name="intro">Select your configuration settings then tap launch to apply them to the main app.</string>
    <string name="launch">Launch main app</string>

    <string name="no_intent_activity">You don\'t have the main app installed, or it is a RELEASE build!</string>

    <string name="enable_analytics">Enable analytics</string>

    <!--
    Declare the names to display in the list
    of servers to choose from - note this must
    have the same number of items as the 'server_urls'
    string array so they can be keyed together.
    -->
    <string-array name="server_names">
        <item>Development Server</item>
        <item>Test Server</item>
        <item>Verify Server</item>
        <item>Production Server</item>
    </string-array>

    <!--
    Define the server urls for each of the servers
    in the 'server_names' array.
    -->
    <string-array name="server_urls">
        <item>http://localhost/dev_server</item>
        <item>http://localhost/test_server</item>
        <item>http://localhost/verify_server</item>
        <item>http://localhost/production_server</item>
    </string-array>
</resources>
Then basically all we have to do is check which options the user selects in the main Configula activity and construct an appropriate intent to launch the main application.
MainActivity
public class MainActivity extends AppCompatActivity {
    private CheckBox mAnalyticsCheckbox;
    private Spinner mServerSpinner;

    @Override
    protected void onCreate(Bundle savedInstanceState) {
        super.onCreate(savedInstanceState);
        setContentView(R.layout.activity_main);

        mAnalyticsCheckbox = (CheckBox) findViewById(R.id.analytics_checkbox);
        mServerSpinner = (Spinner) findViewById(R.id.server_spinner);

        findViewById(R.id.launch_button).setOnClickListener(new View.OnClickListener() {
            @Override
            public void onClick(View v) {
                String serverUrl = getResources().getStringArray(R.array.server_urls)[mServerSpinner.getSelectedItemPosition()];
                boolean analyticsEnabled = mAnalyticsCheckbox.isChecked();

                // Construct the data URI that will be in the launch intent.
                Uri dataUri = new Uri.Builder()
                        .scheme("configula")
                        .authority("io.github.marcelbraghetto.configula.mainapp")
                        .appendQueryParameter("serverUrl", serverUrl)
                        .appendQueryParameter("analyticsEnabled", analyticsEnabled ? "true" : "false")
                        .build();

                Intent intent = new Intent(Intent.ACTION_VIEW);
                intent.setData(dataUri);

                // See if there is something that can handle our intent.
                // In particular, if our main app is not installed OR
                // it is installed as a RELEASE build, then there will
                // be no activity that can launch the intent.
                if (intent.resolveActivity(getPackageManager()) == null) {
                    Toast.makeText(MainActivity.this, getString(R.string.no_intent_activity), Toast.LENGTH_LONG).show();
                } else {
                    startActivity(intent);
                }
            }
        });
    }
}
That’s pretty much it… not too painful. The important things to note are:
- The Uri that is constructed must have the same scheme and authority as the intent filters of the ConfigulaActivity within the main application - otherwise the intent will fail to resolve.
- Before starting the intent - you should check to make sure there is an activity registered somewhere that is able to handle it. For this example, if the main application has never been installed, OR if it is installed but as a release build, then the intent will fail to resolve.
Try out the Configula app by selecting some options and pressing the launch button. If you are running a debug build of your main application, you should see it open with the configuration settings you selected!
Further ideas:
- There is no reason why the Configula launcher needs to be a native application - you could easily host a web page with the deep hyperlinks embedded with configuration parameters and browse to it on a test device.
- The Configula launcher app could be smartened up to retrieve configuration settings from a server, or to manage multiple applications via differing intent filtering.
.:: END ::.
