a-simple-triangle / Part 2 - Setup console app
Marcel Braghetto 2 March 2019
In this article we are going to start building the foundation of our engine.
Note: This article is quite long because we will be doing some automated foundational setup stuff before we start to actually write any code. The extra effort to automate our setup work will pay off when introducing the other platform targets later.
We will begin with our first target platform - a MacOS console application. We will use CMake as the build tool to define and compile our program using the Clang compiler that gets installed alongside Xcode (which is why we needed to install Xcode and its command line tools in the last article). The console application will give us a nice quick application to do our development and iteration on without being burdened with having to deploy to a device such as a phone or simulator.
Although we could just open the Xcode IDE and create a MacOS console application, I am instead choosing to use only command line tools and shell scripts. I took this approach because I wanted to be able to do all my code editing and debugging in one consistent way (later we’ll setup Visual Studio Code for this purpose), rather than having to hop between different IDEs and tooling on the same code base. Also by doing this stuff on the command line it forced me to learn about CMake and how to compile and link C++ code more than I might have if I used a tool like Xcode which hides a lot of that away. In addition, the Android platform uses CMake by default, and our Emscripten platform will too, so we might as well jump in the deep end as early as possible!
For our console application, we’ll need the following tools and libraries:
Xcode and its command line tools.Homebrew.wget to allow our shell scripts to download files from the Internet.CMake which will be the build tool we will use for the console application.Ninja which is a build system to supplement CMake.SDL2 source code and prebuilt MacOS framework.Visual Studio Code.
Make sure you have completed the setup described in the Basic dev setup section in Part 01: Introduction of this series, after which you should have Xcode and its command line tools and Homebrew installed on your Mac.
Workspace folder and setup scripts
Create yourself a folder to work in, I’ll refer to this folder as root from now on. Under the root create a folder named project then within that create a folder named console:
Note: The code samples in GitHub will name their project folder after the article they are for instead of project, but it works the same way.
: root
  + project
    + console
Each of our target platforms will have dependencies that need to be downloaded and configured. Instead of manually (and tediously!) downloading each dependency and configuring them by hand, we will instead write some shell scripts to automate doing these things.
Since many of our targets will have the same sets of dependencies, we will make a small collection of shared scripts that we can include to help avoid duplicated code.
Create a new text file named shared-scripts.sh in the project folder:
: root
  + project
    + console
    shared-scripts.sh
Open the root/project folder in Terminal and add the executable permission to our shell script:
chmod +x shared-scripts.sh
Since pretty much all of our target platforms will need to install something from Homebrew, it would make sense that the first bit of shared code we need is a method that can download Homebrew programs and install them. Open the shared-scripts.sh file in a text editor of your choice and enter the following code:
#!/bin/bash

# Given the name of a Homebrew formula, check if its installed and if not, install it.
fetch_brew_dependency() {
    FORMULA_NAME=$1

    echo "Fetching Brew dependency: '$FORMULA_NAME'."

    if brew ls --versions $FORMULA_NAME > /dev/null; then
        echo "Dependency '$FORMULA_NAME' is already installed, continuing ..."
    else
        echo "Dependency '$FORMULA_NAME' is not installed, installing via Homebrew ..."
        brew install $FORMULA_NAME
    fi
}
Ok cool, so we have our shared script file, next we’ll create a setup script for our console platform target.
- Create a new text file named
setup.sh in the root/project/console folder.
- Similar to what we did to the shared script file, give the new
setup.sh file executable permission: chmod +x setup.sh.
- Open
setup.sh in a text editor and enter the code below.
#!/bin/bash

# Include the shared scripts from the parent folder.
. ../shared-scripts.sh

# Ask Homebrew to fetch our required programs
fetch_brew_dependency "wget"
fetch_brew_dependency "cmake"
fetch_brew_dependency "ninja"
As you can see in our setup.sh script, we are including the code from the shared-scripts.sh file. This gives us access to the methods in the shared scripts, specifically in this case the fetch_brew_dependency method. We then call the fetch_brew_dependency method for each program we would like to install, in this case wget, cmake and ninja.
Save your setup.sh file, then try it out in Terminal. You should see some kind of output similar to this:
$ ./setup.sh
Fetching Brew dependency: 'wget'.
Dependency 'wget' is not installed, installing via Homebrew ...
Updating Homebrew...
==> Downloading https://homebrew.bintray.com/bottles/wget-1.20.1_4.mojave.bottle.tar.gz
==> Pouring wget-1.20.1_4.mojave.bottle.tar.gz
🍺  /usr/local/Cellar/wget/1.20.1_4: 49 files, 3.9MB
Fetching Brew dependency: 'cmake'.
Dependency 'cmake' is not installed, installing via Homebrew ...
==> Downloading https://homebrew.bintray.com/bottles/cmake-3.13.4.mojave.bottle.tar.gz
==> Pouring cmake-3.13.4.mojave.bottle.tar.gz
==> Summary
🍺  /usr/local/Cellar/cmake/3.13.4: 5,543 files, 50.4MB
Fetching Brew dependency: 'ninja'.
Dependency 'ninja' is not installed, installing via Homebrew ...
Updating Homebrew...
==> Downloading https://homebrew.bintray.com/bottles/ninja-1.9.0.mojave.bottle.tar.gz
==> Pouring ninja-1.9.0.mojave.bottle.tar.gz
==> Summary
🍺  /usr/local/Cellar/ninja/1.9.0: 7 files, 275.8KB
Neat huh? Now run ./setup.sh again and you can observe the behaviour if our dependencies had already been installed. The output would look something similar to:
$ ./setup.sh
Fetching Brew dependency: 'wget'.
Dependency 'wget' is already installed, continuing ...
Fetching Brew dependency: 'cmake'.
Dependency 'cmake' is already installed, continuing ...
Fetching Brew dependency: 'ninja'.
Dependency 'ninja' is already installed, continuing ...
This should highlight that by automating our setup scripts we can simply run them repeatedly as many times as we like and they will only do work if required. This will be very useful as we add more automated scripts.
Note: This kind of automation is very helpful if you want to be able to build your project through a continuous integration system.
SDL2
We will be using the SDL2 library to give us some core building blocks such as window management and input event processing. All of our platform targets will need to use SDL2, but may need to consume it in different ways. For our console platform target we will take the following approach:
-
Download the source code version of SDL2 into a third-party folder and use it as a source folder for the SDL2 header files in our C++ code. This is the contents of the .zip file under the Source Code section at https://www.libsdl.org/download-2.0.php.
-
Download and link the prebuilt SDL2 MacOS framework. This is the framework that is inside the .dmg file under the Mac OS X Runtime Binaries section at https://www.libsdl.org/download-2.0.php.
So how will we automate getting the source code with our setup script?
- Check if we already have the SDL2 library in the
third-party folder.
- If not, create a
third-party folder if it doesn’t exist, then:
- Use
wget to download the .zip file from the SDL2 download page.
- Unzip the
.zip file into a third-party folder.
- Rename the unzipped folder from
SDL2-2.0.9 to SDL.
- Clean up by deleting the
.zip file.
Because most of our platform targets will need to setup SDL2, this is another great candidate to put into our shared-scripts.sh file. Open the shared-scripts.sh file again and add the following new methods to it:
# If nothing has created the third-party folder yet, then we'll create it.
verify_third_party_folder_exists() {
    # Navigate into the 'root' folder from our current location.
    pushd ../../
        # Check if there is no third-party folder ...
        if [ ! -d "third-party" ]; then
            # ... and if there isn't, create it.
            mkdir third-party
        fi
    popd
}

# If required, download the SDL library source into the third-party folder.
fetch_third_party_lib_sdl() {
    # Make sure we actually have a third-party folder first.
    verify_third_party_folder_exists

    # Navigate into the third-party folder two levels below us.
    pushd ../../third-party
        # Check to see if there is not yet an SDL folder.
        if [ ! -d "SDL" ]; then
            echo "Fetching SDL (SDL2: 2.0.9) ..."

            # Download the SDL2 source zip file
            wget https://www.libsdl.org/release/SDL2-2.0.9.zip

            # Unzip the file into the current folder
            unzip -q SDL2-2.0.9.zip

            # Rename the SDL2-2.0.9 folder to SDL
            mv SDL2-2.0.9 SDL

            # Clean up by deleting the zip file that we downloaded.
            rm SDL2-2.0.9.zip
        else
            echo "SDL library already exists in third party folder."
        fi
    popd
}
The first method verify_third_party_folder_exists simply makes sure that there actually is a third-party folder and if not, creates one.
The second method fetch_third_party_lib_sdl performs the steps that were described above to fetch the source code version of SDL2.
Note: We will make use of the pushd and popd commands which allow us to push into a directory and pop out of that directory as needed. This can help to make scripts clearer about what directory they are running in.
Save the shared-scripts.sh file and re-open your setup.sh file again. Add the following line after the fetch_brew_dependency lines:
fetch_third_party_lib_sdl
Save your file, then run it in Terminal, and you should see something similar to this (I’ve snipped a bit of the output for brevity):
$ ./setup.sh
Fetching Brew dependency: 'wget'.
Dependency 'wget' is already installed, continuing ...
Fetching Brew dependency: 'cmake'.
Dependency 'cmake' is already installed, continuing ...
Fetching Brew dependency: 'ninja'.
Dependency 'ninja' is already installed, continuing ...
Fetching SDL (SDL2: 2.0.9) ...
Connecting to www.libsdl.org (www.libsdl.org)|192.241.223.99|:443... connected.
HTTP request sent, awaiting response... 200 OK
Length: 6257712 (6.0M) [application/zip]
Saving to: ‘SDL2-2.0.9.zip’

SDL2-2.0.9.zip      100%[===================>]   5.97M  2.97MB/s    in 2.0s

(2.97 MB/s) - ‘SDL2-2.0.9.zip’ saved [6257712/6257712]
Similarly to before, if we re-run this script you will see it doesn’t download SDL2 again because it has checked if it already exists:
$ ./setup.sh
Fetching Brew dependency: 'wget'.
Dependency 'wget' is already installed, continuing ...
Fetching Brew dependency: 'cmake'.
Dependency 'cmake' is already installed, continuing ...
Fetching Brew dependency: 'ninja'.
Dependency 'ninja' is already installed, continuing ...
SDL library already exists in third party folder.
Note: We are saving SDL2 into a folder named SDL deliberately, as there are other libraries we will fetch later on that will expect to find it in this folder.
If you have a look at your file system now you will notice that a new third-party folder has appeared, and within it a new SDL folder which contains the source code version of SDL2:
: root
  + project
    + console
    shared-scripts.sh
  + third-party
    + SDL
Next we will need to fetch the prebuilt MacOS SDL2 framework. For the frameworks, we will download and store them in a folder named Frameworks directly underneath the root/project/console folder, rather than in the root/third-party folder. The steps to do this are:
- Check if we already have the
SDL2.framework in the root/project/console/Frameworks folder.
- If not, create the
Frameworks folder if it doesn’t exist, then:
- Use
wget to download the .dmg file from the SDL2 download page.
- Mount the
.dmg file so it becomes available in the file system.
- Copy the
SDL2.framework from the mounted file system into the Frameworks folder.
- Unmount the
.dmg file.
- Delete the
.dmg file.
- Codesign the framework - this is required for it to be allowed to be used when Xcode tooling tries to link against it.
We will have at least one other target (MacOS desktop application) that will also need to download this prebuilt framework, so we’ll add some more methods to our shared-scripts.sh file:
# If nothing has created the Frameworks folder yet, then we'll create it.
verify_frameworks_folder_exists() {
    # Check if the Frameworks folder exists ...
    if [ ! -d "Frameworks" ]; then
        # ... and if not, create it.
        mkdir Frameworks
    fi
}

# If required, download the SDL2 MacOS Framework into the Frameworks folder.
fetch_framework_sdl2() {
    # Make sure there is a Frameworks folder in the current directory.
    verify_frameworks_folder_exists

    # Navigate into the Frameworks folder
    pushd Frameworks
        # Check that there isn't already an SDL2.framework folder
        if [ ! -d "SDL2.framework" ]; then
            # Download the .dmg file from the SDL2 download site.
            wget https://www.libsdl.org/release/SDL2-2.0.9.dmg

            echo "Mounting DMG file ..."
            hdiutil attach SDL2-2.0.9.dmg

            echo "Copying SDL2.framework from DMG file into the current folder ..."
            cp -R /Volumes/SDL2/SDL2.framework .

            echo "Unmounting DMG file ..."
            hdiutil detach /Volumes/SDL2

            echo "Deleting DMG file ..."
            rm SDL2-2.0.9.dmg

            # Navigate into the SDL2.framework folder.
            pushd SDL2.framework
                echo "Code signing SDL2.framework ..."
                codesign -f -s - SDL2
            popd
        else
            echo "SDL2.framework already exists ..."
        fi
    popd
}
Save the shared-scripts.sh again, and edit your root/project/console/setup.sh file, adding the following line:
Save and run your setup.sh file again and you should see something similar to this:
$ ./setup.sh
Fetching Brew dependency: 'wget'.
Dependency 'wget' is already installed, continuing ...
Fetching Brew dependency: 'cmake'.
Dependency 'cmake' is already installed, continuing ...
Fetching Brew dependency: 'ninja'.
Dependency 'ninja' is already installed, continuing ...
SDL library already exists in third party folder.
Connecting to www.libsdl.org (www.libsdl.org)|192.241.223.99|:443... connected.
Saving to: ‘SDL2-2.0.9.dmg’

SDL2-2.0.9.dmg      100%[===================>] 994.32K   947KB/s    in 1.1s

Mounting DMG file ...
/dev/disk2          	GUID_partition_scheme
/dev/disk2s1        	Apple_HFS                      	/Volumes/SDL2
Copying SDL2.framework from DMG file into the current folder ...
Unmounting DMG file ...
"disk2" ejected.
Deleting DMG file ...
Code signing SDL2.framework ...
Also again, re-run the script and see that it doesn’t redownload the framework if it is already there:
$ ./setup.sh
Fetching Brew dependency: 'wget'.
Dependency 'wget' is already installed, continuing ...
Fetching Brew dependency: 'cmake'.
Dependency 'cmake' is already installed, continuing ...
Fetching Brew dependency: 'ninja'.
Dependency 'ninja' is already installed, continuing ...
SDL library already exists in third party folder.
SDL2.framework already exists ...
You will now see that there is a new Frameworks folder and within it a new SDL2.framework folder:
: root
  + project
    + console
      + Frameworks
        + SDL2.framework
    shared-scripts.sh
  + third-party
    + SDL
Still hanging in there? We’ll start writing some code soon enough - I promise!
Setup shared C++ code
The C++ code that we write should be shareable to all our platform targets. The code itself may need to be aware of different targets from time to time, but the majority of it should not need to know.
We will write our code in a folder named main, which each platform target can add as a reference for its compilation.
Create the new folders main/src under the root/project folder, then create a new text file named main.cpp under the main/src:
: root
  + project
    + main
      + src
        main.cpp
From this point, all of our shared C++ code will go under this main/src folder.
Edit the main.cpp file with any text editor and enter the following block of code that simply initialises the SDL library and exits:
#include <iostream>
#include <SDL.h>

int main(int, char* [])
{
    if (SDL_Init(SDL_INIT_VIDEO | SDL_INIT_EVENTS) == 0)
    {
        std::cout << "Successfully initialised SDL!" << std::endl;
        SDL_Quit();
    }
    else
    {
        std::cout << "Failed to initialise SDL!" << std::endl;
    }

    return 0;
}
The code we’ve just written needs to be associated with our console platform target so it knows to compile it. To do this, we are going to use CMake. Before writing this series of articles I only had a very basic understanding of CMake and I’ll go on record now and state that I am not an expert with it. However, I’ve learned enough to understand how to setup basic projects with it, which is what we will do now.
To build a target using CMake, we need to create a definition that the CMake tools will process that tells it things like what source code to compile, where to find header files, where to find libraries to link to and what command line arguments should be used when compiling code. This definition is written in a file named CMakeLists.txt.
Create a new text file named CMakeLists.txt in the root/project/console folder:
: root
  + project
    + console
      CMakeLists.txt
Let’s walk through step by step what to enter into the CMakeLists.txt file:
Declare what the minimum version of the CMake tool is that is needed to build the target:
cmake_minimum_required(VERSION 3.4.1)
Declare any build arguments that should be applied for the target. For our C++ code we will be compiling against the C++17 version of the language and we will be using C++ exceptions.
set(CMAKE_CXX_FLAGS "${CMAKE_CXX_FLAGS} -std=c++17 -fexceptions")
Next we can declare some build properties to avoid having to repeat ourselves in our build script. In this case, we’ll create custom properties named THIRD_PARTY_DIR and MAIN_SOURCE_DIR:
set(THIRD_PARTY_DIR "../../third-party")
set(MAIN_SOURCE_DIR "../main/src")
We would like to tell CMake to put the build outputs into a folder named out relative to the current folder:
set(CMAKE_RUNTIME_OUTPUT_DIRECTORY ${CMAKE_CURRENT_SOURCE_DIR}/out)
We need to tell CMake where to find any third party, or system header files needed by our code. For now, we will include the header files that were downloaded with the SDL2 source code library.
include_directories(${THIRD_PARTY_DIR}/SDL/include)
We now need to collate a list of source code files to compile as part of building our target. There are a couple of ways to do this but for now we’ll take a simple approach and use the GLOB_RECURSE wildcard mechanism to include all files of a .hpp and .cpp file type that can be found under our shared main/src folder.
Note: The names CPP_HEADERS and CPP_SOURCES can be whatever you like - they are not built in CMake keywords, they are for our own use later in the build script.
file(GLOB_RECURSE CPP_HEADERS ${MAIN_SOURCE_DIR}/*.hpp)
file(GLOB_RECURSE CPP_SOURCES ${MAIN_SOURCE_DIR}/*.cpp)
Its worth mentioning that the alternate approach to the wildcard mechanism is to explicitly add file by file each header and source file one at a time, meaning that any new file created would require an edit of the CMakeLists.txt file. To keep things simple for now, we’ll keep the wildcard approach, though some practitioners would prefer the explicit approach.
The next step is to define an actual executable entity that CMake should produce. We will compile our code into a console application executable named a-simple-triangle-console, so we need to setup a definition for that executable like this:
add_executable(
    a-simple-triangle-console
    ${CPP_HEADERS}
    ${CPP_SOURCES}
)
You can see that the add_executable command takes the name of the executable as its first parameter (a-simple-triangle-console) followed by the list of C++ headers and source files that should be compiled into the executable, which is where we’ve used the CPP_HEADERS and CPP_SOURCES properties from the previous step.
After defining the executable, we need to set a few linker properties on it so it knows how to attach frameworks or other things to itself:
set_target_properties(
    a-simple-triangle-console
    PROPERTIES
    LINK_FLAGS
    "-F../Frameworks -framework SDL2 -framework OpenGL"
)
So, for the set_target_properties command, we first tell it what target to set properties for (a-simple-triangle-console), followed by what we are setting (PROPERTIES), followed by what kind of properties (LINK_FLAGS), followed by the actual properties themselves.
In this target, we are setting the -F flag which tells our executable what frameworks path to look into when linking custom frameworks, followed by -framework SDL2 which will cause it to look for a framework named SDL2 in the frameworks path, followed by -framework OpenGL which exists on the Mac at a system level (we don’t need to put the OpenGL framework into our local Frameworks folder).
Later on we will be adding other frameworks which will require us to come back to this file and make updates.
Save the file and it should look like this:
cmake_minimum_required(VERSION 3.4.1)

set(CMAKE_CXX_FLAGS "${CMAKE_CXX_FLAGS} -std=c++17 -fexceptions")

set(THIRD_PARTY_DIR "../../third-party")
set(MAIN_SOURCE_DIR "../main/src")
set(CMAKE_RUNTIME_OUTPUT_DIRECTORY ${CMAKE_CURRENT_SOURCE_DIR}/out)

include_directories(${THIRD_PARTY_DIR}/SDL/include)

file(GLOB_RECURSE CPP_HEADERS ${MAIN_SOURCE_DIR}/*.hpp)
file(GLOB_RECURSE CPP_SOURCES ${MAIN_SOURCE_DIR}/*.cpp)

add_executable(
    a-simple-triangle-console
    ${CPP_HEADERS}
    ${CPP_SOURCES}
)

set_target_properties(
    a-simple-triangle-console
    PROPERTIES
    LINK_FLAGS
    "-F../Frameworks -framework SDL2 -framework OpenGL"
)
Building the console application
Building a CMake project is done by:
- Creating a
build folder if it doesn’t exist in the same folder as the CMakeLists.txt file.
- Navigating into the
build folder via Terminal.
- Running the following command to get CMake to configure the project ready for building:
cmake -G Ninja .., this asks CMake to look in the parent folder for a CMakeLists.txt file, and use the CMake generator Ninja (which we installed via Homebrew earlier). Strictly speaking, Ninja is not required but it will help with our build times.
- Running the
ninja command to start performing the actual build (if you weren’t using Ninja, you would invoke make instead).
When the build has completed, we would expect to see a new file named a-simple-triangle-console in the out folder (because we told CMake to put its build output into the out folder).
It would be pretty annoying to have to type all this stuff in by hand every time we want to do a build, so … I smell a new shell script!
Create a new text file named build.sh in the root/project/console folder, and mark it as executable (chmod +x build.sh):
: root
  + project
    + console
      build.sh
      CMakeLists.txt
There will be other targets that need to do CMake builds too, so let’s add a new method into our shared-scripts.sh file to create a build folder if it doesn’t exist:
verify_build_folder_exists() {
    echo "Checking for build folder ..."
    if [ ! -d "build" ]; then
        mkdir build
    fi
}
Now, edit the new root/project/console/build.sh file and enter the following:
#!/bin/bash

# Include our shared scripts
. ../shared-scripts.sh

# Check that there is a build folder here.
verify_build_folder_exists

# Navigate into the build folder
pushd build
    # Request that CMake configure itself based on what it finds in the parent folder.
    echo "Configuring CMake with Ninja ..."
    cmake -G Ninja ..

    # Start the build process.
    echo "Building project with Ninja ..."
    ninja
popd
Sweet, so we should now be able to run our new build.sh in Terminal and if everything is OK, CMake will build and produce our console application (I’ve trimmed the output for brevity):
$ ./build.sh
Checking for build folder ...
Configuring CMake with Ninja ...
-- Configuring done
-- Generating done
-- Build files have been written to: <snip>/console/build
Building project with Ninja ...
[2/2] Linking CXX executable ../out/a-simple-triangle-console
Fixing the framework path error
If you look at your file system, you will find that there is now an out folder containing an executable named a-simple-triangle-console.
Navigate into the out folder and run the new executable - you will get an error like this:
$ ./a-simple-triangle-console
dyld: Library not loaded: @rpath/SDL2.framework/Versions/A/SDL2
  Referenced from: <snip>/a-simple-triangle-console
  Reason: image not found
Abort trap: 6
This rather cryptic message is telling us that the executable wants to load the SDL2 framework, but it doesn’t know how to locate it. The reason is that the @rpath you can see is not defined in our executable. Run the following command in the same folder:
$ otool -L a-simple-triangle-console
a-simple-triangle-console:
	@rpath/SDL2.framework/Versions/A/SDL2 (compatibility version 1.0.0, current version 10.0.0)
	/System/Library/Frameworks/OpenGL.framework/Versions/A/OpenGL (compatibility version 1.0.0, current version 1.0.0)
	/usr/lib/libc++.1.dylib (compatibility version 1.0.0, current version 400.9.4)
	/usr/lib/libSystem.B.dylib (compatibility version 1.0.0, current version 1252.200.5)
The otool command lets us see all kinds of information about an executable, the -L argument shows us the list of libraries the executable needs to be able to run. You can see that it is using OpenGL, libc++, libSystem but the interesting one is the @rpath/SDL2.framework.....
Eugh.. what to do then … well, there is something we can do. We will update our executable after it is generated to tell it where to look if it encounters any @rpath libraries - specifically we will tell it to look in our Frameworks folder. Each time we perform a build we will need to do this, so as usual, let’s automate it!
Go to the root/project/console folder and make a new text file named cmake-post-build.sh. Give it executable permission as normal (chmod +x cmake-post-build.sh). Enter the following script and save it:
#!/bin/bash

echo "Adding Frameworks @rpath to binary ..."
install_name_tool -add_rpath @loader_path/../Frameworks out/a-simple-triangle-console
The install_name_tool lets us change characteristics of an executable file. In this case we are adding an rpath with -add_rpath and tell it to look at the path the executable loaded from, into the Frameworks folder in the parent folder.
Save and close that file, then re-open the CMakeLists.txt file again. In CMake files we can attach commands that should be run at different points in the build. What we need to do is add a command that should be run post build, which will run the cmake-post-build.sh script we just created.
Add to the bottom of the CMakeLists.txt file the following:
add_custom_command(
    TARGET a-simple-triangle-console
    POST_BUILD
    WORKING_DIRECTORY ${PROJECT_SOURCE_DIR}
    COMMAND ./cmake-post-build.sh
)
The add_custom_command takes the target to apply the command on (for us its the a-simple-triangle-console target), followed by when this command should run (POST_BUILD), followed by what directory to consider the ‘working directory’, followed by the command, which in this case is ./cmake-post-build.sh meaning it will execute that shell script.
Save the CMakeLists.txt file again, and re-run the build.sh script. When the build has completed again, navigate into the out folder and re-run the console application:
$ ./a-simple-triangle-console
Successfully initialised SDL!
The console application works this time because after the build had completed it ran our cmake-post-build.sh script - correcting the @rpath problem for us in the executable.
Hooray! We’ve just created our console application, using CMake, linked to the SDL2 framework and compiled from our shared set of C++ source code.
Give yourself a pat on the back for suffering through this far!
Now is a good time to start using an IDE for our code editing instead of <insert whatever random text editor you’ve been using so far>, so we can start growing our C++ implementation and debug our code.
Setup Visual Studio Code
It’s probably worth explaining why I’ve chosen to use Visual Studio Code - after all on the Mac we have access to tools like Xcode and Android Studio which are both capable of authoring C++ (and no doubt other tools too). I have found that as I was writing my own C++ projects using both Xcode and Android Studio, I felt that neither of them gave me the sort of ‘agnostic’ experience I wanted when writing a shared code base. Of course since I’m not using Microsoft Windows I can’t use the proper Visual Studio IDE (otherwise I would use that) so I looked at what else was available for Mac.
I decided to try out Microsoft’s Visual Studio Code offering and found that while it is certainly not perfect, it felt like a pleasant, neutral option - giving me a consistent cross platform authoring experience especially for debugging and code formatting (which is radically different by default between IDEs) and avoided what I felt was unnecessary context switching between tools for the same code.
We won’t automate installing Visual Studio Code because once we have created the necessary configuration files for using it with our code base, we would typically commit those configuration files into source control alongside the rest of the project files as they are not something that should really be dynamically generated on demand. So hop on over to the Microsoft Visual Studio Code site and download / install the Mac version manually.
Once you’ve installed it, open it up and install the following extensions (press the small cog icon in the bottom left of the screen and choose Extensions):
- C/C++ (Microsoft)
- CMake Tools (vector-of-bool)
- CMake (twxs)
As an optional extra, I’ve grown quite fond of the Panda Theme extension for syntax highlighting but you don’t need to install it if you don’t want to.
Creating a new Visual Studio Code workspace
- Open
Visual Studio Code and select File -> Add Folder to Workspace..
- Browse to your
root/project/console folder and select it.
- Because we have a
CMakeLists.txt file in the folder, the IDE will automatically know that its a CMake project and we will be prompted to Select a Kit. Select the Clang 10.0.0 (or some version of Clang) option.
- You may be prompted with a question
CMake Tools would like to configure Intellisense for this folder - select Allow.
We can now save our IDE state into a new workspace file so later on we can re-open it again.
- Navigate to
File -> Save Workspace As...
- Make sure the
root/project folder is selected as the place to save the workspace and set the name of the workspace to be a-simple-triangle.code-workspace.
- Select
Save.
After those steps are complete, you should see the workspace looking a bit like this:
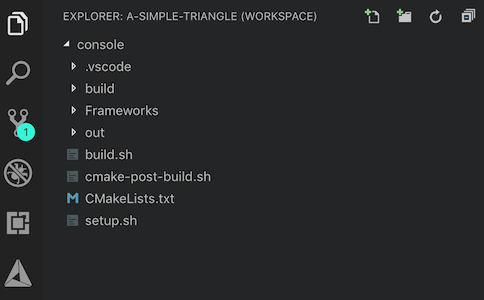
Expand the console/.vscode folder in the EXPLORER panel and open the settings.json file in there. It should look approximately similar to this:
{
    "C_Cpp.default.configurationProvider": "vector-of-bool.cmake-tools",
    "C_Cpp.configurationWarnings": "Disabled"
}
Update the settings.json to look like this, to tell the CMake extension to use the Ninja generator for our builds:
{
    "C_Cpp.default.configurationProvider": "vector-of-bool.cmake-tools",
    "cmake.generator": "Ninja",
    "C_Cpp.configurationWarnings": "Disabled"
}
Close the settings.json file again.
Select the icon on the left that looks like a triangle (its the CMake logo) and you should see a view like this:

The CMake extension has kindly given us a project view that was generated by parsing our CMakeLists.txt file. In addition, it has parsed the rules of the CMakeLists.txt file to respect things like the include directories to find header files.
Press the hammer icon and the same sort of build that we coded into the build.sh script will happen directly inside Visual Studio Code. Try it out now and watch the OUTPUT window in Visual Studio. Even our cmake-post-build.sh script ran just as before - because we included it in the CMakeLists.txt script.
Note: at this stage the hammer icon is not actually running our build.sh script but it is performing the same kind of steps automatically via the CMake extension. It is however running our cmake-post-build.sh script because that was defined at the CMake level in the CMakeLists.txt file.
Visual Studio Code housekeeping
Before writing more code, lets configure how we want to auto format our C++ code. Of course you are welcome to format your C++ code however you please, but the style I’m going to be using is based off the following Clang formatting rules:
{ BasedOnStyle: LLVM, AccessModifierOffset: -4, DerivePointerAlignment: false, PointerAlignment: Left, UseTab: Never, IndentWidth: 4, BreakBeforeBraces: Allman, AllowShortIfStatementsOnASingleLine: false, IndentCaseLabels: true, ColumnLimit: 0, TabWidth: 4, NamespaceIndentation: All }
To apply these rules to our workspace:
- Select the rule definition above and copy it to your clipboard.
- Go to
Code -> Preferences -> Settings and switch to the Workspace Settings tab.
- Expand the
Extensions -> C/C++ section.
- Find the
C_Cpp: Clang_format_style input field and paste the rule from your clipboard.
- Close the settings.
From now on, when you apply formatting to your code (default hotkey is SHIFT + OPTION + F) it will apply this rule. Get in the habit of auto formatting your code as you write it.
Debugging our code
We can run our program from Visual Studio Code in debug mode, allowing us to place break points to inspect our code at runtime. We will need to make a couple of adjustments to enable debugging for our workspace to do this.
Press the Debug icon on the left (it looks like a bug underneath the universal ‘no’ symbol). Notice that we have No Configurations.

- Tap the drop down box with
No Configurations in it, and select Add Config (console) ....
- Select
C++ (GDB/LLDB).
A new file named launch.json will be created, which defines how our console application should be started in order to debug it.
Replace the content of the launch.json file with the following:
{
    "version": "0.2.0",
    "configurations": [
        {
            "name": "(lldb) Launch",
            "type": "cppdbg",
            "request": "launch",
            "program": "${workspaceFolder}/out/a-simple-triangle-console",
            "args": [],
            "stopAtEntry": false,
            "cwd": "${workspaceFolder}",
            "environment": [],
            "externalConsole": false,
            "MIMode": "lldb",
            "preLaunchTask": "build"
        }
    ]
}
Some of the important parts are:
program: this tells the debugger which program to attach to, it should be our console application executable file.externalConsole: keep this as false otherwise a new Terminal window will appear every time you run it.preLaunchTask: this causes a task to be run before attempting to debug. We need to build our code before debugging it, so we will invoke a task named build to do this.
Note: There is no such task named build yet - we’ll make it soon.
After saving the launch.json file you will see the IDE update to look like this:
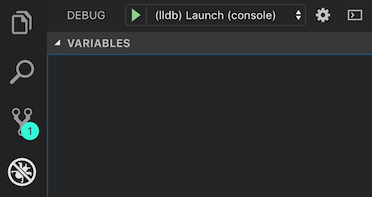
Press the green play button in the debug panel and you will be stopped with an alert dialog like this:

- Select the
Configure Task button so we can create a build task.
- Select the
Create tasks.json file from template option in the drop down list that appears.
- Select
Others from the next drop down list.
You will be presented with a new tasks.json file. This is a place where you can declare all kinds of tasks that might need to run in your Visual Studio Code system. We only care about having a build task. Update the default tasks.json to look like this:
{
    "version": "2.0.0",
    "tasks": [
        {
            "label": "build",
            "type": "shell",
            "command": "./build.sh"
        }
    ]
}
Important bits:
- The
label is how other parts of the build system (such as the launch.json configuration) can trigger this task.
- The
type for us is shell because we want to run a shell script when this task is invoked.
- The
command is exactly what shell script should run. Since we already created a build.sh file earlier in this article, we will just run that to perform our build.
Now if you save and close tasks.json and re-run the debugger, a build should be caused and you will see some DEBUG CONSOLE output noise. Of course, we don’t have any breakpoints in our C++ code yet so the debugger didn’t have any reason to stop while our application was running.
Note: the first time you run the debugger you might get an alert prompt warning you that a process is trying to attach itself to the console application. This is normal, just select Take Control to let the debugger attach itself to our running application.
Let’s add a variable into our C++ code and set a breakpoint to see what it does when we run again. Edit main.cpp and make it look like this (the red dot is a breakpoint - click in the gutter to add or remove them):
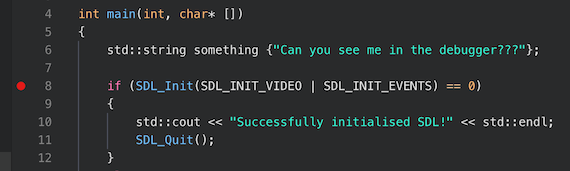
Debug your program again and this time you will find it has stopped (hopefully!) at your breakpoint.

The points of interest to note here are:
- The execution has stopped on line 8 because thats where our breakpoint was set.
- On the left hand side we can see in the
VARIABLES panel the variable something and its value being printed out.
- Toward the top is a small control panel that allows you to control the debugger.
- There is a
WATCH panel where you can add expressions to see changes in variables as you debug.
The fun part, let’s show an OpenGL window
If you are still reading this article, I applaud you! Its pretty dense material and although I could have taken some shortcuts in explaining what to do, I hope that by not doing that you were able understand the why as well as the how.
Let’s wrap up this article by getting an actual window open on our screen running OpenGL.
We will re-craft some of this code later and break it up into pieces but for now we can get at least some bootstrap code into our main.cpp class to show off our new window. Open the main.cpp class again (from now on, do this inside Visual Studio Code).
Add the following includes at the top of the file to allow us to use OpenGL syntax and to ignore the Apple warnings about OpenGL APIs having been deprecated (yes Apple we know, thanks a lot …):
#define GL_SILENCE_DEPRECATION
#include <OpenGL/gl3.h>
Under the include statements we will add a method that is called every frame to render our world:
void render(SDL_Window* window, const SDL_GLContext& context)
{
    SDL_GL_MakeCurrent(window, context);

    glClearColor(0.3f, 0.7f, 0.0f, 1.0f);
    glClear(GL_COLOR_BUFFER_BIT | GL_DEPTH_BUFFER_BIT);

    SDL_GL_SwapWindow(window);
}
Below that we will add a method that will be called every frame, and is responsible for waiting on input events, and updating and rendering our world:
bool runMainLoop(SDL_Window* window, const SDL_GLContext& context)
{
    SDL_Event event;

    // Each loop we will process any events that are waiting for us.
    while (SDL_PollEvent(&event))
    {
        switch (event.type)
        {
            // If we get a quit signal, we will return that we don't want to keep looping.
            case SDL_QUIT:
                return false;

            case SDL_KEYDOWN:
                // If we get a key down event for the ESC key, we also don't want to keep looping.
                if (event.key.keysym.sym == SDLK_ESCAPE)
                {
                    return false;
                }
                break;
            default:
                break;
        }
    }

    // Perform our rendering for this frame, normally you would also perform
    // any updates to your world as well here.
    render(window, context);

    // Returning true means we want to keep looping.
    return true;
}
Below that we will add a method that actually creates our window and runs the main loop until it returns a value of false:
void runApplication()
{
    uint32_t width{640};
    uint32_t height{640};

    // Create a new SDL window based on OpenGL.
    SDL_Window* window{SDL_CreateWindow(
        "A Simple Triangle",
        SDL_WINDOWPOS_CENTERED, SDL_WINDOWPOS_CENTERED,
        width, height,
        SDL_WINDOW_RESIZABLE | SDL_WINDOW_OPENGL | SDL_WINDOW_ALLOW_HIGHDPI)};

    // Obtain an OpenGL context based on our window.
    SDL_GLContext context{SDL_GL_CreateContext(window)};

    // Setup some basic global OpenGL state.
    glClearDepthf(1.0f);
    glEnable(GL_DEPTH_TEST);
    glDepthFunc(GL_LEQUAL);
    glEnable(GL_CULL_FACE);
    glViewport(0, 0, width, height);

    while (runMainLoop(window, context))
    {
        // Just waiting for the main loop to end.
    }

    // Clean up after ourselves.
    SDL_GL_DeleteContext(context);
    SDL_DestroyWindow(window);
}
Finally we need to update our main method to run our application after it has done its SDL initialisation:
So your main.cpp should now look like this:
#define GL_SILENCE_DEPRECATION
#include <OpenGL/gl3.h>
#include <SDL.h>
#include <iostream>

void render(SDL_Window* window, const SDL_GLContext& context)
{
    SDL_GL_MakeCurrent(window, context);

    glClearColor(0.3f, 0.7f, 0.0f, 1.0f);
    glClear(GL_COLOR_BUFFER_BIT | GL_DEPTH_BUFFER_BIT);

    SDL_GL_SwapWindow(window);
}

bool runMainLoop(SDL_Window* window, const SDL_GLContext& context)
{
    SDL_Event event;

    // Each loop we will process any events that are waiting for us.
    while (SDL_PollEvent(&event))
    {
        switch (event.type)
        {
            case SDL_QUIT:
                return false;

            case SDL_KEYDOWN:
                if (event.key.keysym.sym == SDLK_ESCAPE)
                {
                    return false;
                }
                break;
            default:
                break;
        }
    }

    // Perform our rendering for this frame.
    render(window, context);

    return true;
}

void runApplication()
{
    uint32_t width{640};
    uint32_t height{640};

    // Create a new SDL window based on OpenGL.
    SDL_Window* window{SDL_CreateWindow(
        "A Simple Triangle",
        SDL_WINDOWPOS_CENTERED, SDL_WINDOWPOS_CENTERED,
        width, height,
        SDL_WINDOW_RESIZABLE | SDL_WINDOW_OPENGL | SDL_WINDOW_ALLOW_HIGHDPI)};

    // Obtain an OpenGL context based on our window.
    SDL_GLContext context{SDL_GL_CreateContext(window)};

    // Setup some basic global OpenGL state.
    glClearDepthf(1.0f);
    glEnable(GL_DEPTH_TEST);
    glDepthFunc(GL_LEQUAL);
    glEnable(GL_CULL_FACE);
    glViewport(0, 0, width, height);

    while (runMainLoop(window, context))
    {
        // Just waiting for the main loop to end.
    }

    // Clean up after ourselves.
    SDL_GL_DeleteContext(context);
    SDL_DestroyWindow(window);
}

int main(int, char* [])
{
    if (SDL_Init(SDL_INIT_VIDEO | SDL_INIT_EVENTS) == 0)
    {
        std::cout << "Successfully initialised SDL!" << std::endl;

        runApplication();

        SDL_Quit();
    }
    else
    {
        std::cout << "Failed to initialise SDL!" << std::endl;
    }

    return 0;
}
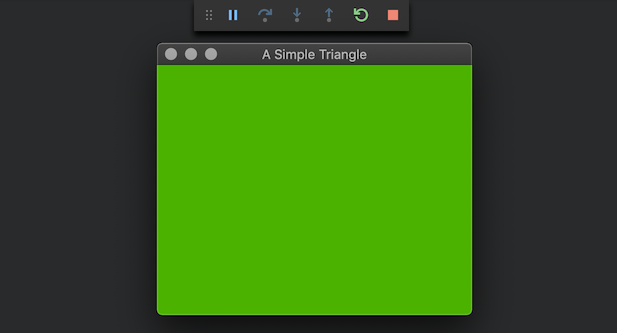
Run your application again and if all works well, you will have a live OpenGL window thats running a loop until you press ESC or close the window!
Wrap up
Oh wow, are you exhausted? I certainly am from writing this article. The good news is that we have established some of the core foundation for our engine. The next few articles will cover each of the other platform targets and bring them into the code base as well.
Bonus bit
We will be using the pushd and popd shell script commands a lot over the course of these articles. Something a little annoying about them which you may have noticed is that they print out a lot of not terribly valuable information into our Terminal when they are called. I had trimmed these outputs in examples shown in this article so it wasn’t distracting.
There is a trick we can use to silence their verbose output, giving us a much cleaner shell script output. Edit the root/project/shared-scripts.sh file, and at the top add the following script:
#!/bin/bash

# Alias the 'pushd' command and have it send its output to the abyss ...
pushd() {
    command pushd "$@" > /dev/null
}

# Alias the 'popd' command and have it send its output to the abyss ...
popd() {
    command popd "$@" > /dev/null
}
By creating methods that share the same name as the actual commands, our scripts which use this shared file will be calling these methods instead. So we can then control what they do, which in this case is to run the real commands but point their output to /dev/null, which means it won’t be displayed to the standard output.
Git ignore
If you were to commit A Simple Triangle into version control, you would want to create a new .gitignore file for the root/platform/console folder, so it won’t include all the files that get auto generated by running the console build. Here is a sample .gitignore that would achieve this for our project:
The code for this article can be found here.
Continue to Part 3: Setup MacOS app.
End of part 2
