crust / Part 9 - Emscripten
Marcel Braghetto 27 February 2022

In this article we will implement the crust-build pipeline for building out the Emscripten target platform. This gives us a web brower compatible version of crust - letting us run our application embedded in a web page! We will:
- Fill in the implementation of the Emscripten build target in our
crust-build project to orchestrate the build steps to prepare and perform.
- Update the
crust-main source code to become Emscripten aware - there are a few things we have to do differently to run our main loop and know about the display size for Emscripten.
Note: Our crust-build implementation for Emscripten will be cross platform - meaning you will be able to do an Emscripten target build on either Windows or MacOS.
Emscripten in Rust
Rust offers the tier 2 wasm32-unknown-emscripten build toolchain for compiling Emscripten compatible code - tier 2 means that it isn’t fully verified and tested on each Rust release, meaning there can be times when a new version of Rust will cause breaking changes.
I actually encountered this twice:
- On Rust 2018 I had to deliberately use a much older version of the Emscripten SDK to retain compatibility with the Rust toolchain
- Upon upgrading to Rust 2021, my Emscripten implementation completely broke so I had to upgrade the Emscripten SDK, but on earlier versions of Rust 2021 (up to about Rust
1.53.0) this too was broken and I had to apply some fairly hacky workarounds
On each occasion it took me many days to find a way to successfully build and run Emscripten with Rust and I almost rage quit the Emscripten target from the crust project because of it. Thankfully though, after updating to Rust 1.59.0, the issues I encountered seem to have been resolved and I was able to use a fairly recent Emscripten SDK version and compile crust successfully without needing any hacky workarounds.
We will be compiling our own crust application code using the Rust Emscripten toolchain which will subsequently use the Emscripten SDK to build the final output. We will also need to make some changes to our crust-main code to accommodate Emscripten, as it requires some special C interop into the Emscripten SDK in order to bootstrap and run a main loop unlike our regular targets.
I wrote a fairly detailed article about building Emscripten with a C++ project in Part 6 - Setup Emscripten of A Simple Triangle. We will be doing some of the same steps in our Rust implementation but actually it will be a fair bit easier as we won’t need to wrangle CMake files or anything.
Build introduction
We’ll start with the crust-build implementation first to get the build pipeline working, then loop back and fix up some code in the crust-main project to make it Emscripten aware.
We also won’t be adding a new debug profile into Visual Studio Code, instead we will just manually run the build from the command line - you can do this either inside a terminal within Visual Studio Code, or in a separate terminal window, so long as you are in the crust-build directory when you run it. The command we’ll be running is:
cargo run -- --target emscripten --variant debug
or for a release build:
cargo run -- --target emscripten --variant release
Run the debug command now and check that you see build output like below:
$ cargo run -- --target emscripten --variant debug
    Finished dev [unoptimized + debuginfo] target(s) in 0.19s
     Running `target/debug/crust-build --target emscripten`
[ print_summary ] ---------------------------------------------
[ print_summary ] Assets dir:          "<snip>/crust-main/assets"
[ print_summary ] Working dir:         "<snip>/emscripten/.rust-build"
[ print_summary ] Rust build dir:      "<snip>/emscripten/.rust-build/rust"
[ print_summary ] Variant:             Debug
[ print_summary ] Target home dir:     "<snip>/emscripten"
[ print_summary ] Main source dir:     "<snip>/crust-main"
[ print_summary ] ---------------------------------------------
The process for our Emscripten build goes like this:
- Install the
wasm32-unknown-emscripten Rust toolchain if needed, and also install via Cargo the https utility which allows us to run a simple HTTP server to preview the compiled Emscripten application after a build. The HTTP server component isn’t strictly needed to actually do an Emscripten build, but you can only browse the final output on a web server.
- Download, install and activate the Emscripten SDK which contains the
emcc compiler and toolchains that we need in order to build crust as an Emscripten application.
- Compile our Rust code using the Rust Emscripten toolchain, letting Rust know where our Emscripten SDK is located so it can participate in the build.
- Create the build output by copying the compiled files and generating an
index.html web page template that loads the compiled Emscripten application.
- Launch a basic web server within the output directory, so browsing to
http://localhost:8000 will load the index.html file we generated - therefore loading crust in the browser!
For the following steps we will be editing emscripten.rs in the crust-build project so open it now. Note also that you’ll need to update the use section as we go if any new types are needed in the code - I won’t spell out what each of them are (you should be able to figure it out) but you can always look at the final source code if you get stuck.
Add the following method:
fn install_rust_dependencies() -> FailableUnit {
    logs::out(log_tag!(), "Installing Rust dependencies ...");

    scripts::run(&Script::new("rustup target add wasm32-unknown-emscripten"))?;
    scripts::run(&Script::new("cargo install --version 1.12.0 https"))
}
This installs the wasm32-unknown-emscripten Rust toolchain and the https utility through Cargo. Update the build method to invoke this:
pub fn build(context: &Context) -> FailableUnit {
    context.print_summary();
    install_rust_dependencies()?;

    Ok(())
}
Downloading and configuring Emscripten SDK
The Emscripten SDK is a rather large download and it fetches additional components the first time it is used however the basic process of setting it up is straightforward. Add the following constants - near the top of the source file is fine:
const EMSCRIPTEN_VERSION: &str = "2.0.32";
const EMSCRIPTEN_URL: &str = "https://github.com/emscripten-core/emsdk/archive/refs/tags/2.0.32.zip";
You can see that we are downloading the SDK from GitHub, and for this project we’ll use version 2.0.32. No doubt there will be later versions available by time you are reading this but I can’t comment on how compatible they would be with the instructions I’m offering in this series.
Add the following methods to fetch and configure the SDK:
fn sdk_dir_name() -> String {
    format!("emscripten-sdk-{}", EMSCRIPTEN_VERSION)
}

fn sdk_dir(context: &Context) -> PathBuf {
    context.working_dir.join(&sdk_dir_name())
}

fn configure_emscripten_sdk(context: &Context) -> FailableUnit {
    logs::out(log_tag!(), "Configuring Emscripten SDK - this may take a while ...");

    let emsdk = sdk_dir(context).join("emsdk");

    remote_zips::fetch(EMSCRIPTEN_URL, &sdk_dir_name(), &context.working_dir)?;
    scripts::run(&Script::new(&format!("{:?} install {}", &emsdk, EMSCRIPTEN_VERSION)))?;
    scripts::run(&Script::new(&format!("{:?} activate {}", &emsdk, EMSCRIPTEN_VERSION)))
}
The sdk_dir_name and sdk_dir methods return the directory name and location of the downloaded SDK - we will need to know these paths in some of the other methods we’ll write which is why we’ve extracted them like this. When the SDK has been downloaded you would have a directory structure like:
 + root
    + emscripten
        + .rust-build
            + emscripten-sdk-2.0.32
The configure_emscripten_sdk method downloads the SDK if required, then invokes the install followed by activate commands, per the setup documentation.
Update the build method to invoke this:
 pub fn build(context: &Context) -> FailableUnit {
    context.print_summary();
    install_rust_dependencies()?;
    configure_emscripten_sdk(context)?;

    Ok(())
}
Make sure you have a decent internet connection, then run a build. You should see the Emscripten SDK downloading, then installing and activating. The first time this happens it can take quite a while as it needs to fetch subsequent internal dependencies of its own, but subsequent builds will be much quicker (output below is trimmed for brevity):
$ cargo run -- --target emscripten --variant debug
   Compiling crust-build v1.0.0 (<snip>/crust-build)
    Finished dev [unoptimized + debuginfo] target(s) in 2.48s
     Running `target/debug/crust-build --target emscripten --variant debug`
[ install_rust_dependencies ] Installing Rust dependencies ...
[ configure_emscripten_sdk ] Configuring Emscripten SDK - this may take a while ...
[ download ] Download: "https://github.com/emscripten-core/emsdk/archive/refs/tags/2.0.32.zip"
Resolving SDK version '2.0.32' to 'sdk-releases-upstream-74646397e3c5010824ad60d1de86c6bcbe334dff-64bit'
Installing SDK 'sdk-releases-upstream-74646397e3c5010824ad60d1de86c6bcbe334dff-64bit'..
Installing tool 'node-14.15.5-64bit'..
Resolving SDK version '2.0.32' to 'sdk-releases-upstream-74646397e3c5010824ad60d1de86c6bcbe334dff-64bit'
Setting the following tools as active:
   node-14.15.5-64bit
   python-3.9.2-1-64bit
   releases-upstream-74646397e3c5010824ad60d1de86c6bcbe334dff-64bit
Compiling application
Sweet, now that we have installed the Emscripten SDK we can use the Rust Emscripten toolchain to compile crust-main. Add the following method:
fn compile_application(context: &Context) -> FailableUnit {
    logs::out(log_tag!(), "Compiling application ...");

    let emscripten_flags = format!(
        r#"-s EXPORTED_FUNCTIONS='["_main","_fileno"]' -O2 -s USE_SDL=2 -s USE_SDL_IMAGE=2 -s SDL2_IMAGE_FORMATS='["png"]' -s USE_WEBGL2=1 --preload-file {:?}@/assets"#,
        &context.assets_dir
    );

    let mut environment = HashMap::new();
    environment.insert("EMCC_CFLAGS".to_owned(), emscripten_flags);

    let script_prefix = if cfg!(target_os = "windows") {
        "emsdk_env.bat &"
    } else {
        ". ./emsdk_env.sh &&"
    };

    scripts::run(
        &Script::new(&format!(
            r#"{} cargo rustc {} --manifest-path {:?} --target wasm32-unknown-emscripten --bin crust --target-dir {:?}"#,
            &script_prefix,
            context.variant.rust_compiler_flag(),
            context.source_dir.join("Cargo.toml"),
            context.rust_build_dir,
        ))
        .working_dir(&sdk_dir(context))
        .environment(&environment),
    )
}
This method contains much of the magic sauce to doing an Emscripten build with Rust - in particular we need to correctly set the EMCC_CFLAGS environment variable with the Emscripten specific build settings for our project. Some of these settings are very sensitive and if set incorrectly can result in a failed build or a build that fails at runtime. Read up on the Emscripten documentation to learn more about them. Of note you can see the --preload-file argument which will bundle up our assets into the compiled artifacts.
Important: Sometimes if you are changing the EMCC_CFLAGS options, Rust won’t be clever enough to realise that the build should be cleaned and done again. You may need to manually delete the emscripten/.rust-build/rust directory if you get issues when only adjusting the Emscripten build environment properties.
The first part of the Rust build command is to load up the Emscripten SDK environment properties by invoking either emsdk_env.bat or emsdk_env.sh depending on whether we are in Windows or not.
Important: Invoking the environment script must be done in the same process as the Rust build command otherwise any environment variables it sets will not flow into the Rust build. This is why we use & or && to specify a concatenation of commands to run in the same shell process.
The actual Rust build command is then executed in the same shell process and specifies the Emscripten SDK directory as the working directory. You can see we are also using the .environment builder method of the Script component to specify the EMCC_CFLAGS environment property as well.
By the end of the compilation, the Rust build directory will contain deps/crust.data, deps/crust.js and deps/crust.wasm which are all the files we need to bundle and load in a web page to run our application.
Update the build method to invoke compile_application:
pub fn build(context: &Context) -> FailableUnit {
    context.print_summary();
    install_rust_dependencies()?;
    configure_emscripten_sdk(context)?;
    compile_application(context)?;

    Ok(())
}
Run a build again, you should see a bunch of environment variable and PATH property messages and some Rust compiler activity.
Note: The first time the compiler is run, it may take a long time because Emscripten might need to fetch its SDL ports. Emscripten uses its own ports of SDL internally and is why we don’t need to actually do anything related to SDL ourselves to include it in the build chain.
Once the build has completed you should be able to locate the following build output files of interest:
+ root
    + emscripten
        + .rust-build
            + rust
                + wasm32-unknown-emscripten
                    + debug
                        + deps
                            - crust.data
                            - crust.js
                            - crust.wasm
Create build output
In this step we will collect the crust.data, crust.js and crust.wasm files into the appropriate output directory and generate an index.html template to load up crust.js and therefore start our application.
Add the following method and constant string:
fn create_output(context: &Context) -> FailableUnit {
    logs::out(log_tag!(), "Creating output ...");

    let build_variant_dir = context.rust_build_dir.join("wasm32-unknown-emscripten").join(context.variant.id()).join("deps");

    outputs::clean(context)?;
    outputs::collect(
        context,
        vec![
            build_variant_dir.join("crust.wasm"),
            build_variant_dir.join("crust.data"),
            build_variant_dir.join("crust.js"),
        ],
    )?;

    io::write_string(INDEX_HTML_TEMPLATE, &outputs::output_dir(context).join("index.html"))
}

const INDEX_HTML_TEMPLATE: &str = r#"
<html>
    <head>
        <meta charset="utf-8">
        <meta http-equiv="Content-Type" content="text/html; charset=utf-8">
        <style>
            canvas.emscripten {
                display:block;
                border: 0px none;
                background-color: #333333;
            }

            textarea.emscripten {
                resize: none;
                width: 600px;
                height: 200px;
                display:block;
                border: 0px none;
                padding: 8px;
                background-color: #222222;
                color: #ffffff;
                margin: 0px;
            }

            .content {
                border: 1px solid #333333;
                display: inline-block;
            }
        </style>
    </head>

    <body>
        <div class="content">
            <canvas class="emscripten" id="canvas" width="600", height="360" oncontextmenu="event.preventDefault()" tabindex=-1></canvas>
            <textarea class="emscripten" id="output" rows="8"></textarea>
        </div>

        <script type='text/javascript'>
            var Module = {
                preRun: [],
                postRun: [],
                print: (function () {
                    var element = document.getElementById('output');
                    if (element) element.value = '';
                    return function (text) {
                        if (arguments.length > 1) {
                            text = Array.prototype.slice.call(arguments).join(' ');
                        }

                        console.log(text);

                        if (element) {
                            element.value += text + "\n";
                            element.scrollTop = element.scrollHeight;
                        }
                    };
                })(),
                printErr: function (text) {
                    if (arguments.length > 1) {
                        text = Array.prototype.slice.call(arguments).join(' ');
                    }

                    console.error(text);
                },
                canvas: (function () {
                    return document.getElementById('canvas');
                })()
            };
        </script>
        <script async type="text/javascript" src="crust.js"></script>
    </body>
</html>
"#;
Nothing special here - we are using the outputs service we wrote a while ago to collect the appropriate build files into the emscripten/out/<variant> directory. We are also writing the INDEX_HTML_TEMPLATE string to emscripten/out/<variant>/index.html via the io::write_string method.
Update the build method to call this:
pub fn build(context: &Context) -> FailableUnit {
    context.print_summary();
    install_rust_dependencies()?;
    configure_emscripten_sdk(context)?;
    compile_application(context)?;
    create_output(context)?;

    Ok(())
}
Now after running a build you should see the appropriate out directory with all the compiled files and the index.html in it, like so:
+ root
    + emscripten
        + out
            + debug
                - crust.data
                - crust.js
                - crust.wasm
                - index.html
Launch in browser
The crust application for Emscripten is actually now built but during development it would be nice to automatically preview the build in a web browser when it is done. To do this we will ask the operating system to open the http://localhost:8000 url which (hopefully) should launch the default web browser.
We will also start the https utility we installed earlier to serve up the content in the output directory, such that index.html will be loaded.
Add the following method (I put it above the INDEX_HTML_TEMPLATE constant):
fn open_in_browser(context: &Context) -> FailableUnit {
    let launch_command = if cfg!(target_os = "windows") { "start" } else { "open" };

    scripts::run(&Script::new(&format!("{} http://localhost:8000", &launch_command)))?;
    scripts::run(&Script::new("http -p 8000").working_dir(&outputs::output_dir(context)))
}
Update the build method to call it:
pub fn build(context: &Context) -> FailableUnit {
    context.print_summary();
    install_rust_dependencies()?;
    configure_emscripten_sdk(context)?;
    compile_application(context)?;
    create_output(context)?;
    open_in_browser(context)?;

    Ok(())
}
Awesome, do another build and now a basic web server will start:
Hosting "." on port 8000 without TLS and no authentication...
Ctrl-C to stop.
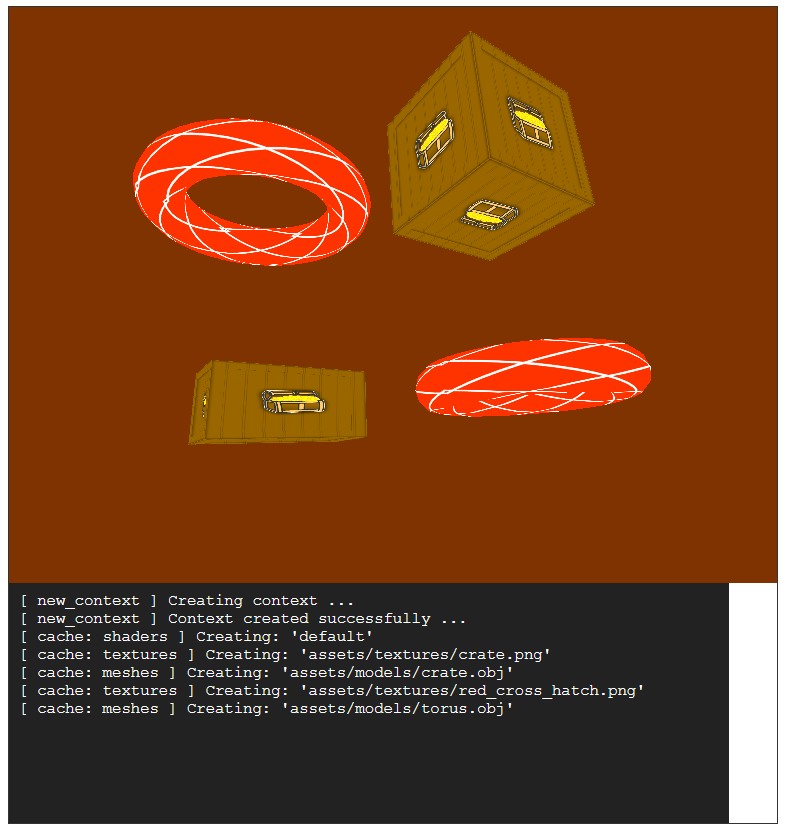
And your web browser should open:

Note: If you don’t see something like above you may need to press the refresh button as the browser may have been faster than the local web server starting up.
That doesn’t look right! What is going on here? The warning message in the browser window is telling us something doesn’t seem right - the reason is because our traditional main loop is executing continually at very high speed and not yielding to the host web browser - in fact on my old Mac computer this even caused my fans to start going crazy!
In Emscripten our code needs to create and run a main loop very differently than for a traditional application.
We are going to need to update some code in crust-main to fix this. Close the browser window and cancel the running web server (CTRL-C). From this point we will be editing source files in the crust-main project instead of crust-build.
Emscripten main loop
Previously in Part 5 - Init SDL we introduced the core/launcher.rs code and I mentioned that although it wasn’t obvious at the time, there was a reason for keeping it in its own file.
Well, the reason is because for the Emscripten target we will be implementing a completely different launcher and we will conditionally compile the Emscripten version for the Emscripten target and the existing version for everything else.
We have already used conditional code to do certain things differently on Windows, for example this kind of code would run emsdk_env.bat on Windows, otherwise ./emsdk_env.sh:
let script_prefix = if cfg!(target_os = "windows") {
    "emsdk_env.bat &"
} else {
    ". ./emsdk_env.sh &&"
};
We can also use conditional properties to control which source files are included too, by writing conditional statement inside use statements and mod files.
Let’s create a stub for our Emscripten launcher, then update the existing code to conditionally compile it for Emscripten. Create core/launcher_emscripten.rs - remember we are now working in the crust-main project. You can leave the new file empty for a moment.
Now, update core/mod.rs and change how the existing launcher module is included, and add a new entry for launcher_emscripten:
pub mod display_size;
pub mod engine;
pub mod failable;
pub mod failable_unit;
pub mod graphics;
pub mod io;
pub mod logs;
pub mod main_loop;
pub mod renderer;
pub mod scene;
pub mod window;

#[cfg(not(target_os = "emscripten"))]
pub mod launcher;

#[cfg(target_os = "emscripten")]
pub mod launcher_emscripten;
Note how we use the cfg statements to conditionally include either launcher or launcher_emscripten. At the moment you would still be able to run on Windows or MacOS, but if we try to compile the Emscripten target now you will see a compilation error like this:
cargo run -- --target emscripten --variant debug

...

error[E0433]: failed to resolve: could not find `launcher` in `core`
  --> src/lib.rs:10:36
   |
10 |     std::process::exit(match core::launcher::launch() {
   |                                    ^^^^^^^^ could not find `launcher` in `core`
This is because core::launcher::launch was not compiled into the Emscripten target, so Rust has no idea what it is. To fix this issue we’ll update lib.rs to also conditionally run either the launcher or launcher_emscripten code. Update lib.rs:
pub mod components;
pub mod core;
pub mod log_tag;
pub mod opengl;
pub mod scenes;

use crate::core::{failable_unit::FailableUnit, logs};

pub fn main() {
    std::process::exit(match launch() {
        Ok(_) => 0,
        Err(err) => {
            logs::out(log_tag!(), &format!("Fatal error: {:?}", err));
            1
        }
    });
}

#[cfg(not(target_os = "emscripten"))]
fn launch() -> FailableUnit {
    core::launcher::launch()
}

#[cfg(target_os = "emscripten")]
fn launch() -> FailableUnit {
    core::launcher_emscripten::launch()
}
We’ve introduced two versions of a launch method - each one delegating to the correct launcher code and each one conditionally compiled in. We tweaked the main method to now call this launch method, instead of directly calling core::launcher::launch(). Of course, if we compile for Emscripten again we still have an error to resolve:
error[E0425]: cannot find function `launch` in module `core::launcher_emscripten`
  --> src/lib.rs:26:32
   |
26 |     core::launcher_emscripten::launch()
   |                                ^^^^^^ not found in `core::launcher_emscripten`
Hopefully this error should be obvious - we haven’t actually written the launch method in our Emscripten launcher so of course it will cause a compilation error. Edit launcher_emscripten.rs:
use crate::{
    core::{failable::Failable, failable_unit::FailableUnit, main_loop::MainLoop},
    opengl::opengl_engine::OpenGLEngine,
};
use std::{cell::RefCell, os::raw::c_int, rc::Rc};

pub fn launch() -> FailableUnit {
    LAUNCHER.with(|it| it.set_main_loop())
}

// We need to hold the data structures statically so we can bind the Emscripten C method callbacks. The static
// instances behave like lazy singletons - the `MAIN_LOOP` is never accessed *before* the `LAUNCHER` is, so there
// won't be any issues around order of initialization.
thread_local!(static LAUNCHER: EmscriptenLauncher = EmscriptenLauncher::new().unwrap());
thread_local!(static MAIN_LOOP: RefCell<MainLoop<OpenGLEngine>> = LAUNCHER.with(|it| RefCell::new(it.new_main_loop().unwrap())));

// This invokes our main loop within our LAUNCHER singleton and is declared as a function that can be called from
// C, allowing us to pass it to Emscripten as the 'main loop' callback. There is an alternate method available that
// takes a single argument cast as `void*` type but it starts to get pretty awful trying to coerce our Rust objects
// into and out of void pointers to be able to pass them through so we'll stick with the (admittedly less than ideal)
// singleton approach so the `MAIN_LOOP` doesn't need to be passed in as an argument.
extern "C" fn run_main_loop() {
    MAIN_LOOP.with(|it| it.borrow_mut().run().unwrap());
}

extern "C" {
    // This is the alias for the Emscripten C function which associates a callback to execute on every
    // iteration of the main loop: https://emscripten.org/docs/api_reference/emscripten.h.html#c.emscripten_set_main_loop
    fn emscripten_set_main_loop(func: unsafe extern "C" fn(), fps: c_int, simulate_infinite_loop: c_int);
}

struct EmscriptenLauncher {
    pub sdl: Rc<sdl2::Sdl>,
}

impl EmscriptenLauncher {
    pub fn new() -> Failable<Self> {
        let sdl = Rc::new(sdl2::init()?);
        sdl2::image::init(sdl2::image::InitFlag::PNG)?;

        Ok(EmscriptenLauncher { sdl: sdl })
    }

    pub fn new_main_loop(&self) -> Failable<MainLoop<OpenGLEngine>> {
        MainLoop::new(&self.sdl, OpenGLEngine::new(&self.sdl)?)
    }

    fn set_main_loop(&self) -> FailableUnit {
        unsafe {
            emscripten_set_main_loop(run_main_loop, 0, 1);
        }

        Ok(())
    }
}
Ok, there is a fair bit to unpack here and I’ll do my best to describe what is going on. In Emscripten we need to invoke a C API method to define which method to call as the main loop. The underlying Emscripten implementation will call this method on each cycle, then yield to the host web browser. This allows an Emscripten application to play nicely with the browser and share its runtime. Here is the Emscripten main loop documentation.
The main loop method we need to pass to Emscripten needs to be somewhat static in nature so it doesn’t fall out of scope and get destroyed while Emscripten is trying to call into it from the browser context. This is because Rust can’t see any external Emscripten code and won’t know that something outside its managed state needs our main loop data to stay alive.
Rust doesn’t allow static objects that are lazily instantiated in the way other languages might but we can achieve a similar outcome by using the thread_local! macro which ultimately automates the creation of a LocalKey.
We must be careful that the object is created scoped to the thread it is in but for the single main loop code in Emscripten this shouldn’t cause us issues. The other nice thing is that the object held is only instantiated the first time something tries to use it.
Note: There are third party crates that can help with dynamically initialised static objects in Rust such as the static_init crate - I actually used this crate originally but I wanted to try and use the least number of third party libraries as possible, so I swapped it out for the standard library thread_local! + LocalKey approach instead. The static_init crate did work really well though, if you want to go that way.
The MAIN_LOOP object when accessed will cause the LAUNCHER object to be instantiated, creating a new instance of EmscriptenLauncher which initialises SDL - this is one of the rare places we are using an .unwrap().
The stored LAUNCHER object (which is an instance of the EmscriptenLauncher structure) is passed into the with lambda and is set to a container holding an instance of our MainLoop structure, created via the it.new_main_loop() invocation.
We hold the main loop inside a RefCell container - which is like a Box container, except that the object inside it is mutable (an object inside a Box is immutable). We need the main loop object to be mutable because its run method mutates data inside it when invoked.
thread_local!(static LAUNCHER: EmscriptenLauncher = EmscriptenLauncher::new().unwrap());
thread_local!(static MAIN_LOOP: RefCell<MainLoop<OpenGLEngine>> = LAUNCHER.with(|it| RefCell::new(it.new_main_loop().unwrap())));
The actual code that triggers this in our lib.rs is:
pub fn launch() -> FailableUnit {
    LAUNCHER.with(|it| it.set_main_loop())
}
When the LAUNCHER object is access via with, the whole sequence of events kicks off.
The code inside set_main_loop needs a bit of explanation. Firstly we need to define a method that can be called from external C code - this is the method that Emscripten will invoke in each cycle. We do this using the extern "C" fn run_main_loop() method signature. This exposes a method named run_main_loop which can be called from outside our code and will tell the MAIN_LOOP object to invoke its run method:
extern "C" fn run_main_loop() {
    MAIN_LOOP.with(|it| it.borrow_mut().run().unwrap());
}
Next we need to define a signature which maps to an external C method so we can invoke it from our Rust code - in this case we would be invoking the external emscripten_set_main_loop in the underlying Emscripten framework.
extern "C" {
    fn emscripten_set_main_loop(func: unsafe extern "C" fn(), fps: c_int, simulate_infinite_loop: c_int);
}
The set_main_loop method in our EmscriptenLauncher code will invoke the external emscripten_set_main_loop function, passing our run_main_loop method as the first argument. From this point Emscripten will start calling run_main_loop via the C interop which therefore executes our Rust code on each frame cycle.
fn set_main_loop(&self) -> FailableUnit {
    unsafe {
        emscripten_set_main_loop(run_main_loop, 0, 1);
    }

    Ok(())
}
The Emscripten main loop documentation has more detailed info about how this works and what the other arguments do.
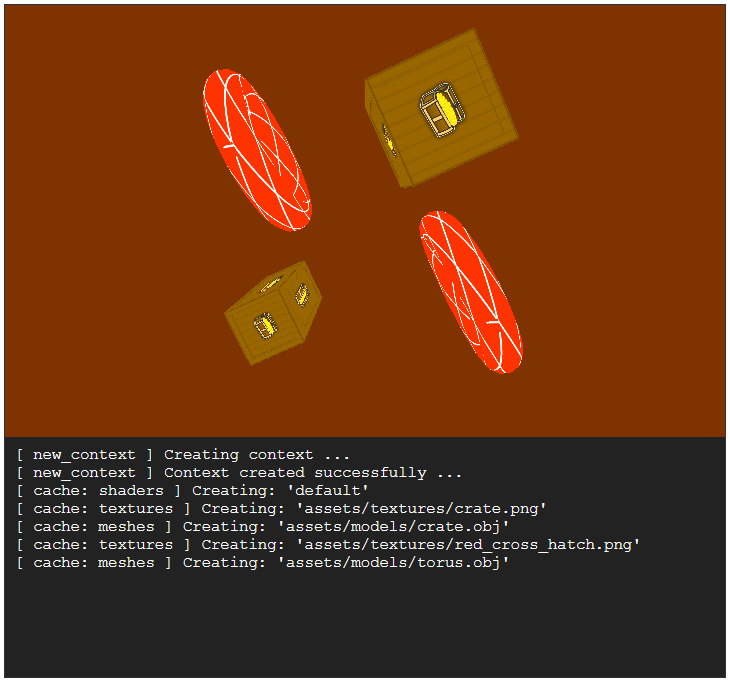
Ok cool, try to run the Emscripten build again - this time you should see the scene appear and be able to move around with the keyboard (you need to click the scene to give it focus first).
Although this is pretty good, there is still one minor problem to fix which might not be obvious. If you look at the image below you can see to the lower right hand side there is a larger amount of empty space:
This is because currently the 3D scene is hard coded in our engine to render at 640x480 because of the display size value returned by the get_size method inside crust-main/src/core/window.rs. However if you check our index.html file we are actually embedding the 3D scene at 600x360 so it seems our scene is not rendering at the size our HTML document has defined.
To fix this issue we need to update the core/window.rs file in crust-main to have an Emscripten specific implementation of get_size, which calls some Javascript code in the browser to ask for the correct size.
Edit core/window.rs to have and Emscripten and a non Emscripten implementation:
use crate::core::{display_size::DisplaySize, failable::Failable};

#[cfg(not(target_os = "emscripten"))]
pub fn get_size(video: &sdl2::VideoSubsystem) -> Failable<DisplaySize> {
    let mut width = 640i32;
    let mut height = 480i32;

    if cfg!(target_os = "android") || cfg!(target_os = "ios") {
        let display_mode = video.desktop_display_mode(0)?;
        width = display_mode.w;
        height = display_mode.h;
    }

    Ok(DisplaySize {
        width: width,
        height: height,
    })
}

#[cfg(target_os = "emscripten")]
pub fn get_size(_: &sdl2::VideoSubsystem) -> Failable<DisplaySize> {
    use std::os::raw::{c_char, c_int};

    extern "C" {
        fn emscripten_run_script_int(code: *const c_char) -> c_int;
    }

    unsafe {
        let width: i32 = emscripten_run_script_int(b"document.getElementById('canvas').width;\0" as *const _ as *const c_char)
            .try_into()
            .map_err(|_| "Failed to get HTML canvas width!")?;

        let height: i32 = emscripten_run_script_int(b"document.getElementById('canvas').height;\0" as *const _ as *const c_char)
            .try_into()
            .map_err(|_| "Failed to get HTML canvas height!")?;

        Ok(DisplaySize {
            width: width,
            height: height,
        })
    }
}
We have kept the original get_size method but wrapped it with #[cfg(not(target_os = "emscripten"))] and added a new Emscripten version. In the Emscripten version we are declaring the external emscripten_run_script_int signature, which lives outside our application code and using it to execute blocks of Javascript to fetch the width and height of the canvas HTML element.
Run the application again and the 3D scene should be rendering at the expected 600x360 size. Additionally, if we had set the canvas object to be a dynamic size this would also fix any problems related to the browser window being resized at runtime:
More info about calling Javascript for an int result here: https://emscripten.org/docs/api_reference/emscripten.h.html#c.emscripten_run_script_int.
Here is the fully interactive version running in your browser now:
Summary
Dealing with Emscripten is a bit rough but getting this working in Rust does seem overall to be a bit cleaner than with C/C++, though it is likely to be more susceptible to breaking changes in the Rust toolchain over time.
In the next article we will implement the Android target - it will be a bit of a beast but we gotta wrangle it some time!
The code for this article can be found here.
Continue to Part 10: Android.
End of part 9
