a-simple-triangle / Part 11 - OpenGL texture mapping
Marcel Braghetto 5 May 2019

Now that we have a 3D mesh rendering to our screen we will add texture mapping to start breathing a bit of life into it.
In this article we will cover:
- Introduction of the third party library
SDL2_image to help us load image files for our texture mapping.
- Addition of
assets code to load texture files from storage.
- Authoring of a class to represent a texture for use in OpenGL.
- Updating of our shaders and OpenGL mesh to apply texturing.
Image loading library
The SDL2 suite contains many helpful libraries to perform common tasks in media applications. Loading image files is something that most graphical applications will need to do sooner or later and thankfully there is an SDL2 add on library named SDL2_image which provides exactly this capability.
Visit the website to learn more about it: https://www.libsdl.org/projects/SDL_image.
The SDL2_image library is not baked into the core SDL2 library, so we need to introduce it into our code base. We will do this in much the same way we’ve added other third party libraries - by automating it through our setup scripts. We will start off with the Mac console platform as we normally do, then work through each platform.
Open your shared-scripts.sh file (it’s been a while yeah!) to add in a new method for fetching SDL2_image. Find the existing method named fetch_third_party_lib_sdl() and immediately below it add a new method like so:
# If required, download the SDL2 image library source into the third-party folder.
fetch_third_party_lib_sdl_image() {
    verify_third_party_folder_exists

    pushd ../../third-party
        if [ ! -d "SDL2_image" ]; then
            echo "Fetching SDL2_image source library (2.0.4) ..."
            wget https://www.libsdl.org/projects/SDL_image/release/SDL2_image-2.0.4.zip
            unzip -q SDL2_image-2.0.4.zip
            mv SDL2_image-2.0.4 SDL2_image
            rm SDL2_image-2.0.4.zip
        fi
    popd
}
Scroll down to where the existing fetch_framework_sdl2() method is, then after it add the following new method to provide a way to download the Mac specific framework files:
# If required, download the SDL2 Image MacOS Framework into the Frameworks folder.
fetch_framework_sdl2_image() {
    verify_frameworks_folder_exists

    pushd Frameworks
        if [ ! -d "SDL2_image.framework" ]; then
            echo "Fetching SDL2_image framework from: https://www.libsdl.org/projects/SDL_image/release/SDL2_image-2.0.4.dmg"
            wget https://www.libsdl.org/projects/SDL_image/release/SDL2_image-2.0.4.dmg

            echo "Attaching DMG file ..."
            hdiutil attach SDL2_image-2.0.4.dmg

            echo "Copying SDL2_image.framework from DMG file ..."
            cp -R /Volumes/SDL2_image/SDL2_image.framework .

            echo "Detaching DMG file ..."
            hdiutil detach /Volumes/SDL2_image
            rm SDL2_image-2.0.4.dmg

            # We need to code sign a couple of binaries to avoid Xcode errors
            pushd SDL2_image.framework/Versions/A/Frameworks/webp.framework
                echo "Code signing SDL2_image.framework / Frameworks / webp.framework ..."
                codesign -f -s - webp
            popd

            pushd SDL2_image.framework
                echo "Code signing SDL2_image.framework ..."
                codesign -f -s - SDL2_image
            popd
        fi
    popd
}
I won’t walk through these scripts in great detail - they do similar things to other scripts we have written in the past. We have to do a bit of Xcode code signing on the framework but we had to do that for the main SDL2 framework as well if you cast your mind back (or look at the existing setup scripts).
Save and close shared-scripts.sh then edit your console/setup.sh script, adding the following lines to the end:
fetch_third_party_lib_sdl_image
fetch_framework_sdl2_image
Save and run the setup.sh within your console folder and you should see output similar to this (yep, I’ve trimmed the output for brevity):
$ ./setup.sh
Fetching Brew dependency: 'wget'.
Fetching Brew dependency: 'cmake'.
Fetching Brew dependency: 'ninja'.

Fetching SDL2_image source library (2.0.4) ...
https://www.libsdl.org/projects/SDL_image/release/SDL2_image-2.0.4.zip
Saving to: ‘SDL2_image-2.0.4.zip’

Fetching SDL2_image framework from: https://www.libsdl.org/projects/SDL_image/release/SDL2_image-2.0.4.dmg
Saving to: ‘SDL2_image-2.0.4.dmg’
Attaching DMG file ...
Copying SDL2_image.framework from DMG file ...
Detaching DMG file ...
Code signing SDL2_image.framework / Frameworks / webp.framework ...
Code signing SDL2_image.framework ...
When the script has completed you will see that there is now a third-party/SDL2_image folder and a console/Frameworks/SDL2_image.framework folder.
We now need to update the CMakeLists.txt file for our console platform so it can be told where to find the source files and framework for SDL2_image. Edit console/CMakeLists.txt and add a new include_directories entry so the includes section looks like this:
include_directories(${THIRD_PARTY_DIR}/SDL/include)
include_directories(${THIRD_PARTY_DIR}/glm)
include_directories(${THIRD_PARTY_DIR}/tiny-obj-loader)
include_directories(${THIRD_PARTY_DIR}/SDL2_image)
Then jump down to the set_target_properties block and update the linker flags to look like this (note the addition of the -framework SDL2_image):
"-F../Frameworks -framework SDL2 -framework SDL2_image -framework OpenGL"
This should be all that is required to gain access to the library - we will now make a small change to our main source code to intialize the library - preparing it for use at runtime and therefore also proving that it is working for us.
Initializing the library
Open the workspace in Visual Studio Code - be sure to do a CMake sync - then edit core/engine.cpp file. Firstly we will include the header file:
Then we will attempt to initialise the image library with png support. Update the internal run function like so:
void run()
{
    static const std::string logTag{classLogTag + "run"};

    ast::log(logTag, "Starting engine ...");
    SDL_Init(SDL_INIT_VIDEO | SDL_INIT_EVENTS);
    ast::log(logTag, "SDL2 initialized successfully ...");

    if (IMG_Init(IMG_INIT_PNG) != IMG_INIT_PNG)
    {
        throw std::runtime_error(logTag + " Could not initialize SDL2_image ...");
    }
    ast::log(logTag, "SDL2_image initialized successfully with PNG support ...");

    resolveApplication()->startApplication();
}
We call the IMG_Init function, passing in which types of image formats we want to support. If the function doesn’t return a result matching our image format types, we know that the library failed to initialise, otherwise we are good to go! Here is the doco for the init function: https://www.libsdl.org/projects/SDL_image/docs/SDL_image.html#SEC8.
Note: As per my note about how I spell words such as colour vs color you will probably see initialize in code and initialise in editorial text.
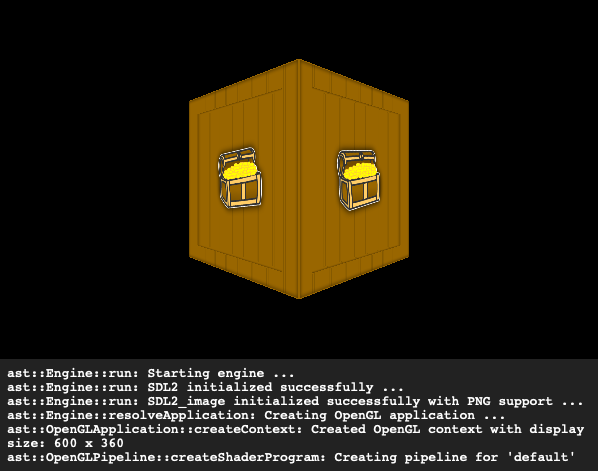
Run your program and you should notice a log message like this:
ast::Engine::run: SDL2_image initialized successfully with PNG support ...
This proves that our console platform is correctly setup for the image library.
The shared scripts we wrote for the console application can now be reused for the MacOS application. First up, edit the macos/setup.sh and add the same two lines that we added for the console platform to the fetch... section. Your script should now fetch the following things:
fetch_third_party_lib_sdl
fetch_third_party_lib_glm
fetch_third_party_lib_tiny_obj_loader
fetch_framework_sdl2
fetch_third_party_lib_sdl_image
fetch_framework_sdl2_image
Close setup.sh and edit the project.yml file. Find the section declaring all the dependencies and change it to look like the following, noting the addition of the Frameworks/SDL2_image.framework:
dependencies:
    - framework: Frameworks/SDL2.framework
        embed: true
    - framework: Frameworks/SDL2_image.framework
        embed: true
    - sdk: OpenGL.framework
Also edit the HEADER_SEARCH_PATHS section to include the SDL2_image source folder so it can find its headers:
HEADER_SEARCH_PATHS:
    - $(PROJECT_DIR)/../../third-party/SDL/include
    - $(PROJECT_DIR)/../../third-party/glm
    - $(PROJECT_DIR)/../../third-party/tiny-obj-loader
    - $(PROJECT_DIR)/../../third-party/SDL2_image
Close the project.yml file and run setup.sh to download the library then regenerate the project. Open the Xcode project and notice that we now have the SDL2_image.framework included in our build. Run the application and we should see the same output as for the console platform:
iOS is a bit trickier to set up but we should be able do it in much the same way as how we integrated the main SDL2 library. In fact, if your memory is good enough, you may recall that we wrote a static library compilation script in a reusable way. I won’t repeat all the code but the way it was called in our ios/setup.sh was like this:
# Create our main SDL2 static library if necessary and put it into the Libs folder.
create_static_library \
    libSDL2.a \
    ../../../third-party/SDL/Xcode-iOS/SDL \
    SDL.xcodeproj \
    libSDL-iOS \
    SDL
We will now test that theory and see if we can truly reuse it to also compile a static library from the SDL2 image library source project which ships inside the third-party/SDL2_image/Xcode-iOS folder. This is also where the decision to name the main SDL2 third party folder SDL pays off, because the SDL2_image Xcode project will look for the main SDL2 source in a folder named SDL.
So, edit the ios/setup.sh script and add another create_static_library block like this:
# Create our SDL_image static library if necessary and put it into the Libs folder.
create_static_library \
    libSDL2_image.a \
    ../../../third-party/SDL2_image/Xcode-iOS \
    SDL_image.xcodeproj \
    libSDL_image-iOS \
    SDL_image
Here we are asking for the SDL_image.xcodeproj to be compiled into a fat static binary named libSDL2_image.a which will appear in the Libs folder once the setup is complete. If you would like a refresher on how the compilation script works you can refer back to the original iOS setup article in this series.
Save the setup.sh file and edit your ios/project.yml file. Update the dependencies section to look like this:
dependencies:
    - framework: Libs/libSDL2.a
        embed: false
    - framework: Libs/libSDL2_image.a
        embed: false
    - sdk: MobileCoreServices.framework
    - sdk: CoreMotion.framework
    - sdk: CoreGraphics.framework
    - sdk: AudioToolbox.framework
    - sdk: CoreAudio.framework
    - sdk: QuartzCore.framework
    - sdk: GameController.framework
    - sdk: Foundation.framework
    - sdk: OpenGLES.framework
    - sdk: UIKit.framework
    - sdk: AVFoundation.framework
    - sdk: ImageIO.framework
Also edit the HEADER_SEARCH_PATHS section to look like this so Xcode can find the header files:
HEADER_SEARCH_PATHS:
    - $(PROJECT_DIR)/../../third-party/SDL/include
    - $(PROJECT_DIR)/../../third-party/glm
    - $(PROJECT_DIR)/../../third-party/tiny-obj-loader
    - $(PROJECT_DIR)/../../third-party/SDL2_image
Close project.yml, run the setup.sh again to regenerate the Xcode project then open and run the Xcode project. Note that the additional libSDL2_image.a is included in the project now and the initialisation log output is displayed.
The Android platform requires a bit more work than some of the others - but this is pretty common when developing for Android. We need to add the SDL2_image in a similar way to how we added SDL2 via JNI.
The SDL2_image folder itself contains a file named Android.mk, which contains the rules needed to compile it. The approach we need to take is this:
- In the setup script, check for
SDL2_image in third-party and fetch it if required.
- Fix a bug that ships with the current version of
SDL2_image which prevents it from compiling for Android.
- If we haven’t yet symlinked the
third-party/SDL2_image into the jni folder of our Android sdl module, then link it.
- Update our
CMakeLists.txt file to include the library.
Update setup script for MacOS
Edit the android/setup.sh script and add the fetch_third_party_lib_sdl_image invocation to fetch the SDL2 image library:
fetch_brew_dependency "wget"
fetch_third_party_lib_sdl
fetch_third_party_lib_glm
fetch_third_party_lib_tiny_obj_loader
fetch_third_party_lib_sdl_image
The next edit needs a bit of explanation. In the third-party/SDL2_image/Android.mk file there is a section of code that reads:
# Enable this if you want to support loading WebP images
# The library path should be a relative path to this directory.
SUPPORT_WEBP ?= true
WEBP_LIBRARY_PATH := external/libwebp-0.6.0
It is marking WebP support as on by default, however the problem is that the correct external WebP folder is actually external/libwebp-1.0.0, NOT external/libwebp-0.6.0 as per the make file. The result is that if WebP is enabled, compilation will fail to find the correct external folder and won’t compile. Since we don’t really need WebP support anyway, we will write a small script which searches for the text SUPPORT_WEBP ?= true and replace it with SUPPORT_WEBP ?= false, avoiding the compilation problem.
At the bottom of setup.sh, add the following script which performs the search and replace via the sed command:
# We will disable 'webp' integration.
pushd ../../third-party/SDL2_image
    echo "Disabling SDL2_image webp integration ..."
    sed -i '' -e 's/SUPPORT_WEBP ?= true/SUPPORT_WEBP ?= false/g' Android.mk
popd
The other script to put in our setup.sh is to create the symlink from the library to our jni folder of our Android library module. This is quite similar to how we did the main SDL2 library. Add the following script:
# If required, create the SDL2_image symlink into the Android library project so it can include it in its build.
pushd sdl/jni
    if [ ! -d "SDL2_image" ]; then
      echo "Linking SDL2_image path to sdl/jni/SDL2_image ..."
      ln -s ../../../../third-party/SDL2_image SDL2_image
    fi
popd
The setup.sh is now done so save and run it to see the result:
$ ./setup.sh

...

Disabling SDL2_image webp integration ...
Linking SDL2_image path to sdl/jni/SDL2_image ...
Update setup script for Android on Windows
Edit android\setup.ps1 and add the following at the end to achieve a similar outcome to our MacOS shell script:
# Check that we have the SDL2 image third party source folder.
if (!(Test-Path "..\..\third-party\SDL2_image")) {
    Write-Host "Fetching SDL2_image source library (2.0.4) ..."
    $WebClient = New-Object System.Net.WebClient
    $WebClient.DownloadFile("https://www.libsdl.org/projects/SDL_image/release/SDL2_image-2.0.4.zip", "..\..\third-party\SDL2_image-2.0.4.zip")

    Push-Location -Path "..\..\third-party"
        Write-Host "Unzipping SDL2_image source into third-party\SDL2_image ..."
        cmd.exe /c 'tar -xf SDL2_image-2.0.4.zip'
        Move-Item -Path SDL2_image-2.0.4 -Destination SDL2_image
        Remove-Item -Path SDL2_image-2.0.4.zip
    Pop-Location
}

# If required, create the SDL2_image symlink into the Android library project so it can include it in its build.
Push-Location "sdl\jni"
if (!(Test-Path "SDL2_image")) {
    Write-Host "Linking third-party\SDL2_image to sdl\jni\SDL2_image."
    cmd.exe /c 'mklink /d SDL2_image ..\..\..\..\third-party\SDL2_image'
}
Pop-Location

# We will disable 'webp' integration.
Push-Location "..\..\third-party\SDL2_image"
    Write-Host "Disabling SDL2_image webp integration ..."
    ((Get-Content -Path Android.mk -Raw) -replace('SUPPORT_WEBP \?= true', 'SUPPORT_WEBP ?= false')) | Set-Content -Path Android.mk
Pop-Location

Write-Host "All done - import the project in this folder into Android Studio to run it!"
Update CMakeLists.txt
Now that the SDL2_image library has been linked into our Android sdl module, we need to update the CMakeLists.txt file of our app module so it can resolve the library.
Edit android/app/CMakeLists.txt and start by adding a new add_library entry to define the SDL2 image library - we will give it the name sdl2_image within our CMake configuration. Place this new entry below the existing add_library entries:
add_library(
        sdl2_image
        SHARED
        IMPORTED
)
Next we need to define a new set_target_properties entry to configure the new sdl2_image library. Add the following below the existing set_target_properties entries. Observe that it is quite similar to the existing entries:
set_target_properties(
        sdl2_image
        PROPERTIES
        IMPORTED_LOCATION
        ${SDL_SO_DIR}/libSDL2_image.so
)
We also need to add the SDL2_image folder to our include_directories to pick up the header files, so your include_directories section will look like this:
include_directories(${THIRD_PARTY_DIR}/SDL/include)
include_directories(${THIRD_PARTY_DIR}/glm)
include_directories(${THIRD_PARTY_DIR}/tiny-obj-loader)
include_directories(${THIRD_PARTY_DIR}/SDL2_image)
Finally we need to add the new sdl2_image into our main target so it is linked along with the other libraries:
target_link_libraries(
        a-simple-triangle
        hidapi
        sdl2
        sdl2_image
        ${log-lib}
        GLESv2
)
Save and close the CMakeLists.txt file and open the Android project in Android Studio.
Open up the app module and edit the class MainActivity.java. We will add in the SDL2 image library to the getLibraries() method:
public class MainActivity extends SDLActivity {
    @Override
    protected String[] getLibraries() {
        return new String[]{
                "hidapi",
                "SDL2",
                "SDL2_image",
                "a-simple-triangle"
        };
    }
}
You should now be able to run the application - remember Build -> Rebuild Project if you are having issues (and grab a cup of coffee - it takes a while …). If the stars align and you followed these steps accurately you should see our familiar display:
Emscripten has built in support for SDL2_image similar to SDL2. We will still fetch the library source into the third party folder and use it as the location to find the header files.
Edit the emscripten/setup.sh and add the fetch_third_party_lib_sdl_image command:
fetch_third_party_lib_sdl
fetch_third_party_lib_glm
fetch_third_party_lib_tiny_obj_loader
fetch_third_party_lib_sdl_image
Close setup.sh and edit emscripten/CMakeLists.txt, firstly adding a new entry into the include_directories section:
include_directories(${THIRD_PARTY_DIR}/SDL/include)
include_directories(${THIRD_PARTY_DIR}/glm)
include_directories(${THIRD_PARTY_DIR}/tiny-obj-loader)
include_directories(${THIRD_PARTY_DIR}/SDL_image)
Finally, we need to activate the built in support for SDL2_image through some additional linker flags. The syntax is a bit weird but the specific part that adds the library support is -s USE_SDL_IMAGE=2 -s SDL2_IMAGE_FORMATS=\"['png']\" which tells Emscripten to use version 2 of SDL image, and to include the png image format support:
set_target_properties(
    a-simple-triangle
    PROPERTIES
    LINK_FLAGS
    "-O2 -s USE_SDL=2 -s USE_SDL_IMAGE=2 -s SDL2_IMAGE_FORMATS=\"['png']\" -s USE_WEBGL2=1 --preload-file ../../main/assets@/assets"
)
Save and close the CMakeLists.txt file and run your build.sh to compile the Emscripten platform. The first time you build after adding SDL2_image you will see some Emscripten output like this: generating port: sdl2-image-png .... Remember this only happens the first time.
Eventually our browser should open and our image library will successfully initialise:
Our Windows setup will largely follow the same kind of steps as our integration of the main SDL2 library. We will download the Windows dev library for SDL2_image and unpack the appropriate .lib and .dll files to use them.
To begin, edit the windows/setup.ps1 and add the following to the end to fetch the Windows version of the SDL2 image library:
# Check that we have the SDL2_image third party Windows dev library
if (!(Test-Path "..\..\third-party\sdl-image-windows")) {
    Write-Host "Downloading SDL Image Windows library into third party folder sdl-image-windows ..."
    $WebClient = New-Object System.Net.WebClient
    $WebClient.DownloadFile("https://www.libsdl.org/projects/SDL_image/release/SDL2_image-devel-2.0.4-VC.zip", "..\..\third-party\SDL2_image-devel-2.0.4-VC.zip")

    Push-Location -Path "..\..\third-party"
        Write-Host "Unzipping SDL Image Windows library into third-party\sdl-image-windows ..."
        cmd.exe /c 'tar -xf SDL2_image-devel-2.0.4-VC.zip'
        Move-Item -Path SDL2_image-2.0.4 -Destination sdl-image-windows
        Remove-Item -Path SDL2_image-devel-2.0.4-VC.zip
    Pop-Location
}
Close and run setup.ps1 via PowerShell and observe a new folder named sdl-image-windows in the third-party folder.
Next we will add some additional scripts to our cmake-post-build.ps1 file to ensure the required .dll files are bundled into the out folder during a build. Specifically we need SDL2_image.dll, libpng16-16.dll and zlib1.dll:
Push-Location -Path "out"

...

if (!(Test-Path "SDL2_image.dll")) {
    Copy-Item -Path "..\..\..\third-party\sdl-image-windows\lib\x64\SDL2_image.dll"
}

if (!(Test-Path "libpng16-16.dll")) {
    Copy-Item -Path "..\..\..\third-party\sdl-image-windows\lib\x64\libpng16-16.dll"
}

if (!(Test-Path "zlib1.dll")) {
    Copy-Item -Path "..\..\..\third-party\sdl-image-windows\lib\x64\zlib1.dll"
}

...

Pop-Location
Remember: For the purpose of these articles I am only copying the 64 bit lib and dll files.
Save and close the cmake-post-build.ps1 file and edit the windows/CMakeLists.txt file.
Firstly add a new CMake property to represent the SDL2_image.lib, directing it at the 64 bit .lib file in the third party SDL2 image folder. Your CMake properties should look like this:
set(LIB_SDL2 ${THIRD_PARTY_DIR}/sdl-windows/lib/x64/SDL2.lib)
set(LIB_SDL2_MAIN ${THIRD_PARTY_DIR}/sdl-windows/lib/x64/SDL2main.lib)
set(LIB_GLEW ${THIRD_PARTY_DIR}/glew/lib/Release/x64/glew32s.lib)
set(LIB_SDL2_IMAGE ${THIRD_PARTY_DIR}/sdl-image-windows/lib/x64/SDL2_image.lib)
Then update the include_directories section and add an additional entry for the sdl-image-windows/include location. Your include_directories should look like this:
include_directories(${THIRD_PARTY_DIR}/sdl-windows/include)
include_directories(${THIRD_PARTY_DIR}/glew/include)
include_directories(${THIRD_PARTY_DIR}/glm)
include_directories(${THIRD_PARTY_DIR}/tiny-obj-loader)
include_directories(${THIRD_PARTY_DIR}/sdl-image-windows/include)
Finally, update the target_link_libraries definition to also include the LIB_SDL2_IMAGE library:
target_link_libraries(
    a-simple-triangle
    opengl32
    ${LIB_GLEW}
    ${LIB_SDL2}
    ${LIB_SDL2_MAIN}
    ${LIB_SDL2_IMAGE}
)
Save and close the CMakeLists.txt file and open the project in Visual Studio. Run the application (might need to force a rebuild to pick up the changes).
Loading the image file for our texture
Now that we have integrated the SDL image library, we can look at how to load an image file from storage. The image file data will then become the source for generating a texture. SDL has a data type named SDL_Surface, which is generated by using one of the available image loading functions in the SDL image library.
Visit the documentation site https://www.libsdl.org/projects/SDL_image/docs/SDL_image.html to see the different IMG_Load... functions that are available. The one we are interested in looks like this:
SDL_Surface *IMG_Load_RW(SDL_RWops *src, int freesrc);
We are already using the SDL_RWops for our text file I/O to give us cross platform storage I/O which is why we will pick this function. Once we’ve loaded the image file from disk, we will need to decide what to do with it. Our goal is to create an OpenGL texture - however we know that eventually we will need to create Vulkan textures too. To that end we will load the image data into an intermediary class that is agnostic to OpenGL or Vulkan - this is similar to the idea of the ast::Mesh which subsequently is used to generate an ast::OpenGLMesh. We will call our intermediary class ast::Bitmap.
Bitmap class
Create two new files: main/src/core/bitmap.hpp and main/src/core/bitmap.cpp. Edit the header file with the following definition:
#pragma once

#include "internal-ptr.hpp"
#include "sdl-wrapper.hpp"

namespace ast
{
    struct Bitmap
    {
        Bitmap(SDL_Surface* surface);

        uint16_t getWidth() const;

        uint16_t getHeight() const;

        void* getPixelData() const;

    private:
        struct Internal;
        ast::internal_ptr<Internal> internal;
    };
} // namespace ast
Our Bitmap will take in an SDL_Surface pointer and hold it internally and claim ownership of its lifecycle. The public functions do the following:
getWidth: As you’d expect, returns the width in pixels of the bitmapgetHeight: Can you guess what this does?getPixelData: This gives a memory pointer to the data of the bitmap. This is required so OpenGL and later Vulkan can perform memory copy operations to create textures from a bitmap.
Next the implementation will look like this:
#include "bitmap.hpp"

using ast::Bitmap;

struct Bitmap::Internal
{
    SDL_Surface* surface;

    Internal(SDL_Surface* surface) : surface(surface) {}

    ~Internal()
    {
        SDL_FreeSurface(surface);
    }
};

Bitmap::Bitmap(SDL_Surface* surface) : internal(ast::make_internal_ptr<Internal>(surface)) {}

uint16_t Bitmap::getWidth() const
{
    return static_cast<uint16_t>(internal->surface->w);
}

uint16_t Bitmap::getHeight() const
{
    return static_cast<uint16_t>(internal->surface->h);
}

void* Bitmap::getPixelData() const
{
    return internal->surface->pixels;
}
If you follow the implementation you can see that our Bitmap class manages the lifecycle of the SDL_Surface pointer it is constructed with - the destructor frees it. The public functions simply delegate to the appropriate member functions of the internal surface field with some required type casting applied.
Load bitmap through assets
With our bitmap class finished we can now add a new function to the ast::assets namespace to load image files. We will introduce a new function named loadBitmap which will return to us a new instance of our ast::Bitmap class populated with the data from a stored image file.
Pop open our assets.hpp file and add the following header include:
Now add a new function signature for loading our bitmap - you can see it looks very similar to our other asset loading functions:
ast::Bitmap loadBitmap(const std::string& path);
Open assets.cpp to add the implementation. Start off by including the header file for the SDL image library:
Then add the function implementation for loadBitmap:
ast::Bitmap ast::assets::loadBitmap(const std::string& path)
{
    SDL_RWops* file{SDL_RWFromFile(path.c_str(), "rb")};
    SDL_Surface* source{IMG_Load_RW(file, 1)};
    SDL_Rect imageFrame{0, 0, source->w, source->h};

    uint32_t redMask;
    uint32_t greenMask;
    uint32_t blueMask;
    uint32_t alphaMask;

#if (SDL_BYTEORDER == SDL_BIG_ENDIAN)
    redMask = 0xff000000;
    greenMask = 0x00ff0000;
    blueMask = 0x0000ff00;
    alphaMask = 0x000000ff;
#else
    redMask = 0x000000ff;
    greenMask = 0x0000ff00;
    blueMask = 0x00ff0000;
    alphaMask = 0xff000000;
#endif

    SDL_Surface* target{SDL_CreateRGBSurface(
        0,
        imageFrame.w, imageFrame.h,
        32,
        redMask, greenMask, blueMask, alphaMask)};

    SDL_BlitSurface(source, &imageFrame, target, &imageFrame);

    SDL_FreeSurface(source);

    return ast::Bitmap(target);
}
The code in this function uses the same SDL_RWops approach as our text file loading code. The small difference is the "rb" instead of "r" to specify that we want to load binary data instead of text data.
Most of this new function is to work around an SDL quirk (though I guess it’s by design …) where it will order the bytes of a surface it generates using the endianness of the host environment. So if we had an image file where the data was in R G B format, then if the system was little endian, the SDL surface would by default end up having a byte ordering of B G R instead.
If we don’t accommodate the difference in byte ordering then on some systems our textures will appear to have their blue and red colours swapped. The image below shows the problem on the left compared to what it should look like on the right.
There is an OpenGL specific way to get around this problem by conditionally passing in GL_BGR if we are on little endian architecture into the 7th argument of the glTexImage2D function in our opengl-texture.cpp file. Unfortunately this approach is not compatible with OpenGL ES2 which we have established was our baseline. If you are targetting a higher level of OpenGL you may be able to use this approach instead of what we will be doing to handle it.
We will apply the following approach to solve this problem in a cross platform way with the downside of needing to do some extra handling of image data as it is transformed into surface data.
Firstly we will read the image file into a new surface named source. At this point the surface will be encoded with the byte order of the endianness of the host architecture. We also define a rectangle matching the dimensions of the surface:
SDL_RWops* file{SDL_RWFromFile(path.c_str(), "rb")};
SDL_Surface* source{IMG_Load_RW(file, 1)};
SDL_Rect imageFrame{0, 0, source->w, source->h};
Then we will conditionally define a set of colour masks describing how to route the red, green and blue bytes into a new surface based on whether we are on little endian or big endian architecture. We use the SDL_BYTEORDER macro to find out what the endianness is:
uint32_t redMask;
uint32_t greenMask;
uint32_t blueMask;
uint32_t alphaMask;

#if (SDL_BYTEORDER == SDL_BIG_ENDIAN)
redMask = 0xff000000;
greenMask = 0x00ff0000;
blueMask = 0x0000ff00;
alphaMask = 0x000000ff;
#else
redMask = 0x000000ff;
greenMask = 0x0000ff00;
blueMask = 0x00ff0000;
alphaMask = 0xff000000;
#endif
The colour masks for red, green and blue along with the source surface are then used to create a new surface programmatically via the SDL_CreateRGBSurface function:
SDL_Surface* target{SDL_CreateRGBSurface(
    0,
    imageFrame.w, imageFrame.h,
    32,
    redMask, greenMask, blueMask, alphaMask)};
With the new target surface constructed and configured using the colour masks, we can perform a copy operation from the source surface into the target surface via the SDL_BlitSurface function. This paints the source bytes into target surface in the format declared in the target - for example on little endian it will change BGR to RGB which is what we want:
SDL_BlitSurface(source, &imageFrame, target, &imageFrame);
Tidy up the source surface as it has no further use to us:
Finally, create and return a new ast::Bitmap object with the target surface as its data:
return ast::Bitmap(target);
Incidentally, because we are doing this explicit transformation it means that our loadBitmap function will always produce a consistently formatted surface which is kind of nice as we can assume the image format in our graphics code is always RGBA if it is given via an ast::Bitmap.
Adding a bitmap to our assets
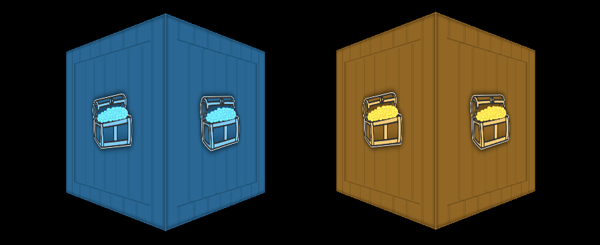
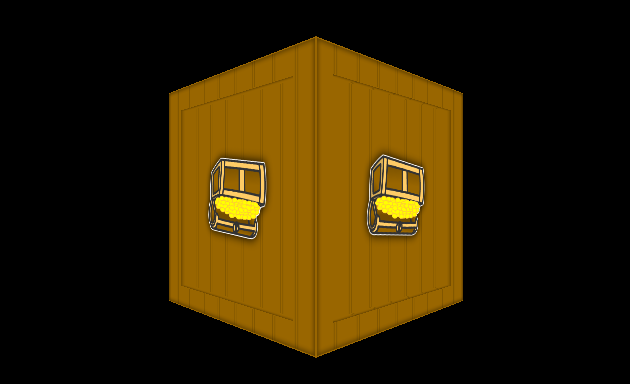
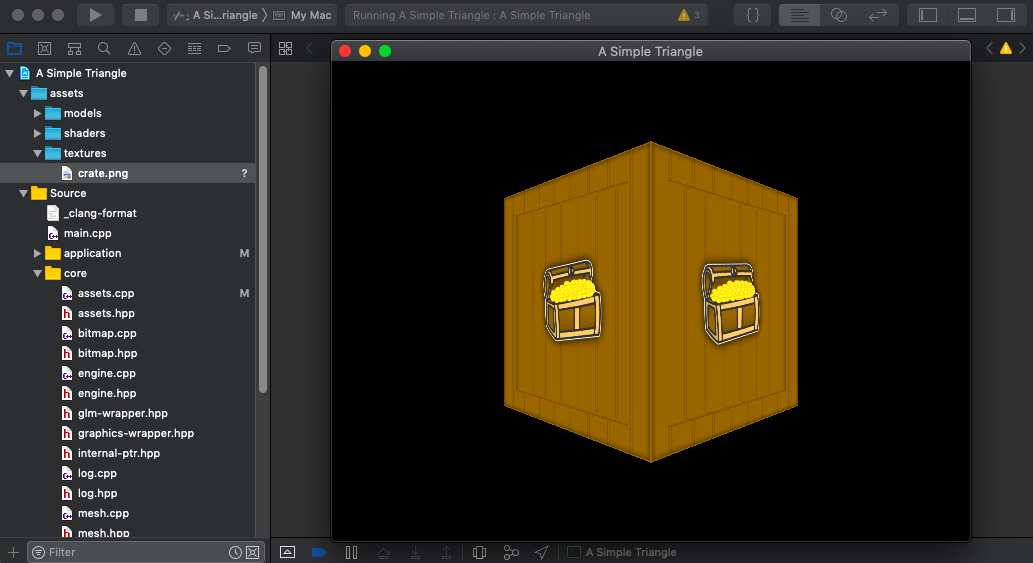
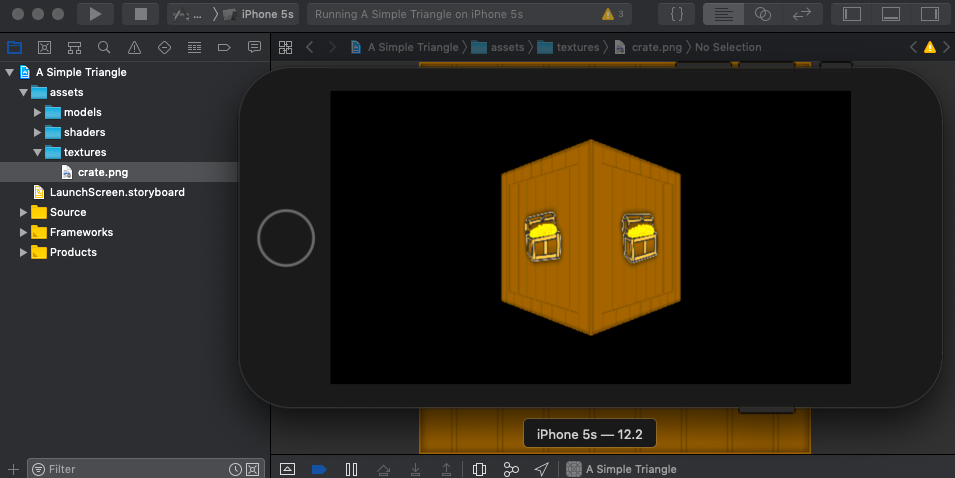
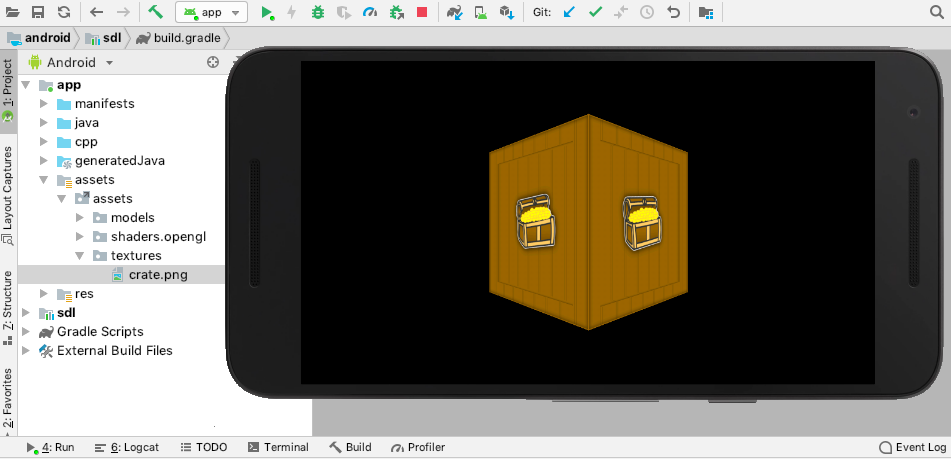
Cool, let’s add an image file to our assets folder so we can test drive our new code. I made the following image with an old treasure chest graphic I created a while ago. Create a new folder for our texture files at main/assets/textures, then right click on the crate.png image below and save it into that folder:

Note: Images used for texturing historically have required width and height dimensions in powers of 2. For example 64, 128, 256, 512 etc. The width and height can be different so long as they are a power of 2. More recent versions of OpenGL can support non power of 2 sized images however I will be sticking with images that respect this rule. Also be aware that all devices will have a maximum size that a texture can be, many mobile devices only support 2048 x 2048 (low end devices perhaps less) with more modern devices supporting 4096 x 4096 or potentially more.
Loading the crate bitmap
Jump into our opengl-application.cpp and add the following header include:
#include "../../core/bitmap.hpp"
Then add a new ast::Bitmap member field to the Internal struct, initialising it in the constructor by loading our crate bitmap file:
struct OpenGLApplication::Internal
{
    ...
    const ast::Bitmap bitmap;

    Internal() : ...
                 bitmap(ast::assets::loadBitmap("assets/textures/crate.png")) {}
Run the application now and though you won’t see anything new, we have actually loaded the image into a bitmap object successfully.
Turning the bitmap into an OpenGL texture
As I mentioned earlier, our new ast::Bitmap class is really an intermediary between the raw image data and an OpenGL or Vulkan texture representation. We need to now create the OpenGL specific representation using a bitmap as the source.
The following article does a great job at explaining textures in OpenGL and I’d highly recommend reading it: https://learnopengl.com/Getting-started/Textures.
For our engine we will introduce a new class to hold an OpenGL texture named … OpenGLTexture!
Create the new files main/src/application/opengl/opengl-texture.hpp and main/src/application/opengl/opengl-texture.cpp.
Edit the header file with the following:
#pragma once

#include "../../core/bitmap.hpp"
#include "../../core/internal-ptr.hpp"

namespace ast
{
    struct OpenGLTexture
    {
        OpenGLTexture(const ast::Bitmap& bitmap);

        void bind() const;

    private:
        struct Internal;
        ast::internal_ptr<Internal> internal;
    };
} // namespace ast
Observe that the constructor takes a bitmap as input. We also have a bind function which we need to call whenever we want the texture to be applied to the object being rendered.
Now for the implementation:
#include "opengl-texture.hpp"
#include "../../core/graphics-wrapper.hpp"

using ast::OpenGLTexture;

namespace
{
    GLuint createTexture(const ast::Bitmap& bitmap)
    {
        GLuint textureId;

        glGenTextures(1, &textureId);
        glBindTexture(GL_TEXTURE_2D, textureId);
        glTexParameteri(GL_TEXTURE_2D, GL_TEXTURE_MIN_FILTER, GL_LINEAR);
        glTexParameteri(GL_TEXTURE_2D, GL_TEXTURE_MAG_FILTER, GL_LINEAR);
        glTexImage2D(
            GL_TEXTURE_2D,
            0,
            GL_RGBA,
            bitmap.getWidth(),
            bitmap.getHeight(),
            0,
            GL_RGBA,
            GL_UNSIGNED_BYTE,
            bitmap.getPixelData());
        glGenerateMipmap(GL_TEXTURE_2D);

        return textureId;
    }
} // namespace

struct OpenGLTexture::Internal
{
    const GLuint textureId;

    Internal(const ast::Bitmap& bitmap)
        : textureId(::createTexture(bitmap)) {}

    ~Internal()
    {
        glDeleteTextures(1, &textureId);
    }
};

OpenGLTexture::OpenGLTexture(const ast::Bitmap& bitmap)
    : internal(ast::make_internal_ptr<Internal>(bitmap)) {}

void OpenGLTexture::bind() const
{
    glBindTexture(GL_TEXTURE_2D, internal->textureId);
}
There are a few things to explain here.
- The
Internal constructor is asking OpenGL to generate a GLuint handle id via the ::createTexture function. You may recall we worked with OpenGL handle ids earlier when creating vertex buffers.
- Our destructor is cleaning up the OpenGL handle id to be a good citizen and free the texture memory.
- The
bind function uses the glBindTexture API which basically sets the state of the renderer to use this texture next time something applies one.
- We are specifying
GL_RGBA as both the internal and source types to the glTexImage2D invocation. If we hadn’t performed the endianness translation in the loadBitmap function, this is the place where the byte order of the texture would be in the wrong order giving us visual anomalies.
The ::createTexture function does the same kind of steps as described in https://learnopengl.com/Getting-started/Textures so its probably easier to read that article than me regurtitating it here.
We use the bitmap passed into the function to derive the width and height of the texture and the bitmap.getPixelData() function to access the actual data bytes that will be transferred into the OpenGL texture.
Update OpenGL application
Save your files then revisit opengl-application.cpp. First, replace the bitmap header to instead import our OpenGL texture header:
#include "../../core/bitmap.hpp"
becomes:
#include "opengl-texture.hpp"
Then replace our bitmap field with an OpenGL texture:
const ast::Bitmap bitmap;
becomes:
const ast::OpenGLTexture texture;
and finally the constructor:
bitmap(ast::assets::loadBitmap("assets/textures/crate.png")) {}
becomes:
texture(ast::OpenGLTexture(ast::assets::loadBitmap("assets/textures/crate.png"))) {}
Note that we are still calling the loadBitmap function, but it is now used to directly inject the constructor of the OpenGL texture.
Once again, run your code. Nothing will visually be different however you now have an OpenGL texture loaded and primed to be used in our rendering code.
Texture coordinates
A texture isn’t terribly useful to us unless we map it to a 3D mesh using texture coordinates. Often texture coordinates are referred to as the UV coordinates of a mesh. When we loaded our 3D model in part 9 we only parsed the position of each vertex though I mentioned at the time that we would later revisit to parse texture coordinates.
So what we need to do is this:
- Parse the texture coordinates from the 3D model
.obj file into our existing mesh classes.
- Update our default shader program to apply texture mapping during rendering.
- Update our rendering code to use our texture.
Parsing the texture coordinates
Our existing ast::Vertex class currently holds the x, y, z position of a vertex. We need to add another field that can hold the texture coordinate to use. We can use a glm::vec2 field to hold the texture coordinate and name the new field texCoord.
Open the vertex.hpp file, adding the texture coordinate field glm::vec2 texCoord so it looks like so:
#pragma once

#include "glm-wrapper.hpp"

namespace ast
{
    struct Vertex
    {
        glm::vec3 position;
        glm::vec2 texCoord;
    };
} // namespace ast
For the moment we will still not add an implementation for ast::Vertex.
To populate the texCoord field, we need to revisit our .obj parsing code in the assets.cpp file. Open assets.cpp and jump to the loadOBJFile function. Find the inner loop where we construct a position for the vertex and add a new block which creates a texCoord vector like so:
ast::Mesh ast::assets::loadOBJFile(const std::string& path)
...

    // Construct a new (x, y, z) position for the current mesh index.
    glm::vec3 position{
        attributes.vertices[3 * index.vertex_index + 0],
        attributes.vertices[3 * index.vertex_index + 1],
        attributes.vertices[3 * index.vertex_index + 2]};

    // Construct a new (u, v) texture coordinate for the current mesh index.
    glm::vec2 texCoord{
        attributes.texcoords[2 * index.texcoord_index + 0],
        1.0f - attributes.texcoords[2 * index.texcoord_index + 1]};

...
What we are doing here is finding the u and v texture coordinates by striding 2 values at a time for the current index and applying offsets of 0 and 1 to locate the correct values.
There is a slightly strange computation when processing the v coordinate where we take 1.0f and subtract the input. The reason for this is that the coordinate system of OpenGL starts at bottom left, whereas the texture coordinates are from top left so images appear upside down without inverting the v. If we didn’t do this, our texture would appear like this:
Apart from that, reading in the texture coordinates is much the same thing we did for the x, y, z position except we only need two values instead of three. Now update the following line so the texCoord is also stored in our new vertex object:
vertices.push_back(ast::Vertex{position});
to this:
vertices.push_back(ast::Vertex{position, texCoord});
Looking good! There is however a problem now. We want to make sure we only store unique vertices in our list of vertices, which we had previously achieved using our std::unordered_map along with the position as a key. Up until now this approach was fine because a vertex only had a position - so as long as the position was unique, the vertex was unique. Although we still have the position field we now also have a texCoord field. By relying only on the position field to determine uniqueness it means that a vertex sharing the same position but with a different texture coordinate will be evaluated as being equal which is not true.
Adding hashing and equality to vertices
A vertex should really only be considered equal if both the position and the texture coordinate are the same. To fix this issue we will need to revisit the ast::Vertex class and add the ability for it to be able to produce a hash code and to be able to evaluate equality. This will cause our vertex class to only be unique when one or more of its properties are different in comparison to another vertex. Reopen the vertex.hpp file and update it to look like the following:
#pragma once

#include "glm-wrapper.hpp"

namespace ast
{
    struct Vertex
    {
        glm::vec3 position;
        glm::vec2 texCoord;

        bool operator==(const ast::Vertex& other) const;
    };
} // namespace ast

namespace std
{
    template <>
    struct hash<ast::Vertex>
    {
        size_t operator()(const ast::Vertex& vertex) const
        {
            return ((hash<glm::vec3>()(vertex.position) ^ (hash<glm::vec2>()(vertex.texCoord) << 1)) >> 1);
        }
    };
} // namespace std
We have added a new function definition to override the == operator which we will implement in a minute.
The strange looking template definition at the bottom gives us a custom hashing function for a vertex. It takes the hash of the position and the hash of the texCoord fields, exclusive ors (XOR) them together while shifting the bits of the texCoord left. By combining the position and the texCoord into the hashing function, we can once again evaluate the uniqueness of a vertex correctly within our std::unordered_map.
Now for the implementation of the == operator overload function. We didn’t need an implementation file for ast::Vertex before, but now we must create one to add the equality implementation. Create a new file named vertex.cpp in the same folder as vertex.hpp. Enter the following into it:
#include "vertex.hpp"

using ast::Vertex;

bool Vertex::operator==(const Vertex& other) const
{
    return position == other.position && texCoord == other.texCoord;
}
The implementation is fairly basic - the equality operator will return true if each of the fields of the other vertex are equal to the fields in the current instance.
We should now go back to our ast::assets::loadOBJFile function and adjust the inner loop to use the new hashing and equality of our vertex class when processing the mesh data.
Update the inner loop to look like this now:
ast::Mesh ast::assets::loadOBJFile(const std::string& path)
{
    ...

    std::unordered_map<ast::Vertex, uint32_t> uniqueVertices;

    // Loop through all the shapes that there found.
    for (const auto& shape : shapes)
    {
        // For each shape, loop through its indices.
        for (const auto& index : shape.mesh.indices)
        {
            // Construct a new (x, y, z) position for the current mesh index.
            glm::vec3 position{
                attributes.vertices[3 * index.vertex_index + 0],
                attributes.vertices[3 * index.vertex_index + 1],
                attributes.vertices[3 * index.vertex_index + 2]};

            // Construct a new (u, v) texture coordinate for the current mesh index.
            glm::vec2 texCoord{
                attributes.texcoords[2 * index.texcoord_index + 0],
                1.0f - attributes.texcoords[2 * index.texcoord_index + 1]};

            // Construct a vertex with the extracted data.
            ast::Vertex vertex{position, texCoord};

            // This will help deduplicate vertices - we maintain a hash map where a
            // vertex is used as a unique key with its value being which index can
            // be used to locate the vertex. The vertex is only added if it has not
            // been added before.
            if (uniqueVertices.count(vertex) == 0)
            {
                uniqueVertices[vertex] = static_cast<uint32_t>(vertices.size());
                vertices.push_back(vertex);
            }

            indices.push_back(uniqueVertices[vertex]);
        }
    }

    ...
}
Observe that our hash map now uses an ast::Vertex as a key instead of a glm::vec3. We have also created a new ast::Vertex in the loop before the uniqueness check. We have to do this because now our vertex itself is the key into the hash map. We then use the vertex field as the key for all the other hash map operations instead of the position as it was before.
We now have successfully updated our code to gather the texture coordinates of a mesh to complement its vertices. Next up we need to include the texture coordinates within the OpenGLMesh class so they can be available during the shader pipeline in our renderer.
Updating the OpenGL mesh class
Our OpenGL mesh class currently creates buffers to hold the indices and vertices for the mesh. The addition of texture coordinates means we have to rejig the vertex buffer generation to include not only three float values representing the x, y, z position, but also another two float values representing the u, v texture coordinates. Previously our buffer would have been laid out in memory as an array with a stride of 3 * the size of a float, meaning the start of each block of data for a specific vertex is 3 * 4 = 12 bytes from each other - because there are 3 float values, and a float is made up of 4 bytes:
|  Vertex 0  |  Vertex 1  |
|  12 bytes  |  12 bytes  |
| x0, y0, z0 | x1, y1, z1 |

Stride = 3 float values * the size of a float = 12 bytes
To include a texture coordinate for each vertex we need to splice two additional float values after each x, y, z series - we’ll refer to them as u and v. Our memory layout will need to look like this:
|      Vertex 0      |      Vertex 1      |
|      20 bytes      |      20 bytes      |
| x0, y0, z0, u0, v0 | x1, y1, z1, u1, v1 |

Stride = 5 float values * the size of a float = 20 bytes
Note that each vertex now requires 5 float values instead of 3 as we had before, therefore we say it has a stride of 5 * the size of a float. Within each stride the x, y, z position starts at offset 0 and the u, v coordinate starts at offset 3 * the size of a float. Therefore with the additional two float values we end up with a stride of 5 * 4 = 20 bytes - because we have 5 float values, and each float value is made up of 4 bytes.
To apply this change in code, edit the opengl-mesh.cpp file and change the createVertexBuffer function to be like so:
GLuint createVertexBuffer(const ast::Mesh& mesh)
{
    std::vector<float> bufferData;

    for (const auto& vertex : mesh.getVertices())
    {
        // Position
        bufferData.push_back(vertex.position.x);
        bufferData.push_back(vertex.position.y);
        bufferData.push_back(vertex.position.z);

        // Texture coordinate
        bufferData.push_back(vertex.texCoord.x);
        bufferData.push_back(vertex.texCoord.y);
    }

    GLuint bufferId;
    glGenBuffers(1, &bufferId);
    glBindBuffer(GL_ARRAY_BUFFER, bufferId);
    glBufferData(GL_ARRAY_BUFFER,
                 bufferData.size() * sizeof(float),
                 bufferData.data(),
                 GL_STATIC_DRAW);

    return bufferId;
}
You will see that we no longer have a temporary std::vector<glm::vec3> but instead a std::vector<float>. This is because we need to insert the position which is a glm::vec3 and the texCoord which is a glm::vec2. Since we have to declare a type for the std::vector we need to drop down to a data type common to both, which is a float. Therefore within the loop code we will explicitly add the position.x, position.y and position.z values followed by the texCoord.x and texCoord.y values manually.
The glBufferData command also needs a minor adjustment to declare that its data size is based on sizeof(float) instead of sizeof(glm::vec3) as it was before.
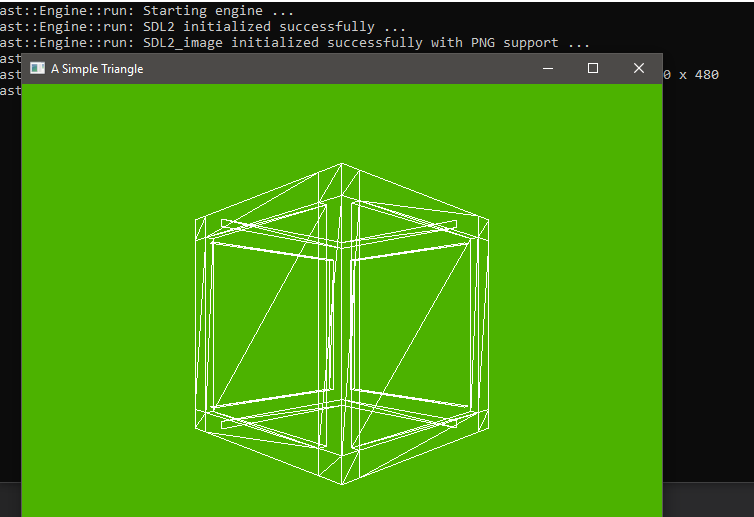
If you run your program now you will see a corrupted view of our beloved crate model like this:

There are a few reasons for this:
- We haven’t updated our default vertex shader and fragment shader to include support for a texture coordinate.
- We haven’t adjusted our rendering code to account for the change in stride, meaning that texture coordinate values in the buffer are being used as parts of the position for each vertex.
- We haven’t told our renderer to use the texture when it is drawing our mesh.
We’ll work on fixing these problems now.
Updating the default vertex and fragment shader
If you recall in part 10 when we wrote a vertex and fragment shader program we included the ability for our C++ code to pass in the vertex position in our render loop via an attribute which we named vertexPosition. We need to add another attribute to allow the texture coordinate to also be passed in.
Edit the vertex shader file assets/shaders/opengl/default.vert like so:
uniform mat4 u_mvp;

attribute vec3 a_vertexPosition;
attribute vec2 a_texCoord;

varying vec2 v_texCoord;

void main()
{
    gl_Position = u_mvp * vec4(a_vertexPosition, 1.0);
    v_texCoord = a_texCoord;
}
A few things have changed here:
- We are prefixing
attribute fields with a_ and varying fields with v_. This allows us to have two fields named texCoord - one as an attribute and one as a varying. For consistency, we will also prefix uniform fields with u_.
- We have added an additional
attribute named a_texCoord which our renderer will populate for each vertex.
- We have removed the existing
varying vec4 fragmentColor in favour of varying vec2 v_texCoord. The v_texCoord will be passed through to the fragment shader to help it know how to apply the texture.
Now edit the fragment shader file assets/shaders/opengl/default.frag like so:
uniform sampler2D u_sampler;

varying vec2 v_texCoord;

void main()
{
    gl_FragColor = texture(u_sampler, v_texCoord);
}
We are accepting the varying vec2 v_texCoord as input from the vertex shader. We are also declaring a new uniform:
uniform sampler2D u_sampler;
This is an OpenGL uniform used to take in the currently bound texture in the rendering pipeline and make it available within our fragment shader code. The main function uses this sampler in combination with the v_texCoord to find out where in the texture to paint from:
gl_FragColor = texture(u_sampler, v_texCoord);
Save and close the shader files - we are done with them.
Update shader pipeline
To use our new texture coordinate shader attribute we need to update our pipeline class which is responsible for rendering a mesh. Our pipeline will now need to know which texture to apply when rendering so the first thing is to tweak the existing render function. Edit opengl-pipeline.hpp, add the #include "opengl-texture.hpp" header, then adjust the render function signature from this:
void render(const ast::OpenGLMesh& mesh, const glm::mat4& mvp) const;
to this:
void render(const ast::OpenGLMesh& mesh, const ast::OpenGLTexture& texture, const glm::mat4& mvp) const;
Save the header file then hop over to opengl-pipeline.cpp. Update the internal struct to look like the following:
struct OpenGLPipeline::Internal
{
    const GLuint shaderProgramId;
    const GLuint uniformLocationMVP;
    const GLuint attributeLocationVertexPosition;
    const GLuint attributeLocationTexCoord;
    const GLsizei stride;
    const GLsizei offsetPosition;
    const GLsizei offsetTexCoord;

    Internal(const std::string& shaderName)
        : shaderProgramId(::createShaderProgram(shaderName)),
          uniformLocationMVP(glGetUniformLocation(shaderProgramId, "u_mvp")),
          attributeLocationVertexPosition(glGetAttribLocation(shaderProgramId, "a_vertexPosition")),
          attributeLocationTexCoord(glGetAttribLocation(shaderProgramId, "a_texCoord")),
          stride(5 * sizeof(float)),
          offsetPosition(0),
          offsetTexCoord(3 * sizeof(float)) {}

    void render(const ast::OpenGLMesh& mesh, const ast::OpenGLTexture& texture, const glm::mat4& mvp) const
    {
        // Instruct OpenGL to starting using our shader program.
        glUseProgram(shaderProgramId);

        // Populate the 'u_mvp' uniform in the shader program.
        glUniformMatrix4fv(uniformLocationMVP, 1, GL_FALSE, &mvp[0][0]);

        // Activate the 'a_vertexPosition' attribute and specify how it should be configured.
        glEnableVertexAttribArray(attributeLocationVertexPosition);
        glVertexAttribPointer(attributeLocationVertexPosition, 3, GL_FLOAT, GL_FALSE, stride, (GLvoid*)(offsetPosition));

        // Activate the 'a_texCoord' attribute and specify how it should be configured.
        glEnableVertexAttribArray(attributeLocationTexCoord);
        glVertexAttribPointer(attributeLocationTexCoord, 2, GL_FLOAT, GL_FALSE, stride, (GLvoid*)(offsetTexCoord));

        // Apply the texture we want to paint the mesh with.
        texture.bind();

        // Bind the vertex and index buffers.
        glBindBuffer(GL_ARRAY_BUFFER, mesh.getVertexBufferId());
        glBindBuffer(GL_ELEMENT_ARRAY_BUFFER, mesh.getIndexBufferId());

        // Execute the draw command - with how many indices to iterate.
        glDrawElements(GL_TRIANGLES, mesh.getNumIndices(), GL_UNSIGNED_INT, (GLvoid*)0);

        // Tidy up.
        glDisableVertexAttribArray(attributeLocationVertexPosition);
        glDisableVertexAttribArray(attributeLocationTexCoord);
    }

    ~Internal()
    {
        glDeleteProgram(shaderProgramId);
    }
};
Firstly note that we have added a new field to store the location of the texCoord attribute in our shader:
const GLuint attributeLocationTexCoord;
Then we have updated the names of the existing attributes with the prefixing I mentioned earlier and snagged the attribute location for the texCoord:
Internal(const std::string& shaderName)
        ...
        uniformLocationMVP(glGetUniformLocation(shaderProgramId, "u_mvp")),
        attributeLocationVertexPosition(glGetAttribLocation(shaderProgramId, "a_vertexPosition")),
        attributeLocationTexCoord(glGetAttribLocation(shaderProgramId, "a_texCoord")),
        ...
We have also added the stride, offsetPosition and offsetTexCoord fields to compute and store our stride and the offsets of where to find the position and texCoord data within a given stride. The stride is assigned the value of 5 * the size of a float. The offsetPosition is assigned the value of 0 because it is always found at the start of a stride. The offsetTexCoord is assigned the value of 3 * the size of a float because the first value of the texture coordinate is located at the fourth float in a stride - and since arrays start at index 0, the fourth element is at index 3.
const GLsizei stride;
const GLsizei offsetPosition;
const GLsizei offsetTexCoord;

Internal(const std::string& shaderName)
        ...
        stride(5 * sizeof(float)),
        offsetPosition(0),
        offsetTexCoord(3 * sizeof(float)) {}
We then update the render function, adding in the texture argument and removing the code to render in wireframe mode. You may want to remember how we applied the wireframe rendering for future reference but since we want to see our textured crate we can remove it.
The OpenGL commands to enable and configure the vertex shader attributes has changed - firstly the existing code which populated the vertex position. The only changes here are the use of our stride field for the fifth argument to glVertexAttribPointer and the use of the offsetPosition in the final argument.
// Activate the 'a_vertexPosition' attribute and specify how it should be configured.
glEnableVertexAttribArray(attributeLocationVertexPosition);
glVertexAttribPointer(attributeLocationVertexPosition, 3, GL_FLOAT, GL_FALSE, stride, (GLvoid*)(offsetPosition));
The texture coordinate attribute is then activated with the following new block of code which specifies the attributeLocationTexCoord as the destination attribute, along with 2 because there are two float values to expect - the u and v texture coordinates. The offsetTexCoord is given as the last argument so OpenGL can find the texture coordinate data within a given stride.
// Activate the 'a_texCoord' attribute and specify how it should be configured.
glEnableVertexAttribArray(attributeLocationTexCoord);
glVertexAttribPointer(attributeLocationTexCoord, 2, GL_FLOAT, GL_FALSE, stride, (GLvoid*)(offsetTexCoord));
The next new line of code asks the provided texture argument to bind itself - meaning that it becomes the active texture within the OpenGL render state so any subsequent drawing commands will apply it.
// Apply the texture we want to paint the mesh with.
texture.bind();
Finally in the tidy up code we add the OpenGL command to disable the texture coordinate vertex attribute:
glDisableVertexAttribArray(attributeLocationTexCoord);
These changes will now allow our pipeline to correctly map the extra texture coordinate data into our shader. Close the pipeline class now.
Update main render loop
All that’s left is to update our main render loop in the OpenGL application to include the texture. Edit the opengl-application.cpp file and change the following line:
defaultPipeline.render(mesh, mvp);
becomes:
defaultPipeline.render(mesh, texture, mvp);
While we are here, let’s say goodbye to our lime green background once and for all:
glClearColor(0.3f, 0.7f, 0.0f, 1.0f);
becomes:
glClearColor(0.0f, 0.0f, 0.0f, 1.0f);
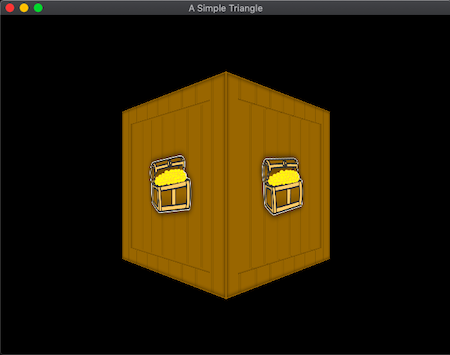
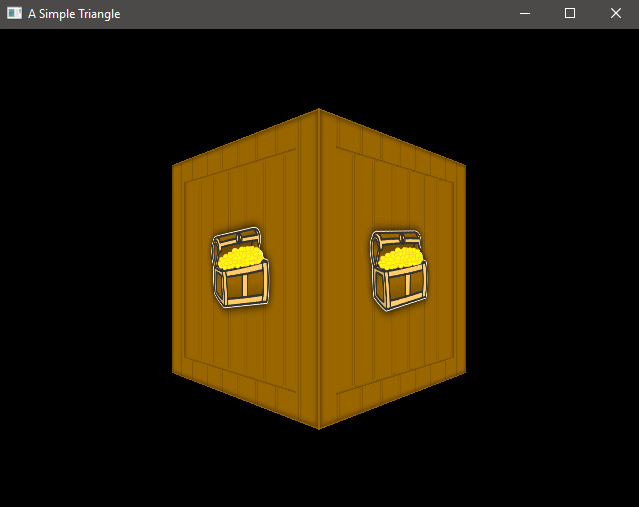
Run your application again, if all is well you will finally see our crate model with the crate texture wrapped around it:
Run the application on each of our target platforms to observe the same output - proving again our cross platform prowess!
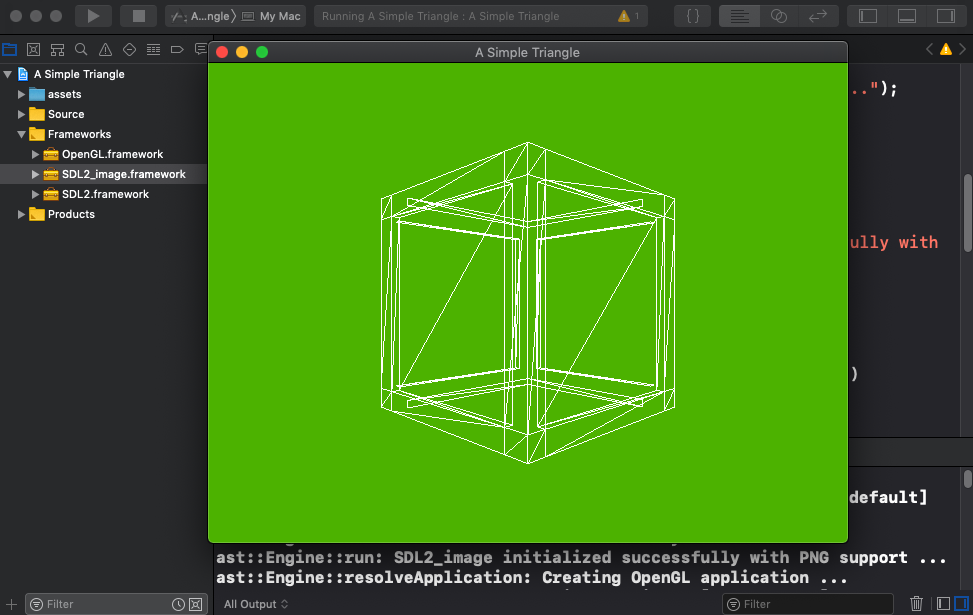
Mac Console
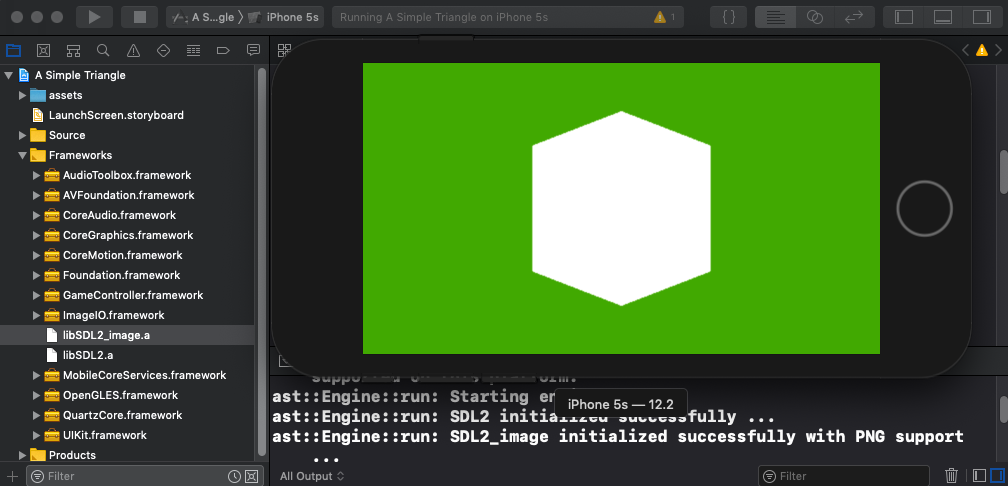
MacOS
iOS
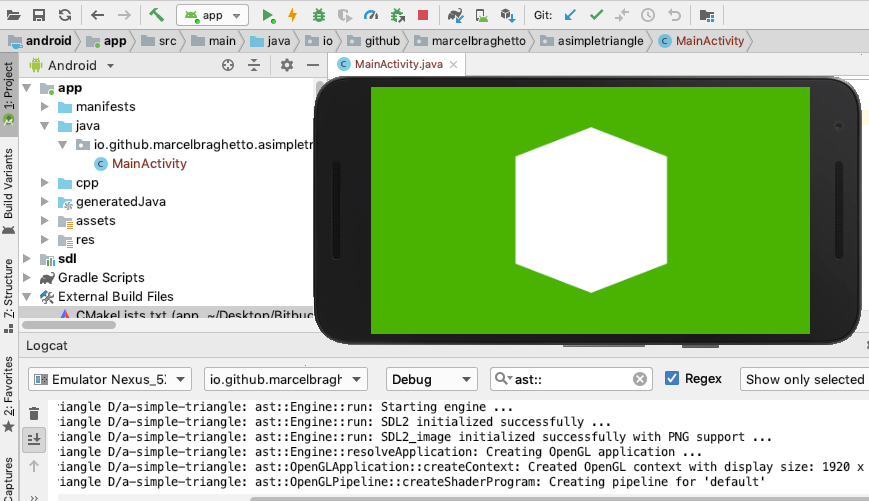
Android
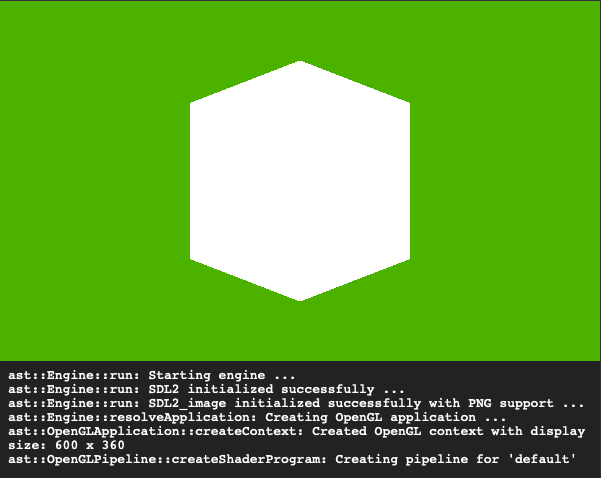
Emscripten
Windows
Summary
It took quite a bit of effort to get texturing up and running but I wanted to try and explain as much as I was able (I am still learning this myself) and not rush to the solution with lots of hand waving instead of explanation.
In the next article we will refactor some of this code and introduce an update loop to our application.
The code for this article can be found here.
Continue to Part 12: Scenes and update loop.
End of part 11
