crust / Part 4 - Launch debugger
Marcel Braghetto 6 February 2022

In this article we will add enough code to our crust-build application to launch the crust-main application and debug it on Windows and MacOS Console.
Application launch
By the end of part 3 we had wired up the command line interface of crust-build but we still couldn’t successfully launch our main application for debugging because nothing had actually compiled it or collected the required build artifacts needed to launch it.
If we solve this problem first, we will be able to experience the benefits that our builder application offers us during the development of our main application code.
To reach this point we will add build code for the Windows and MacOS Console target platforms which will:
- Compile the main application project
- Collect the compiled main application binary and put it in the location expected by our VS code launch task
- Collect any third party dependencies and put them in the appropriate location
Scripts
The first thing we want to do is to compile our main application. This requires us to execute cargo and rustc scripts on the command line. Of course, we won’t be running these scripts ourselves - our crust-build code needs to do it for us - but how can Rust code run command line scripts?
At a raw level, the Rust language offers a way to invoke processes programmatically, through the Command mechanism. This is pretty cool and gives us the tools we need to run scripts, but even in the example code on the documentation page you can see that scripts need to be executed differently on Windows compared to other systems so we are going to need some conditional code if we want our build implementation to be cross platform compatible.
To help solve this problem, we are going to author a new utility in crust-build/core which takes a raw script block as input, then wraps it with an operating system appropriate shell command and executes it. For Windows we will actually use the standard cmd program (instead of PowerShell) and on other systems we will use bash as the scripting host. This gives us a nice deterministic approach instead of letting whatever default shell program is available run our scripts.
Script model
The first thing we’ll do is create a data model which defines a block of script code to run and a couple of other properties about how it should be run. Create a new file core/script.rs and add it to core/mod.rs:
use std::{collections::HashMap, option::Option, path::PathBuf};

pub struct Script {
    pub content: String,
    pub working_dir: Option<PathBuf>,
    pub environment: HashMap<String, String>,

    _private: (),
}

impl Script {
    pub fn new(content: &str) -> Self {
        Self {
            content: content.trim().to_owned(),
            environment: HashMap::new(),
            working_dir: Option::None,
            _private: (),
        }
    }

    pub fn environment(mut self, environment: &HashMap<String, String>) -> Self {
        self.environment = environment.clone();
        self
    }

    pub fn working_dir(mut self, working_dir: &PathBuf) -> Self {
        self.working_dir = Some(working_dir.clone());
        self
    }
}
The Script struct models the following properties:
content: This is the actual block of shell script the consumer wants to executeenvironment: A map of key value pairs that should be injected as environment variables when running the scriptworking_dir: Used to specify a specific directory to execute the script within_private: This is small trick to prevent the possibility of an instance of a Script struct being created without using the new method
The environment and working_dir methods apply the builder pattern, where you can start with a default Script object, and apply additional properties to it afterward.
Scripts service requirements
Next we will author a scripts utility which can be invoked with an instance of a Script object to execute. The flow of operation for the scripts utility is:
- Create a temporary directory as a place to write the given script content into an actual shell script file
- Wrap the script content with the required preamble based on whether we are on Windows or not
- Write the script content into a shell script file within the temporary directory - marking it as executable if required
- Create a new Command object which points at the shell script file as the command to execute
- Configure the command object with any environment variables or working directory properties from the input
Script
- Execute the command object, returning a success or failure
There are a few things here which can’t yet do which we’ll need to prepare for:
- Create a temporary directory and run something in it
- Write text files to disk
- Mark files as executable
Temporary directories
It is not uncommon to run system utilities and scripts within a temporary directory - it can help to isolate the file system related to running the shell script and avoid conflicts with other scripts that might be run in the same place.
We will use the third party tempfile crate to help us with creating and cleaning up temporary directories in the file system. Add the following dependency to the [dependencies] section of crust-build/Cargo.toml:
We’ll also expose a helpful wrapper method which takes in a lambda and runs it within a temporary directory. Since we’ll be creating a bunch of other I/O utilities, we will invent a new io core utility service. Create core/io.rs and register it in core/mod.rs:
use crate::core::failable_unit::FailableUnit;
use std::path::Path;

pub fn in_temp_dir(work: &mut dyn FnMut(&Path) -> FailableUnit) -> FailableUnit {
    let temp = tempfile::Builder::new().prefix("crust").tempdir()?;
    work(&temp.path())
}
We now have the in_temp_dir method which accepts a lambda named work whose signature allows us to pass it the actual file system path of the temporary directory where file operations can be done. As soon as the in_temp_dir method finishes, the temporary directory will be deleted. We would use it like this:
use crate::core::io;

io::in_temp_dir(&mut |temp_dir| {
    // Do some work - the 'temp_dir' path is the location of the temporary directory
    // Any files written into 'temp_dir' will be automatically cleaned up
}
Writing files
The next thing we need is a way to write a string to a text file - in our scripts service this will let us write the shell script content into a file within the temporary directory. We are actually going to write another method which understand how to write bytes to a file as well, as we’ll need it later on but it can also be used to write strings. Add the following methods to io.rs (note also the additions to the use statements):
use crate::core::failable_unit::FailableUnit;
use std::{
    fs::File,
    io::Write,
    path::{Path, PathBuf},
};

...

pub fn write_bytes(content: &[u8], path: &PathBuf) -> FailableUnit {
    let parent = path.parent().ok_or("Parent directory not found")?;
    std::fs::create_dir_all(parent)?;

    let mut file = File::create(path)?;
    file.write_all(content)?;

    Ok(())
}

pub fn write_string(content: &str, path: &PathBuf) -> FailableUnit {
    write_bytes(content.as_bytes(), path)?;
    Ok(())
}
You can see that the write_string method calls the write_bytes method with a byte array view of the string.
Note: The u8 data type represents an unsigned 8 bit char type.
File attributes
This is bit of an icky one because it is not required on Windows at all however on nix based systems we need to set the executable attribute of a shell script file if we want to run it, which our scripts service will need to do. So, for Windows there is a no-op implementation otherwise we will set the specified permissions on the given file. Add the following to io.rs:
#[cfg(target_os = "windows")]
pub fn apply_permissions(_: &PathBuf, _: u32) -> FailableUnit {
    // On Windows this is a no-op but we will leave it stubbed so we can cross compile easily.
    Ok(())
}

#[cfg(not(target_os = "windows"))]
pub fn apply_permissions(path: &PathBuf, permissions: u32) -> FailableUnit {
    use std::os::unix::fs::PermissionsExt;
    Ok(std::fs::set_permissions(&path, std::fs::Permissions::from_mode(permissions))?)
}
Note: When a method takes an argument but doesn’t use it, you can name the argument _ to avoid Rust compiler warnings about unused code.
Scripts service
Ok, we have a enough utilities available now in our io module to implement our scripts service. Create core/scripts.rs and register it in core/mod.rs:
use crate::core::{failable::Failable, failable_unit::FailableUnit, io, script::Script};
use std::{
    path::Path,
    process::{Command, Stdio},
};

#[cfg(not(target_os = "windows"))]
fn create_command(script_dir: &Path, script_block: &str) -> Failable<Command> {
    let mut script_content = "#!/usr/bin/env bash\n\n".to_owned();
    script_content += "set -o errexit\n";
    script_content += "set -o pipefail\n";
    script_content += "set -o nounset\n\n";
    script_content += script_block;

    let script_file_path = script_dir.join("script.sh");
    io::write_string(&script_content, &script_file_path)?;
    io::apply_permissions(&script_file_path, 0o755)?;

    Ok(Command::new(&script_file_path))
}

#[cfg(target_os = "windows")]
fn create_command(script_dir: &Path, script_block: &str) -> Failable<Command> {
    let script_file_path = script_dir.join("script.bat");
    io::write_string(script_block, &script_file_path)?;

    Ok(Command::new(&script_file_path))
}

pub fn run(script: &Script) -> FailableUnit {
    io::in_temp_dir(&mut |temp_dir| {
        let mut command = create_command(temp_dir, &script.content)?;

        command.current_dir(match &script.working_dir {
            Some(working_dir) => working_dir.clone(),
            _ => temp_dir.to_path_buf(),
        });

        command.envs(&script.environment);
        command.stdout(Stdio::inherit());
        command.stderr(Stdio::inherit());

        let output = command.output()?;
        let status_code = output.status.code().ok_or("Failed to get shell script status code.")?;

        if output.status.success() {
            Ok(())
        } else {
            Err(format!("Shell script returned failed status code: {:?}", &status_code).into())
        }
    })
}
The run method does the following:
- Creates a new temporary directory to do all the work within
- Calls the
create_command method which has a different implementation if you are on Windows
- Applies the working directory to the command if the script specified one
- Applies the environment variables to the command from the script
- Specifies how the
stdout and stderr streams should behave - Stdio::inherit will cause streams to be printed to the terminal console
- Execute the command and have a look at the status code of the output
- Return a success or error value to the original caller of the
run method
This allows us to write code like this:
fn do_something() -> FailableUnit {
    scripts::run(&Script::new("cargo run"))
}
So long as the script content can actually run within a Windows Batch file or Bash script, it will be executed.
The create_command method simply constructs a batch or shell script file, adding in any platform specific preamble (such as the hashbang and options for Bash scripts), saving the script to disk and returning a Command pointing at the script file.
Note: For crust-build we don’t need to capture the output of any shell scripts but if you need to do this you would return a Failable<String> and you’d also need to change the command.stdout so it pipes through to your code instead of being printed on the screen.
Compile main application
The new scripts service gives us enough to now be able to compile our main application source code from within our target platform build code. Edit windows.rs and macos_console.rs and add a new method to compile the main source code and call it from the build method:
use crate::{
    core::{context::Context, failable_unit::FailableUnit, logs, script::Script, scripts},
    log_tag,
};

pub fn build(context: &Context) -> FailableUnit {
    context.print_summary();
    compile(context)?;
    Ok(())
}

fn compile(context: &Context) -> FailableUnit {
    logs::out(log_tag!(), "Compiling application ...");

    scripts::run(&Script::new(&format!(
        r#"cargo rustc {} --manifest-path {:?} --bin crust --target-dir {:?}"#,
        context.variant.rust_compiler_flag(),
        context.source_dir.join("Cargo.toml"),
        context.rust_build_dir,
    )))?;

    logs::out(log_tag!(), "Compile completed successfully!");

    Ok(())
}
You can see that our new compile method takes the build context as an argument, then uses our scripts service to execute the following command:
cargo rustc <1> --manifest-path <2> --bin crust --target-dir <3>
With the interpolated arguments:
<1>: If a release build, the --release argument will be inserted, otherwise nothing<2>: The full path to the crust-main/Cargo.toml file so regardless of where the script is run from it can find which Rust project we want to compile<3>: The path where we want to output the result of doing the compilation. On Windows this would be windows/.rust-build/rust, on MacOS macos-console/.rust-build/rust
The --bin crust tells the compiler to build the binary target named crust in the manifest.
If you run the application now (yes you will still get the error about the missing launch binary) you will see that our crust-main application code is being compiled (in the sample below I was running on my Windows machine):
> Executing task in folder crust-build: cargo run -- --target windows --variant debug <

    Finished dev [unoptimized + debuginfo] target(s) in 0.03s
     Running `target\debug\crust-build.exe --target windows --variant debug`
[ print_summary ] ---------------------------------------------
[ print_summary ] Assets dir:          "<snip>\\crust-main\\assets"
[ print_summary ] Working dir:         "<snip>\\windows\\.rust-build"
[ print_summary ] Rust build dir:      "<snip>\\part-04\\windows\\.rust-build\\rust"
[ print_summary ] Variant:             Debug
[ print_summary ] Target home dir:     "<snip>\\windows"
[ print_summary ] Main source dir:     "<snip>\\crust-main"
[ print_summary ] ---------------------------------------------
[ compile ] Compiling application ...

C:\<snip>\AppData\Local\Temp\crustD9tVcf>cargo rustc  --manifest-path "<snip>\\crust-main\\Cargo.toml" --bin crust --target-dir "<snip>\\windows\\.rust-build\\rust"
    Finished dev [unoptimized + debuginfo] target(s) in 0.08s
[ compile ] Compile completed successfully!
Notice that the command was executed inside a temporary directory: AppData\Local\Temp\crustD9tVcf.
Notice also that in Rust you can create interpolated strings using the format! macro, populated using the rules described here. We are also using the special r# # string modifiers to include double quotes without escaping them. You can see how this works in the console output - observe that the file paths have " quotes around them:
cargo rustc --manifest-path "<snip>\\crust-main\\Cargo.toml" --bin crust --target-dir "<snip>\\windows\\.rust-build\\rust"
If you were to look inside the windows or macos-console directories (they would have been automatically created!) you should see the debug binary produced from the compilation:
+ root

    + macos-console
        + .rust-build
            + rust
                + debug
                    - crust

    + windows
        + .rust-build
            + rust
                + debug
                    - crust.exe
You could actually navigate to those directories in a terminal and run the programs and they will print the expected Hello world!:
PS C:\<snip>\windows\.rust-build\rust\debug> .\crust.exe
Hello, world!
Collecting the output
Let’s now fix the problem with our broken launch task by collecting the compiled executable binary and putting it in the location we told the launch task to look for it in.
On Windows we expect the binary to end up at windows/out/debug/crust.exe and on MacOS macos-console/out/debug/crust.
Being able to collect files to keep as outputs is something we will write as a new core service because later on we’ll need to collect other files too. But before we create the outputs service we’ll need to enhance our io module with the following abilities:
- Delete file/s
- Create directories
- Copy files
Although the Rust standard library offers the bare bones tools to do file operations, it doesn’t always do things in a cross platform compatible way and sometimes you need to apply some additional logic to file system operations. For these reasons - and for ease of use - we will create wrapper utility methods in our io module. Edit core/io.rs:
...

pub fn copy(source: &PathBuf, destination: &PathBuf) -> FailableUnit {
    if source.is_dir() {
        if cfg!(target_os = "windows") {
            scripts::run(&Script::new(&format!(
                "xcopy /E /H /I {:?} {:?}",
                &source,
                &destination.join(source.file_name().ok_or("Missing file name")?)
            )))?;
        } else {
            scripts::run(&Script::new(&format!("cp -R {:?} {:?}", &source, &destination)))?;
        }
    } else {
        std::fs::copy(source, destination)?;
    }

    Ok(())
}

pub fn create_dir(path: &PathBuf) -> FailableUnit {
    std::fs::create_dir_all(path)?;

    Ok(())
}

pub fn delete(victim: &PathBuf) -> FailableUnit {
    logs::out(log_tag!(), &format!("Deleting {:?}", victim));

    // We need to also check if we are trying to delete a symlink by querying for link meta data.
    // The regular `.exists` method will return false even if the victim is a broken symlink.
    let is_symlink = std::fs::read_link(&victim).is_ok();

    if !is_symlink && !victim.exists() {
        return Ok(());
    }

    if victim.is_dir() || is_symlink {
        std::fs::remove_dir_all(victim)?;
    } else {
        std::fs::remove_file(victim)?;
    }

    Ok(())
}
Challenge: You will have some unresolved symbols after copying these methods into your io.rs file - see if you can work out how to update the use clauses at the top of the file to resolve them :)
In the copy method we look at the host operating system and use our scripts service to actually perform the copy itself if the source is a directory. The built in Rust APIs for copying didn’t seem to accommodate cross platform recursive copying (at least when I wrote this). So we’ll just issue a shell script command applicable to Windows or Nix to do the recursive copy operation ourselves.
Important: The behaviour of xcopy on Windows means that a source directory will not be automatically inferred as needing to be created as a child of the destination directory, instead the contents of the source directory will be copied over. For Windows we need to explicitly append the name of the source directory to the destination to preserve the expected directory structure.
The delete method also contains a peculiarity - when trying to figure out if the caller is deleting a file or a directory, the is_dir method can’t cope very well with symlinks. We need to manually check if the victim is a symlink ourselves and use that information to categorise it with the directory deletion path. If we don’t do this then broken symlinks don’t get deleted which means the next time something wants to create the same symlink it won’t work.
Outputs service
Okie dokie, we can now create our outputs service. Create core/outputs.rs and register it in core/mod.rs:
use crate::{
    core::{context::Context, failable_unit::FailableUnit, io, logs},
    log_tag,
};
use std::{path::PathBuf, vec::Vec};

pub fn output_dir(context: &Context) -> PathBuf {
    context.target_home_dir.join("out").join(context.variant.id())
}

pub fn clean(context: &Context) -> FailableUnit {
    io::delete(&output_dir(context))
}

pub fn collect(context: &Context, sources: Vec<PathBuf>) -> FailableUnit {
    io::create_dir(&output_dir(context))?;

    for source in sources {
        logs::out(log_tag!(), &format!("Collecting: {:?}", source));

        if source.is_dir() {
            io::copy(&source, &output_dir(context))?;
        } else {
            io::copy(&source, &output_dir(context).join(source.file_name().ok_or("Missing file name")?))?;
        }
    }

    Ok(())
}
Although not all target platforms will need us to collect outputs on their behalf, for the ones that do we will make the <target platform id>/out/<variant> the root directory where any files will be collected. This is what the output_dir method returns.
We also offer a utility method clean so we can always be sure there are no left over collected files between builds.
The collect method itself simply takes a vector of paths to files we want to copy into the output directory.
Collecting the compiled binaries
Cool, let’s hop back into our windows.rs and macos_console.rs files and add a new step to collect the compiled binary file into the output directory:
use crate::{
    core::{context::Context, failable_unit::FailableUnit, logs, outputs, script::Script, scripts},
    log_tag,
};

pub fn build(context: &Context) -> FailableUnit {
    context.print_summary();
    compile(context)?;
    create_output(context)?;
    Ok(())
}

fn compile(context: &Context) -> FailableUnit {
    logs::out(log_tag!(), "Compiling application ...");

    scripts::run(&Script::new(&format!(
        r#"cargo rustc {} --manifest-path {:?} --bin crust --target-dir {:?}"#,
        context.variant.rust_compiler_flag(),
        context.source_dir.join("Cargo.toml"),
        context.rust_build_dir,
    )))?;

    logs::out(log_tag!(), "Compile completed successfully!");

    Ok(())
}

fn create_output(context: &Context) -> FailableUnit {
    logs::out(log_tag!(), "Creating product ...");
    outputs::clean(context)?;
    outputs::collect(context, vec![context.rust_build_dir.join(context.variant.id()).join("crust.exe")])
}
Note that we now have a create_output method which is called as part of the build.
For macos_console.rs, change the line which collects the binary file to (note the absence of the .exe file extension):
outputs::collect(context, vec![context.rust_build_dir.join(context.variant.id()).join("crust")])
Run our project again and you should briefly see our main application run and finish, and see the following kind of output in the build terminal:
[ compile ] Compiling application ...

<snip>cargo rustc  --manifest-path "<snip>\\crust-main\\Cargo.toml" --bin crust --target-dir "<snip>\\windows\\.rust-build\\rust"
    Finished dev [unoptimized + debuginfo] target(s) in 0.52s
[ compile ] Compile completed successfully!
[ create_output ] Creating product ...
[ delete ] Deleting "<snip>\\windows\\out\\debug"
[ collect ] Collecting: "<snip>\\windows\\.rust-build\\rust\\debug\\crust.exe"
If you check the target platform directories now you will see that our compiled binary has been collected into the expected location:
+ root

    + macos-console
        + out
            + debug
                - crust

    + windows
        + out
            + debug
                - crust.exe
Debugging
Ok, even though it was hard to see, our crust-main application did actually launch but it doesn’t do much before finishing so it exited almost immediately again. But we can now test drive the debugger to demonstrate how we can launch our application and inspect the code while it is running.
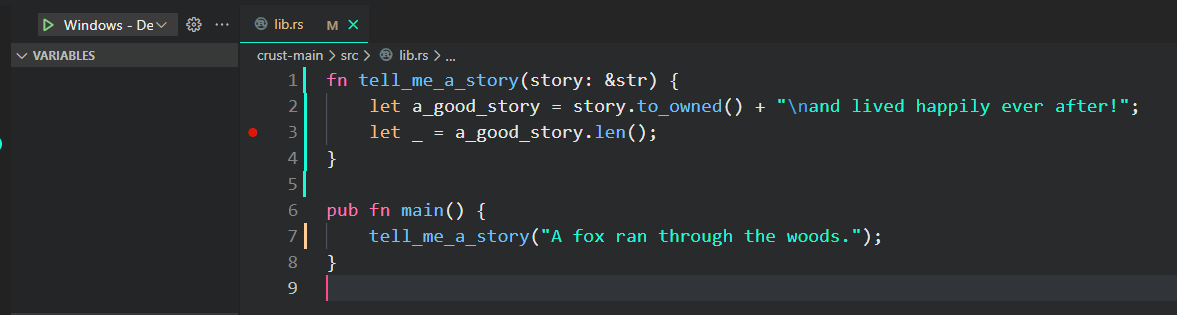
Edit crust-main/src/lib.rs with:
fn tell_me_a_story(story: &str) {
    let a_good_story = story.to_owned() + "\nand lived happily ever after!";
    let _ = a_good_story.len();
}

pub fn main() {
    tell_me_a_story("A fox ran through the woods.");
}
Then in the Visual Studio Code gutter click next to the line shown below to add a debugger breakpoint:
Run the application and this time the debugger will halt at the breakpoint and you see on the left hand panel the content of all the variables in scope at the time:
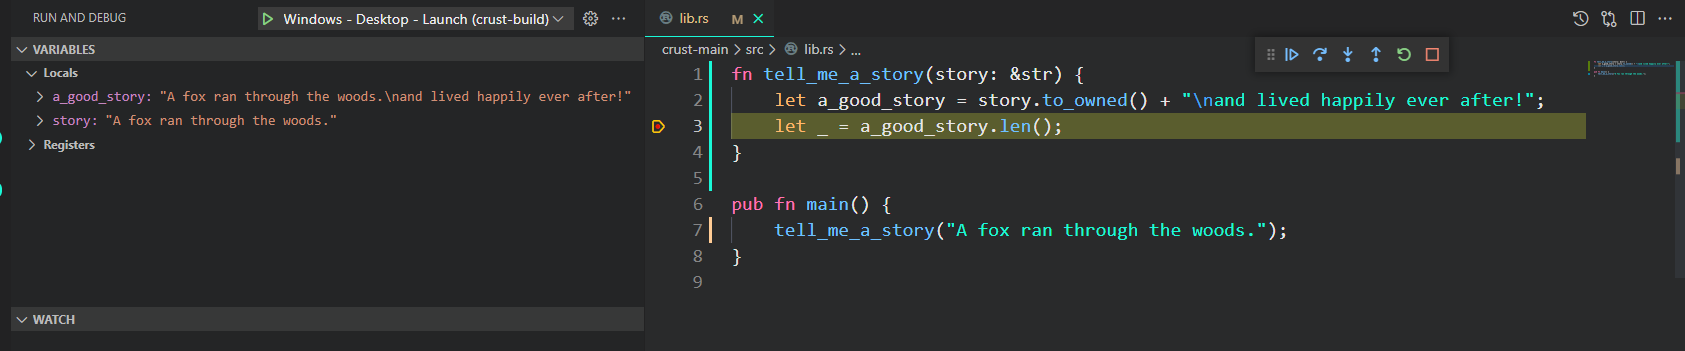
You can use the debug control panel to continue forward, step over code or stop. Basically we now have one of the key tools available to us to do proper Rust software development - a debugger if you weren’t sure :)
Summary
We covered a fair bit of ground in this article and I’m sure if you haven’t done Rust before there might be bits of this code that still seem vague. Stick with it though as it only ramps up from here but it’s worth it!
Although it is very exciting to know that the fox in the woods lived happily ever after, in the next article we are going to start getting serious with SDL2 and get to a point where we have a Windows and MacOS application that can initialise SDL in preparation for creating our 3D scene.
The code for this article can be found here.
Continue to Part 5: Init SDL.
End of part 4
